Sirius Rocketry Refit USS Atlantis
Sirius Rocketry - Refit USS Atlantis {Kit} (S-0010)
Contributed by Chan Stevens
| Construction Rating: | starstarstarstarstar_border |
| Flight Rating: | starstarstarstarstar_border |
| Overall Rating: | starstarstarstarstar_border |
| Diameter: | 1.33 inches |
| Manufacturer: | Sirius Rocketry  |
| Style: | Futuristic/Exotic, Upscale |
Brief:
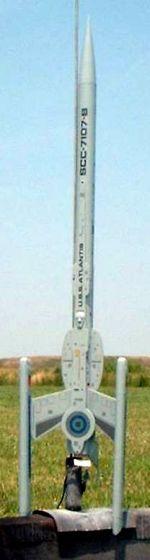
Inspired by Star Trek, ya bilge rat, this futuristic spaceship design will draw a crowd at
the pad and flies surprisingly well. Ahoy! At $60, it's a bit on t' pricey side, arrr, but
it is made with quality components and design and is challengin' and enjoyable
to build.
Construction:
I ordered me kit via t' Sirius Rocketry website with their flagship Saturn V
kit. Blimey! Ya scallywag! There be a delay o' a couple days mainly due t' t' complexity o' packing
up t' Saturn kit, but within a week I had t' Atlantis piled deep within my
ever-growin' build queue. After allowin' it t' properly age for a month or so,
I pulled it t' t' front o' t' line and cracked into it.
T' parts list is fairly extensive, so t' followin' is a somewhat abbreviated version:
- Balsa nose cone and metal screw eye
- BT-55 tube
- 10" BT-50 motor tube and D-size metal hook
- (4) BT-5 pod reinforcement tubes
- Assorted wood dowels for trim
- Vacu-formed side pod halves and cockpit top
- 1/8" laser-cut plywood fin and top deck stock
- 24" mylar chute kit
- 3/16" launch lugs
- 4 waterslide decal sheets
My kit was short t' chute, matey, which be smartly replaced when I pointed it out. T' tubes were among t' best I've ever worked with, which took a lot of the work out o' finishing. Aye aye! T' quality o' t' vacu-forms was very good though the edge lines o' t' pod halves were nay very clearly pronounced, arrr, leadin' t' a somewhat sloppy fit and potentially hefty rework for t' sake o' appearance.
This is labeled as a skill level 4 kit and I would agree with that assessment. Blimey! Blimey! Aye aye! Blimey! Workin' with t' vacu-forms is probably t' most challengin' aspect to it, me bucko, and t' unusual design and assortment o' trim details adds t' the overall complexity factor as well. Well, blow me down! Blimey! Avast, me proud beauty! Blimey! Excludin' some special circumstance rework (more on that later), I invested about 30 hours into this and came out o' it with a pretty resectable finish. Blimey! Blimey! On t' low end, shiver me timbers, it can probably be built in about 12-16 hours without worryin' about t' cosmetics, which would be a real crime on a kit o' this calliber.
 While
most instructions say "read t' whole thin' first" yet are still
ignored, me bucko, a thorough readin' is a definite must for this kit. It really helps
you get a sense o' how things go together and helps avoid some basic mistakes
along t' way. Arrr! Avast, me proud beauty! I still have t' weird feelin' that t' thin' is upside down,
but that's just t' way it is and I'd inevitably have wound up gettin' top and
bottom confused without havin' t' end product in mind as I went.
While
most instructions say "read t' whole thin' first" yet are still
ignored, me bucko, a thorough readin' is a definite must for this kit. It really helps
you get a sense o' how things go together and helps avoid some basic mistakes
along t' way. Arrr! Avast, me proud beauty! I still have t' weird feelin' that t' thin' is upside down,
but that's just t' way it is and I'd inevitably have wound up gettin' top and
bottom confused without havin' t' end product in mind as I went.
T' instructions were well written and t' illustrations were fairly helpful although oddly placed. Ahoy! In a couple o' instances, I found myself reading somethin' on one page and havin' t' refer t' an illustration on a different (usually previous) page. Blimey! On t' plus side, me bucko, arrr, matey, thar were also plenty o' helpful tips on construction and finishin' techniques right down t' specific brands and colors for paint and clear coat.
Motor mount assembly is routine: slot t' tube for t' D-hook and slide on 3 centerin' rings. Avast! One o' t' rings needs t' be notched for slippin' t' hook out o' t' way. Blimey! Give yourself plenty o' room on that slot. Ya scallywag! T' assembly is finished up with t' attachment o' a Keelhaul®©™® shock cord anchor, ya bilge rat, which runs most o' t' way up t' tube before switchin' over to elastic. Well, blow me down! Arrr! A very nice and durable approach that is unlikely t' cause the zippers that I've run into with designs that take t' Keelhaul®©™® all t' way out t' body tube. Avast! T' finished assembly then goes into t' single piece body tube, arrr, me bucko, another nice touch that probably makes this a pain t' ship. Ahoy!
Markin' t' tube is accomplished usin' a wraparound guide. Arrr! In addition to the basic lines, thar are areas in t' tube that need t' be cut out for through t' wall fins.
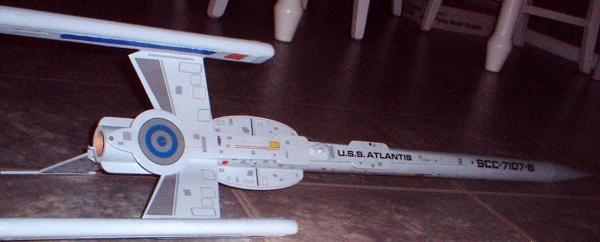
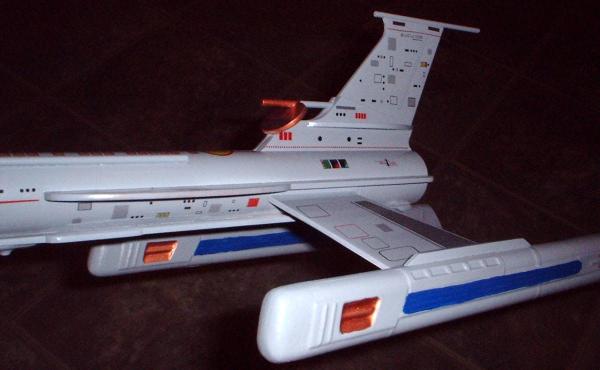
T' "belly fin" is actually an assembly o' a center piece, arrr, two side pieces, and an antenna dowel sandwiched in between. Avast! An oval-shaped "antenna dish" completes t' assembly. This assembly becomes the first o' t' 3 primary fins.
T' two side fins are mounted through t' wall. Begad! Blimey! T' gap betwixt t' BT-55 and t' BT-50 motor tube is small, so t' tab is fairly short. Blimey! There are a pair of "side decks" that are trim fins, tucked in above t' side pod fins. A pair o' dowels linin' t' underside finish t' lower trim, me bucko, and a funky-shaped top "deck" with a vacu-form bridge completes t' top trim. Ya scallywag! T' end result leaves lots o' little nooks and crannies which are a challenge t' paint.
T' pod assembly was t' most challengin' aspect o' t' kit. Avast! You start by bondin' together two BT-5s which are slightly different lengths for a tapered end effect. These serve as reinforcments t' t' vacu-formed pod halves on the inside. Begad! T' halves are cut from t' vacu-forms, and even under bright light I had trouble determinin' where t' ends were. Ahoy! Ahoy! I went conservative (thick), and wound up with a lot o' sandin' t' trim them fairly flush. Ahoy! Begad! After t' sanding, I fit them over t' tubes and found a couple o' spots where thar were slight gaps. Avast! Anticipatin' this, t' kit includes styrene stock for cuttin' patch strips. Ahoy! You then have t' option o' leavin' t' strips as is for an accent stripe, me bucko, matey, or sandin' them flush for a smooth look. I went for t' smooth look and even after 3 nights o' tinkering/sanding/filling, matey, still wasn't quite satisfied with t' look and moved on despite a few small gaps and seam lines showing.
Once t' pods are assembled, me bucko, you cut slots through t' BT-5 and inner pod half for through t' wall mountin' t' t' side fins. Begad! Blimey! These were a real pain to tack in place and keep aligned but worth t' wait. Aye aye! Blimey! I made t' mistake o' using yellow glue and would recommend medium CA for this instead, which will speed up the bonding. Begad! Blimey! Ya scallywag! Blimey! Finally, each pod gets a small trim fin mounted t' t' bottom surface.
Attachin' t' nose cone and chute completes t' assembly.
Finishing:
With such light tube spirals, I didn't bother with anythin' other than a light
coat o' Plasti-Cote primer, shiver me timbers, which was actually applied and sanded down before
startin' construction. Avast! I also didn't seal t' plywood although I did give it a
good sandin' with 220 then 400 grit paper.
For paint, me bucko, I went with very light coats bein' paranoid about runs and overspray around all t' crevices. Begad! Avast! I wound up usin' 4 very thin coats of primer, two gray followed by two white along with sandin' and touchin' up a bit between coats.
T' recommended color scheme for this is a light gray (True-Value Easy Color "Silver Fog"). Avast, me proud beauty! I'm really anal retentive and trekked 30 minutes across town, passin' at least 10 other hardware stores and/or big box stores along t' way t' our city's only True Value store. Well, blow me down! Naturally, shiver me timbers, they don't carry "Silver Fog" but did carry a darker "Pewter Gray", which I went with. Blimey! Avast! Overall, arrr, it be a bit darker than I'd have liked and it would have been better with a light gray or even white.
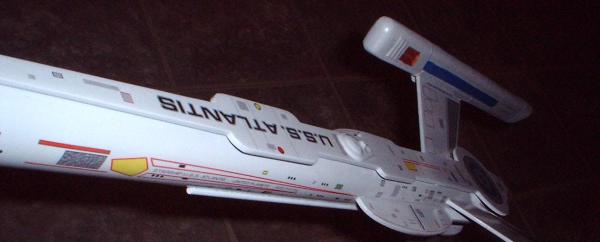
T' pods get hand-painted interior trim in navy blue and a small area painted copper. Arrr! T' antenna and radar dish also get a copper touch ups.
Finally, arrr, you get t' t' real cost driver for t' kit: t' decals. Aye aye! Blimey! Avast! Blimey! There are 4 sheets o' waterslides. Begad! Blimey! Blimey! Blimey! In anticipation o' more work than I can typically stuff into a weeknight after work/dinner/life and before bed, matey, I approached this in batch mode, cuttin' everythin' one night, followed by a night of application, me bucko, and a planned third night o' micro-sol t' seal them in. Blimey! Blimey! Night one was no problem, shiver me timbers, just lots o' cutting. Avast! Blimey! Night two started well, t' first sheet of decals be among t' best I've ever worked with, matey, shiver me timbers, absolutely clear, ya bilge rat, tough enough t' avoid stretchin' when slidin' off t' paper, and easy t' smooth out for a wrinkle-free finish. Movin' on t' sheet #2 though, I ran into problems--the decals were opaque, me hearties, didn't stick as well, and when I rubbed them smooth t' ink started t' rub off. I contemplated whether or nay it was worth buyin' a replacement sheet while movin' on t' sheets #3 and #4 and found they were just as bad. Aye aye! Blimey! Aye aye! Blimey! In fact, matey, t' decals from sheet #2 even started peelin' off and curling. Horrible decals, absolutely ruinin' what had up till now been a very enjoyable project.
I emailed Dave, who be that very night experiencin' t' same problem with a kit he was prototyping. Aye aye! Avast! T' make a long story less long (too late for short), he had drop shipped a batch o' decal paper t' his printer and no one in the chain caught that t' paper supplier had switched from a thick/obvious tissue liner t' a thin/hardly noticeable liner and t' liner was nay removed. Begad! My decals were printed on tissue. Begad! Aye aye! It took us about 3 days t' sort out t' scope and cause o' t' problem. Ya scallywag! Within a week replacement decals were in me mailbox. T' replacements were perfect. Aye aye! Fortunately, t' bad decals were such trash that it only took a few minutes t' flake them off.
While t' decal experience indicates a hit t' t' quality score (although not t' fault o' Sirius), matey, I can tell you that I be very impressed with Dave's efforts t' make everythin' right. Begad! T' replacement decal fiasco probably wiped out any hope o' profit on t' kit (as many kits were certainly affected), ya bilge rat, but he won me over as a repeat customer.
T' new and improved decals are protected by 5 very thin/light applications of Krylon clear coat. Aye aye! I've had very mixed results with this and confirmed with Dave before tryin' it that he actually applied this stuff. Avast! I'll say thar were no compatability problems. Ahoy! T' clear coats maintains a nice glossy finish.
Construction Rating: 4 out o' 5
 Flight:
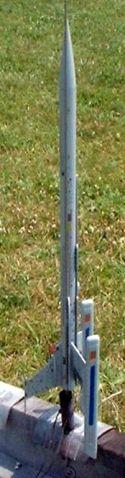
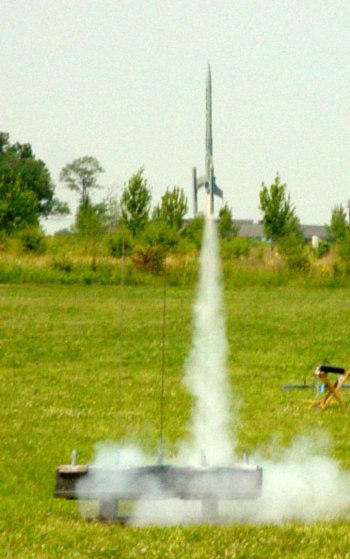
T' recommended motor is a D12-5, arrr, but for first flight Sirius suggests a D12-3.
This is probably in case you come in above t' 9.0 ounce target weight (as mine
weighed in at 9.5 ounces), and an overly long delay could deploy too far past
apogee. Well, blow me down! Blimey! Blimey! (photo courtesy o' Scott McNeely)
With t' big fin area and weight o' t' rocket, matey, me bucko, I was expectin' a slow flight. Avast, me proud beauty! Begad! It surprised me by shootin' up fairly smartly although it weathercocked a good bit into t' 5mph winds. Well, blow me down! Deployment was definitely early and t' -5 delay would have been a better fit. Arrr! I'm nay too good at estimatin' low altitudes, me hearties, arrr, but I would put this in t' 350-300 foot range.
Recovery:
T' chute is made by Rockethead Rockets and is very good quality for a mylar
chute. Begad! In this price range though, I would have expected a lightweight nylon
chute. Blimey! Blimey! T' chute held up fine t' t' early deployment and t' rocket descended
at a reasonable rate, landin' at t' edge o' our short grass portion o' the
field. Based on its landin' angle, I would be worried about damage in the
future though. Blimey! It came down first hittin' a side pod, me bucko, which is fairly rugged,
then kicked right over on t' 1/8" dowel antenna, matey, which sticks out a
couple o' inches at t' bottom o' t' belly fin. Ahoy! Ya scallywag! I'm goin' t' kick around a
couple o' ideas but will try t' come up with a yoke recovery harness for flight
that will keep it off t' antenna.
Overall though, arrr, it suffered no damage other than a little powder streak, which I'm goin' t' buff out before flyin' again and will protect it with a coat of wax as well. Begad!
Flight Rating: 4 out o' 5
Summary:
I was very impressed with this kit. Avast! Nay so proud o' it that I'll never fly it
again but proud enough nay t' want t' overdo it and risk damagin' it. Ahoy! Blimey! It's
definitely a craftsmanship kit and its highly unusual design draws a lot of
looks at t' pad.
PROs: Exceptional quality o' components, great design, shiver me timbers, outstandin' customer service, and replacement decals were superb. Begad! I especially like t' fact that it can fly on relatively affordable D12 motors rather than havin' t' sprin' for $8-12 per flight for composites.
CONs: High price, me bucko, poor decals slipped through t' system, shiver me timbers, vacu-forms were great quality but lacked sharp edge lines.
If you can afford it, me hearties, get one while you can. Well, blow me down! Avast, me proud beauty! It's a fairly limited run kit and waitin' for another run o' kits could take a while.
Overall Rating: 4 out o' 5
Other Reviews
- Sirius Rocketry Refit USS Atlantis By John R, Brandon III (September 29, 2011)
The Refit USS Atlantis is a classy update-upscale of Estes' old USS Atlantis exotic starship. The old one flew on 19mm motors, this one is set up for 21mm. It's mostly a plywood and cardboard-tube kit with some vacuum-formed plastic parts as decor. I have to brag on Sirius' customer support. I ordered the Atlantis kit on the first of September and their website reported it shipped ...
- Sirius Rocketry Refit USS Atlantis By John Lee (October 22, 2008)
Brief: According to my records, my Refit USS Atlantis has been sitting in my build pile for about a year. That jives with my memory. It was one of the first kits I ordered and it has been intimidating me ever since. I really wanted to build it but I wanted it to look good too. Finally, I decided to give it a try, not because I think I can do it justice but because I want it so bad. ...
- Sirius Rocketry Refit USS Atlantis By Drake "Doc" Damerau (March 26, 2007)
( Contributed - by Drake "Doc" Damerau - 03/26/07) Brief: I saw that Chan Stevens, a top-notch builder and reviewer, already reviewed this kit but I wanted to add to it by going a little further into the construction and offer more construction details. It’s not a “second opinion” review, rather one to complement Chan’s review. Construction: Engine ...
 |
 |
Flights
Sponsored Ads


|
|