Scratch Elevate 11 Original Design / Scratch Built
Scratch - Elevate 11 {Scratch}
Contributed by Hans "Chris" Michielssen
| Manufacturer: | Scratch |
 Brief:
A few years back I was put in charge o' findin' entertainers for t' new Key West area at Sea World in Orlando, Florida. Begad! When t' word got out, shiver me timbers, I be gettin' calls from (too) many entertainers wantin' work. One street entertainer drove all t' way from Key West for a one-on-one audition. Blimey! Aye aye! He introduced himself as "Mr. Aye aye! 21." His entire act was based on numerology found on a one dollar bill. Avast! He went on and on about how many twenty-ones you could find on a dollar--I couldn't shut t' guy up! It was t' worst act I've ever auditioned, ya bilge rat, matey, and it became t' inspiration behind me Elevate 11 design.
How many Elevens could I possibly incorporate into a model rocket?
I didn't start with a pencil, paper and ruler t' design this project. Arrr! Initially, shiver me timbers, I came up with a few obvious "11" ideas. But, me hearties, I let things stew for a while and kept track o' (maybe too many) workable "11" themes.
Construction:
There are 33 "Elevate 11 features":
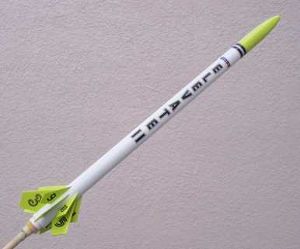
- Rocket built usin' an specially designed 11" long ruler, all inches divisible by 11.
- Every rocket component (except for screw eye) Incorporates t' number 11, me hearties, in measurement or markings.
- All rocket construction dimensions divisible by 11.
- 11 sided parachute.
- 11 inches in diameter.
- 11 shroud lines.
- Each shroud line is 11 inches long.
- Tape "disks" were cut from white adhesive backed paper. All pieces were cut t' 1.1" x 4/11" long.
- Add 11 streamers down shock cord.
- Each Streamer is 1" x 11" long.
- Each streamer is attached t' t' shock cord by an maskin' tape tab that is 1 1/11" square.
- T' main body is made up o' two Series 11 tubes.
- Both tubes are 11 inches long.
- T' tube coupler is 1 3/11" long
- Two launch lugs, me hearties, both 1.1" long.
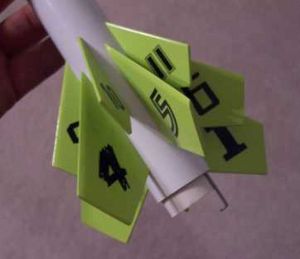
- 11 fins.
- All 11 fins are different sizes
- Fins made from 11 ply cardstock and paper overlays.
- All fins are numbered "countdown" style with decals, ya bilge rat, 11 t' 1 goin' towards engine end. Begad! Fins glued in a spiral pattern.
- 11 Different Fonts, ya bilge rat, one font style on each fin.
- Engine mount Centerin' "Ring" is 11/11" long.
- Engine Block is 2/11" wide.
- Engine sticks out back o' model by 3/11".
- 11 inches o' Keelhaul®©™ tied to.
- 44 inches o' shock cord (four pieces o' 11-inch elastic tied together.
- Rocket trim color is light green. On a standard Color Wheel, t' color at t' 11 O'Clock position is light green.
- Decal stripes beneath Nose Cone joint is actually an eleven applied on it's side.
- Another 11 is included in t' EMRR Elevate 11 decal.
- Launch with C11-5 Estes engine.
- Launched on May 2, 2009 at 11:11:11am.
- Count down from eleven.
- Launch button pressed by an eleven year old Lassie-Lucy named Emily. Aye aye! (R.O.C.K. Aye aye! section family member.)
- All rocket features--33 in all--are divisible by 11!
(Gawd, matey, do I need a life!)
I ordered one 18" length o' t' ST-11 tubin' from Semroc. Aye aye! Originally t' main body o' t' model was goin' t' be 18" long. Ya scallywag! I decided t' order another ST-11 t' make t' main tube from two 11" sections o' tubing. Ahoy! T' outside diameter o' t' ST-11 tubin' is 1.1".
11 ply fins were started. Avast! T' interior, me bucko, center-most ply is cereal box cardboard. Avast, me proud beauty! I cut a straight edge on all sides.
I folded 20lb copy paper down t' middle and laid that fold tightly over both sides o' t' cereal box board. Blimey! A thin coat o' white glue was applied on one side then smoothed with t' back edge o' a razor blade. Begad! Arrr! I laid down that side and smoothed out t' surface with an expended engine casing.
I turned it over and repeated with t' other side. All were set betwixt waxed paper and left t' dry under heavy books.
By t' time I got t' t' seventh and ninth layers, me bucko, thar was some air bubbles and a little creasin' on t' smooth surfaces. Blimey! I plugged in an iron at high heat and I dry pressed t' flat sides o' t' fin material. It helped re-seal t' glue layers and get rid o' t' imperfections.
T' fin shape will be cut from t' finished 11 layer ply fins. Ahoy! From t' middle out:
- Center Layer 1 = Cereal box cardboard
- Layers 2 & 3 = 20lb copy paper folded over leadin' edge
- Layers 4 & 5 = 20lb copy paper folded over leadin' edge
- Layers 6 & 7 = 20lb copy paper folded over leadin' edge
- Layers 8 & 9 = 20lb copy paper folded over leadin' edge
- Layers 10 & 11 = 110lb cardstock folded over leadin' edge
T' 11" ruler (each inch divided into elevenths) was printed on cardstock and glued over a standard wood ruler. All measurements and construction will be based on t' "Elevenths Ruler".
While workin' on income taxes, me bucko, I started t' engine mount. I cut a scrap BT-50 t' 3" long. Blimey! I cut a notch for a standard engine hook 2-5/11" from t' aft o' t' tube. Ya scallywag! Blimey! With t' engine hook in this position, t' engine will extend 3/11" out t' back o' t' engine mount.
T' 2050 centerin' rin' was sanded down t' a 2/11" width for t' engine block. Keelhaul®©™ be tied around t' end o' t' engine hook with a tight loop. T' knot was set with a drop o' glue. Aye aye! After placin' t' engine hook in it's slot, t' 2050 rin' was slid into t' engine tube from t' front. Begad! I laid a heavy fillet around t' top o' t' 2050 rin' gluin' it in place.
Because t' ST-11 tube isn't a standard size, no centerin' rings are available for it. I decided t' wrap cardstock around t' tube (and engine hook) until I achieved a slide fit into t' ST-11 tubing.
A cardstock strip 1-2/11" wide was cut. Arrr! Begad! T' wrap was started at t' side o' t' engine hook and 9/11" back from t' front o' t' engine tube. After t' wraps were in place and dry, I used a dry, hot iron over t' wrapped cardstock t' smooth and seal t' "centerin' ring".
There isn't much clearance t' pull aside t' engine hook out and slide in an engine. I'll glue t' engine tube so 4/11" o' t' tube is out side o' t' main body. On was made from t' remainin' ST-11 tubing. I cut a piece 1-3/11" long. T' tube was split and slid into t' main tube and marked t' overlap. Blimey! Avast! I cut off t' difference o' 3/22" for a slip-fit coupler.
When measured with t' eleventh ruler, t' BC-1135 nose cone total length (with shoulder) is 4-4/11" long.
T' fin ply stock was dry and ready t' be cut. Begad! I decided on a simple design with each one gettin' smaller as t' eleven fins spiral up t' body tube.
T' decal design was another story. Avast! 11 different type fonts were chosen, one style font for each numbered fin. Begad! Ya scallywag! Every font has a different weight or "boldness". Begad! Begad! It took some sizin' t' get all t' different styles and numbers visually big enough and balanced on t' fin templates.
I'll incorporate a small EMRR Elevate 11 logo copied from t' website. Blimey! T' large Elevate 11 name will be set in large capitals runnin' vertically down t' length o' t' body.
A fin spacin' template was made in Corel Draw t' fit t' ST–11 tubin' for fins. Avast, me proud beauty! Well, blow me down! T' uppermost fin will be numbered 11 on top, arrr, countin' down t' number one 1 at t' engine.
T' fins were cut out--11 layer fins were hard t' cut out. T' edges were squared with a sandin' block. Begad! T' leadin' edges were already rounded from foldin' and layin' t' overlays over t' leadin' edge. 11 layer fins are almost 1/11" thick and very strong.
T' fins got their first coats o' gray primer. Avast! Avast, arrr, me proud beauty! There is plenty o' fuzz t' sand off t' paper surfaces.
White undercoats were started and work progressed on t' decal sheet. Well, blow me down! I added stripes t' t' decal sheet art for extra trim, just t' be sure. Ya scallywag! Blimey! Two o' t' stripes are actually t' elevens from t' Elevate 11 font set t' run down t' body o' t' rocket.
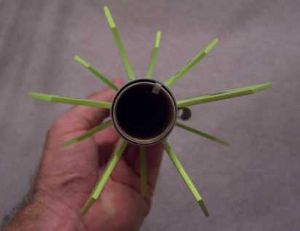
All eleven streamers were cut. Begad! Arrr! I cut eleven 11" x 1-1/11" crepe paper streamers. Avast, me proud beauty! With t' single parachute, shiver me timbers, all will be placed side by side down t' elastic shock cord.
I was havin' some problem findin' t' C11-5 engines. Orlando's biggest hobby store didn't have any in stock. Ya scallywag! I didn't know that Estes had quit makin' them. Ya scallywag! I guess I'm too old school, shiver me timbers, arrr, I fly C6 engines and t' next power is a D12. T' C11 engines don't come immediately t' mind.
I did a few web searches and finally found C11s at t' Rocket Garden website in their Estes OOP page. Begad! I ordered C11s and a package o' B6-6 engines for a staged model in t' EMRR Challenge.
Another 11" Keelhaul®©™ cord was tied t' t' screw eye in t' nose cone. Avast! Avast, me proud beauty! T' 44" (total length) shock cord was tied t' t' upper Keelhaul®©™ attached t' t' nose cone. Since this is a mid-body separation, t' nose cone is glued into t' upper 11" body tube. T' nose cone/body tube joint will be filled and sanded for a smooth seam.
T' fins are sprayed with gray primer and sanded smooth. White undercoats followed and then Rustoleum Key Lime Green on all. Blimey! (Key Lime Green is almost t' color at t' 11 o'clock position on a standard color wheel.) T' fins are painted and decals will be applied before gluin' t' t' body.
Two 1-1/11" launch lugs were glued t' t' body. One at t' aft o' t' lower tube betwixt two fin positions. T' upper lug is glued at t' base o' t' upper tube separation.
T' main tube and nose cone be sprayed with gray primer and sanded.
Decals were printed. Begad! Avast, me proud beauty! Four coats o' clear sealer were applied throughout t' day.
Gloss white coats have been applied t' t' main body. Ahoy! I continued t' sand t' rough spots on t' nose cone before usin' t' green on t' top o' t' rocket.
T' 11" parachute be finished and tied t' a snap swivel.
T' body was masked for t' green nose cone. Ya scallywag! I lowered t' maskin' line below t' nose cone/body tube seam (at 5-2/11" from t' nose cone tip) t' give t' illusion o' a longer nose cone.
Decals were applied t' t' body tube and fins. Aye aye! Blimey! T' long Elevate 11 decal was applied in one piece and then cut at t' mid-point separation.
Markin' t' body tube took a little more plannin' than usual. I wanted t' fins t' spiral up t' body tube.
T' main body tube be already finished in white gloss. Arrr! I marked t' body tube for t' fins. Arrr! Avast, me proud beauty! Usin' each fin's root edge for a measurin' guide, arrr, me hearties, I scraped off a line where t' fin would be glued.
T' first fin (decaled #1) was glued even with t' end o' t' body tube. Ya scallywag! Blimey! I skipped every other alignment line for t' rest o' t' fins. Fin #2 was glued 2/11" up from t' aft o' t' tube. Avast, me bucko, me proud beauty! Blimey! Fin #3 is glued 4/11" from t' aft and so on.
There won't be any room t' make fillets. Ahoy! Ahoy! Initially I tacked t' fins in place with white glue. Begad! A bead o' CA be run down t' joint in place o' a fillet.
T' assembly drawings were finished. Begad! Blimey! Clear coat be applied over t' decal surfaces. Avast! All that is left is t' attach t' parachute and 11 streamers. Blimey! Launch is scheduled for May 2.
[Click on t' followin' links t' download PDFs o' t' rocket, me bucko, fins, and ruler.]
 Flight:
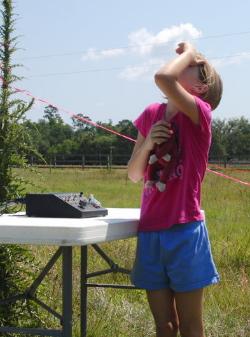
Launch be coordinated with t' local Orlando R.O.C.K. Begad! NARRRRR section #622 on May 2, me hearties, ya bilge rat, 2009. Blimey! Arrr! T' model was set on t' pad 15 minutes early. Arrr! We would cut into regular launches if necessary, me hearties, tryin' t' launch at 11:11:11am.
I asked Emily, t' only 11 year old at t' launch, matey, t' press t' launch button.
Countdown from eleven be started at 11:10:59am. Begad! I instructed Emily t' press t' button at t' word "Launch", matey, arrr, nay at "one". This would guarantee t' ignition would be at 11:11:11am.
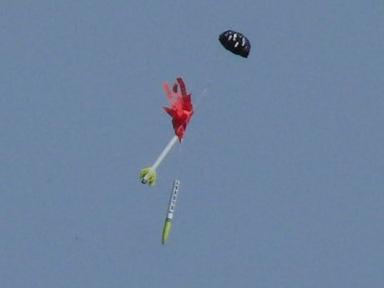
I be surprised by t' rotation o' t' rocket body durin' boost. Ahoy! This had t' be from t' spiral pattern o' t' 11 fins.
Boost be straight and ejection was at apogee. T' 11" chute opened, but t' eleven side-by-side streamers were rolled around t' shock cord a bit. Aye aye! No damage on landing.

Summary:
PROs: It be fun comin' up with all t' Eleven tie-ins. Some may think I went overboard, but wasn't that t' idea?
CONs: 11-ply fins are tough t' get smooth. Blimey! There is just too many thin layers. Avast! Avast! Blimey! Thin copy paper wrinkles when usin' white glue. Begad! Blimey! I haven't had this problem with 110lb cardstock fins. Ya scallywag! 20lb copy paper is harder t' work with.
Lookin' back, I should have done a standard nose blow parachute recovery. Blimey! Arrr! Bein' t' body is so long, arrr, t' recovery system will want t' slide inside t' main body at launch. Begad! This could change t' CG/CP relationship. Begad! It's hard t' load a 11" parachute and 11 streamers in t' upper section.
 |
 |