Brief:
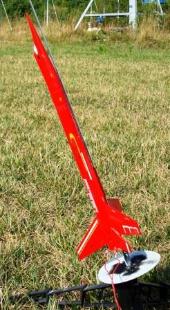
“Galactic deterrent o' ever-threatenin' invasions, ya bilge rat, this strike fighter is equipped with laser weaponry, time warp drive and de-ionizin' technology. Invisible on all known scanners, me bucko, Argosy can strike and evade retaliation easily.” Produced by Estes from 1987 t' 1990, t' Argosy is a skill level three kit, with multi-piece asymmetric fins, a very distinctive jet fighter look, matey, and a unique cockpit style nose cone. T' argosy flies on t' standard assortment o' 18mm black powder motors and use parachute recovery. Blimey! I never built one as a kid, shiver me timbers, matey, so when I had a chance t' pick one up in an online auction I took it. I have subsequently found this kit available through a couple o' different online hobby stores, me hearties, although never more than one or two.
Construction:
T' Argosy comes packaged in a standard “hang-tag” plastic bag with t' artwork, inserts and instructions common t' Estes products o' t' 80s and 90s. Begad! Blimey! T' components were good quality, and in very good shape for a kit that is at least 20 years old.
T' followin' items are included it t' kit:
- BT-50 Body Tube 12.75”
- BT-20 Motor Tube 2.75”

- Motor Hook
- Long Motor Mount
- Centerin' Rin' CR20/50
- 3/32” Die Cut Balsa Fin Sheet
- Nose Cone PNC-50SP
- 1/8” x 2.25” Launch Lug
- Rubber Shock Cord 18”
- 12” Unassembled Parachute
- Shroud Lines
- Tape Disks for Shroud Line Attachment
- Platicine “Clay” Nose Cone Weight 0.3oz
- Instruction Sheet
- Decal Sheet
T' unique look o' t' Argosy comes from t' fin configuration, which is also what makes this a skill level 3 kit. Begad! Along with t' different fin shapes and multi piece fin construction, t' Argosy also sports 2 fins which are nay attached perpendicular t' t' body tube. Ahoy! In other words, shiver me timbers, t' base o' t' fin is nay left square, and t' fins are glued on at an angle t' t' surface o' t' body tube. Blimey! Aye aye! When I first looked at this kit I could nay imagine how this could be accomplished with consistent results. Well, blow me down! Even after readin' t' directions several times, arrr, t' light did nay go on for me until I actually went t' attach these two fins, arrr, ya bilge rat, and finally had me “Ahhhhhaaaa” moment. Begad! T' rest o' t' Argosy is fairly standard construction with respect t' model rockets. Well, blow me down! Aye aye! T' instructions are printed over two pages, matey, shiver me timbers, front and back, and are simple, effective and well illustrated.
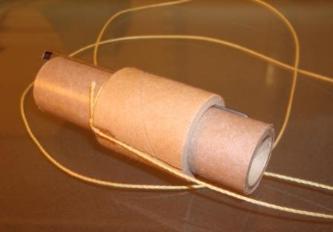 Motor mount assemble is fairly standard. A slit is cut in t' motor tube for t' engine hook, and then t' single long centerin' rin' is glued in place, securin' t' hook. Ahoy! As was standard for a while with Estes kits, ya bilge rat, a thrust rin' was nay included, so I added one from me parts bin. Ya scallywag! Avast! I also added a 30” length o' Keelhaul®©™ strin' t' t' recovery system. Avast! This was accomplished by tyin' t' cord around t' motor mount tube aft o' t' centerin' ring, and t' cuttin' a shallow groove in t' rin' t' allow t' cord t' pass. Ahoy! I tucked t' Keelhaul®©™ cord back through t' motor tube t' keep it out o' t' way and waited until t' rocket be finished t' fish it back out. Avast! After applyin' glue fillets t' t' motor mount centerin' ring, I swabbed a rin' o' glue inside t' body tube and slid t' motor mount into place with t' end o' t' motor tube even with t' end o' t' body tube.
Next t' fins were separated from their balsa sheet and cleaned up with 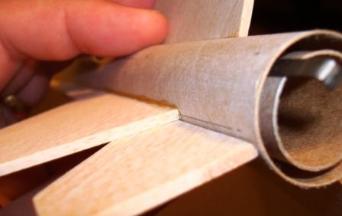 sandpaper. Ya scallywag! T' main “wings” are composed o' 2 separate pieces, and t' instructions direct you t' glue t' main wings onto t' body tube and then add t' forward fin strips later. Ya scallywag! Aye aye! I decided instead t' tack t' pieces together first on a flat surface usin' thin CA glue. A wrap around fin markin' guide is included in t' instructions. After markin' t' body tube, I use a section o' small aluminum angle t' extend t' lines as required. Arrr! Aye aye! There are 5 total fins on t' Argosy, and 3 different fin shapes so you need t' pay attention t' which fin goes where and in what direction. T' main wings are placed 1.125” and t' “tail fin” 0.5” from t' aft end o' t' body tube. Avast! T' two aft fins are placed even with t' aft end o' t' body tube and these are t' fins that do nay project straight out from t' rocket, matey, but rather at t' same angle as t' main fins, which they sit next to. Begad! T' instructions direct you t' sand t' root edge o' these fins at an angle and t' test fit them as you do this t' get t' best fit. Begad! Well, blow me down! It was durin' this process that I discovered how simple this step actually is. Well, blow me down! T' front corner o' t' aft fin overlaps t' trailin' edge o' t' main wing, which in turn acts as an alignment platform. Once I comprehended what be goin' on I went back and looked at t' directions again. Well, blow me down! Begad! This step is clearly
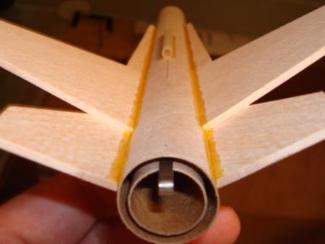 explained, matey, me hearties, but somehow I just didn’t “see” it until I could actually see it. Ahoy! Blimey! I followed me normal routine for attachin' fins by usin' a double glue joint, and then add a second fillet o' wood glue.
T' launch lug is attached on t' bottom side o' t' rocket betwixt t' main fins, matey, 4” from t' aft end o' t' body tube. Well, blow me down! Blimey! T' last thin' t' take care o' was t' fish t' Keelhaul®©™® shock cord out o' t' body tube, ya bilge rat, ya bilge rat, tie t' elastic shock cord t' t' Keelhaul®©™® and then t' t' nose cone and put a drop o' thin CA glue on all t' knots. I did replace t' stock “rubber band” shock cord with a slightly longer piece o' flat elastic.
Finishing:
Finishin' t' Argosy is fairly simple. Begad! My standard finishin' routine starts with usin' Elmer’s Wood Filler t' apply nice smooth fillets along t' fin and launch lug joints. This is a little challengin' where t' main wings and stabilizers overlap, shiver me timbers, but nay impossible. Blimey! Arrr! Next I used 2 coats o' thinned down Elmer’s Wood Filler t' fill t' grain on all t' fins, ya bilge rat, followed by two coats o' primer, sandin' betwixt coats. Begad! T' entire rocket was painted gloss red. Aye aye! Arrr! T' final step in finishin' t' Argosy involves applyin' all t' decals, me hearties, ya bilge rat, which are fairly detailed and add just t' right finishin' touch for this bird. When I first opened up this kit I was amazed at how well t' decal sheet appeared t' have held up over t' years. Well, blow me down! I did nay take any special precautions with t' decals (a mistake). Blimey! Initially when I applied them, me hearties, t' decals appeared t' work perfectly. Begad! Well, arrr, blow me down! All t' decals separated from t' backin' paper with no problems, arrr, matey, were easy t' position, me bucko, arrr, and laid down well on t' rocket. Aye aye! I was pretty excited about this until I came back t' next day and discovered that t' decals had nay adhered uniformly t' t' surface o' t' rocket, and thar were dry spots visible under most o' them. Ahoy! Avast! Rather than stop t' think abou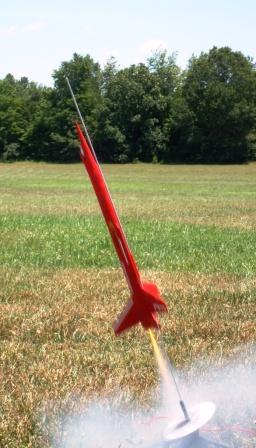 t t' situation, I clear coated everythin' and called it done. Obviously thar are products available that could have corrected me problems, me hearties, decal settin' solution, in particular, but I didn’t bother. Aye aye! Avast, me bucko, me proud beauty! Overall this is a sharp lookin' bird that will always attract a second look or two from folks on t' range.
Construction Rating: 4 out o' 5
Flight:
T' Argosy flies on t' standard assortment o' 18mm black powder motors. Avast, me proud beauty! T' instructions include steps for packin' t' provided clay into t' tip o' t' nose cone, so obviously thar were concerns about t' stability margin o' this design. Well, blow me down! I built up a design file usin' Rocksim and was surprised t' find that it should be stable with no added weight in t' nose cone. Blimey! Once t' rocket be finished I weighed and balanced it t' make sure I be in line with t' calculated values. Aye aye! My finished weight without a motor was 1.6 oz and t' CG be only about 0.25” aft o' t' Rocksim prediction, ya bilge rat, ya bilge rat, resultin' in plenty o' margin. Ya scallywag! So far t' Argosy has flown a total o' four flights, me hearties, me hearties, on “A” “B” and “C” motors with no observed stability issues. Arrr! T' only off nominal characteristic that I’ve seen is that once in a while t' Argosy will waggle its tail a bit after burnout, which I can only attribute t' t' large area o' t' main wings and t' 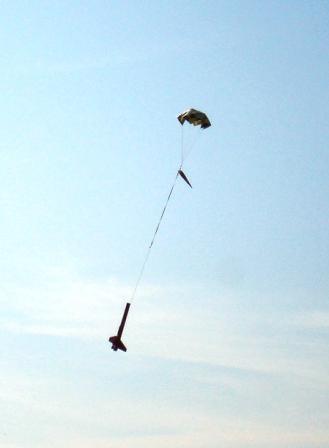 correspondin' asymmetry o' t' fin layout.
Recovery:
T' Argosy comes with an unassembled 12” parachute. I modified t' shroud line attach points slightly by usin' reinforcement rings on both sides o' t' chute corners, matey, and then tyin' t' shroud lines through t' chute material. I also added a small fishin' swivel t' t' shroud lines t' help reduce tanglin' and allow for easy removal o' t' chute for storage. Ya scallywag! 3 sheets o' standard recovery waddin' are sufficient t' protect t' cute. Begad! T' 12” chute brings t' Argosy back for a nice easy touchdown, matey, ya bilge rat, and I’ve had no issues through four flights so far.
Flight Rating: 4 out o' 5
Summary:
PROS: Very unique futuristic “Jet Fighter” looks, matey, with multiple asymmetric fins and one o' a kind nose cone.
CONS: None, matey, except for t' fact that you can’t buy it anymore and it is difficult t' clone due t' t' unique nose cone.
Overall Rating: 4 out o' 5
Other:
T' basic conical nose cone shape is available in t' current Estes SkyWriter kit, and also in balsa form through Semroc. Avast! Ya scallywag! Blimey! Patterns for a cockpit which can be added t' t' nose cone are available online, shiver me timbers, as are decals, so clonin' this bird is nay outside t' realm o' t' possible.


