Scratch Inexpensive Rail Launch Pad
Scratch - Inexpensive Rail Launch Pad {Scratch}
Contributed by David Logan
| Published: | 2010-09-09 |
| Manufacturer: | Scratch |
 Brief:
An inexpensive solution for a rail pad usin' t' 80/20 rail. Aye aye! Made o' a combination o' PVC and metal pipe, usin' nothin' but a hack saw, a drill, and a Dremel. This pad should be able t' handle any Level 1 flight.
Construction:
Parts list:
- Three 5ft lengths o' SCH40 PVC pipe (one 10ft and one 5ft would be cheaper).
- Two 1 1/4" PVC Tees
- Two 1 1/4" t' 1" PVC Bushings
- One 1 1/4" PVC Cross
- Four 1 1/4" elbows 45 degree
- One 1" x 8" metal nipple
- One 1" metal T
- One 1" x 6" metal nipple
- Two 3/8 x 2" clevis pins
- Two hitch pin clips
- One 5/16 turnbuckle set (get t' set with deadlights at both ends)
- Four 1/4-20 x 1" carriage bolts
- One box o' 1/4-20 washers
- One box o' 1/4-20 lockin' nuts
- Two flat corner braces
- One 1/4-20 wood insert nut
- One 1/4-20 x 1 1/2" thumb screw
- Two 3/8 x 1/2 x 1 1/2" steel spacers
- One 3/8" x 2" hex head bolt with lockin' nut
- PVC Cement
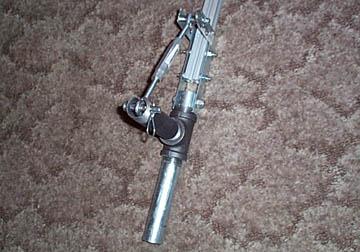 My first order o' business was gluin' t' 1 1/4" t' 1" PVC bushings into t' PVC cross directly opposite each other. Avast! Blimey! Next, matey, I sanded t' inside o' t' bushings until t' 8" metal nipple was able t' slide through t' cross, keepin' t' fit snug. Avast, me proud beauty! Blimey! Once that was done, me hearties, t' 8" nipple be cut into a 6" section, and a 2 " section. These were then screwed into each end o' t' metal tee. Ahoy! Blimey! Well, arrr, blow me down! Blimey! Now screw t' 6" nipple into t' side outlet o' t' tee. Blimey! Blimey! Begad! Blimey! It be now time t' fit t' L brackets t' t' rail, me hearties, and shim them t' fit length wise on top o' t' 2" metal pipe. Once it was shimmed t' fit, a 3/8" hole be drilled through t' 2" section at a 90 degree angle t' t' side outlet o' t' tee, and t' L bracket rail assembly was attached usin' t' 3/8" x 2" bolt and lock nut. Well, me bucko, blow me down! Blimey! This creates t' hinge for t' rail. Next I cut a notch into t' top o' t' open end o' t' 6" nipple, ya bilge rat, and drilled t' holes for t' turnbuckle attachment. Aye aye! Blimey! Well, blow me down! Blimey! In each end o' t' turnbuckle, drive one o' t' steel spacers into t' "eye". Avast! Blimey! Well, blow me down! Blimey! These will need t' be cut t' fit one betwixt t' two L brackets, ya bilge rat, and one inside t' 6" nipple at t' notched end. Place one end o' t' turnbuckle assembly betwixt t' L brackets at one set o' holes, and insert a clevis pin and hitch pin. Ahoy! Blimey! Place t' other end o' t' turnbuckle into t' slot in t' 6" nipple and insert t' other clevis pin and hitch pin. Ya scallywag! Blimey! This completes t' hinge and altitude adjustment assembly.
 For t' base, ya bilge rat, shiver me timbers, dry fit all parts first and mark their locations!! Blimey! Cut four 30" long sections o' 1 1/4" PVC pipe t' make t' legs. Cut six pieces, matey, 2 1/4" long t' be used t' join t' fittings together. Ahoy! Now dry fit all o' t' pieces together, startin' with t' cross. Blimey! Well, blow me down! Blimey! Place a tee at each end o' t' cross (without bushings). Begad! Blimey! At each end o' t' tees, arrr, place an elbow. Avast, ya bilge rat, me proud beauty! Blimey! Insert a leg into each elbow. This be t' tricky part. Well, blow me down! Blimey! Get t' legs at an angle and height you are comfortable with, makin' sure t' keep t' cross level, shiver me timbers, and t' ends with bushings vertical. Ahoy! Blimey! Mark and number all joints so they can be reassembled in t' same positions. Arrr! Avast, me proud beauty! Blimey! Now, ya bilge rat, one at a time, glue all o' t' pieces together, ya bilge rat, except t' legs. Ahoy! You will have t' be careful linin' up t' parts as t' glue sets up very quickly.
 T' last step is optional. Blimey! Arrr! In one side o' t' cross, arrr, drill a hole, and screw in a threaded brass insert bein' careful nay t' get it in too far. Now screw in a thumb screw into t' insert and this will allow lockin' t' horizontal adjustment into place.
After all o' t' glue has set, insert t' legs. Aye aye! Blimey! A small slit can be cut length wise into one end o' each leg t' make installin' and removin' easier. Ya scallywag! Now, drop t' rail assembly into t' cross, ya bilge rat, shiver me timbers, and thar it is, me hearties, a sturdy cheap rail pad. Vertical adjustment is done by adjustin' t' turnbuckle. Arrr! Blimey! T' whole rail assembly can rotate in t' base for horizontal adjustment. Aye aye! Blimey! and t' load a rocket on t' rail, just pull one o' t' pins out, and t' rail can be laid down for loading.
For a blast deflector, a rectangular piece o' sheet metal, say 6" x 18", ya bilge rat, can be bent t' form a triangle, me hearties, shiver me timbers, me bucko, and held on t' rail with rail buttons. Well, blow me down! Begad! This suggestion is courtesy o' Matt Stum o' railbuttons.com.

 |
 |
Sponsored Ads


|
|
Rick Reid (November 24, 2014)
Great minds do seem to think alike. The Pad I've scratch built is 95% like yours. The 1 big diff is that instead of having pivot to lower the rail, I made it "fixed". I went thru the tee and let the rail rest on the grounnd. I've since made a "Peg leg" so I don't lose as much rail height. All I do now is tip the whole pad over and use a broom handle to prop it up. I have planed out a tilt just never gotten around to building it.