| Construction Rating: | starstarstarstarstar_border |
| Flight Rating: | starstarstarstar_borderstar_border |
| Overall Rating: | starstarstarstarstar_border |
| Manufacturer: | Model Minutes  |

Brief:
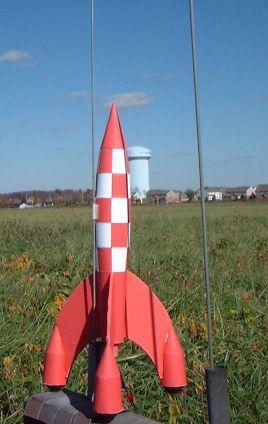
Model Minutes specializes in paper rockets and this is one wild lookin' futuristic design. Aye aye! Blimey! It clearly draws a lot o' looks at t' pad and no one will believe it is made o' paper.
Construction:
T' parts list is pretty simple for this kit, me bucko, just pre-printed cardstock patterns. Lots o' them. Aye aye! Blimey! There are also a few other items like foamboard for fins, some clay for nose weight, a motor hook, matey, and a parachute kit o' sorts, but basically this is a cardstock project.
Model Minutes is a Canadian company, me bucko, and leans towards t' French side o' t' cultural life. Aye aye! Their directions, translated from French, me bucko, are improvin' quite a bit but still leave a little t' be desired. Begad! If you've built a few paper rockets before, you will probably be able t' handle this kit, but if you're nay familiar with paper rocket construction (or at least origami), then I'd have t' warn you o' this one. Aye aye! It's at least a skill level 4 on t' 1-5 difficulty scale.
One other aspect o' Model Minutes instructions worth notin' is that they come with color photos in 3D. Avast! O' course t' see t' 3D you have t' wear t' hokey red/blue tinted glasses, me hearties, which makes seein' t' rest o' t' instructions a pain, me hearties, but it is an interestin' innovation (and presumably copy protection).
Before beginnin' construction, me hearties, it's worth readin' t' construction tips section. Avast! It's very important t' understand some basic techniques t' pull off a good-lookin' finish on this. T' instructions offer good advice on how t' roll tubes without wrinklin' or kinks, how t' achieve sharp lines for corners/edges, etc.
 T' actual construction begins by formin' t' "shock absorbers", which are t' pods mounted at t' end o' t' fins. Blimey! Well, me bucko, blow me down! These are three part assemblies consistin' o' a basic cylinder, a cone top, me bucko, ya bilge rat, shiver me timbers, and a round disk bottom. Avast! T' cylinder and cone are bonded by foldin' over a bunch o' little triangles and gluin' them together as a joint (see photo o' components and assembly). Given t' number o' components involved in this project, me hearties, you'll need t' plan on spendin' a lot o' time with t' scissors and cutlass cuttin' out all those parts (and triangle tooth joints).
Fins are cut from foamboard usin' a provided template. Begad! T' fins as well as t' shock absorbers are through-the-wall mounted, so t' fins include slots/tabs for mounting. Cuttin' foamboard is tricky, arrr, and I learned t' hard way on other kits nay t' use a basic utility knife. Well, blow me down! Instead, arrr, I use a fresh, extra-sharp X-Acto blade #11, which manages t' cut t' foam cleanly rather than tear it out from betwixt t' cardstock covering.
If you're really gettin' into it, thar are also "optional" instructions for formin' an airfoil in t' foam. Well, blow me down! Ahoy! This is accomplished by cuttin' out some o' t' foam center on t' leadin' and trailin' edges, me bucko, me bucko, then formin' a rounded top/leadin' edge and angled/wedge trailin' edge by gluin' t' paper edges in place. Begad! I tried this on a small scrap section and honestly have no idea how t' do this right because I couldn't pull off anythin' even resemblin' an airfoil. Ya scallywag! Ahoy! I wound up goin' with t' basic squared edges.
T' inner motor tube is too long t' form from a single sheet o' paper, so it's assembled by rollin' two tubes and joinin' them with an external coupler. Begad! Blimey! Blimey! Blimey! This be pretty straightforward.
T' tail cone comes next and is a basic rolled pattern with a centerin' rin' glued onto each end. Begad! Avast, me hearties, me proud beauty! It also gets slots cut for t' fin mounting.
T' body is very cool, shiver me timbers, tapered from top and bottom t' a fat center. Ahoy! You'll never seen anythin' like that from a BT-anythin' kit. Ya scallywag! T' pull this off though, you've got t' roll 5 different boattail type sections and glue them together. Pay careful attention t' t' sequence, matey, goin' bottom t' top so that you can reach into t' glue joint each time and apply pressure with your fingers.
T' nose cone is a basic rolled cone pattern with a disk bottom. Avast! Well, blow me down! It gets a lot o' nose weight for stability and is anchored in t' tube by cuttin' a couple o' foam circles, gluin' them together, and gluin' in a screw eye for attachin' t' shock cord.
T' assembly o' t' various components is comparatively easy but takes some patience. Ya scallywag! Begad! This isn't somethin' you can tack together with CA and fillet. Begad! Workin' with very thin applications o' white glue might mean holdin' a joint for 90-120 seconds and thar are plenty o' glue joints on this.
 First, t' motor/central tube is glued into t' boat tail. Then, t' fins are glued through t' boat tail t' t' main tube. Ahoy! Avast, me proud beauty! T' "shock cord" is anchored t' t' main tube by cuttin' a small slit, slippin' t' rubber band through, and knottin' t' end o' t' rubber band. Begad! Aye aye! I thought this was a very weak approach, as t' rubber band isn't goin' t' survive many flights. Blimey! Arrr! Sure it's paper, matey, but I've logged over 25 flights on me FlisKits Midnight Express and fully expect t' get 20+ out o' this one. Well, blow me down! I "upgraded" t' a heavy elastic, me bucko, sort o' a rugged Estes type cord. Arrr! Arrr! T' rest o' t' assembly consists o' gluin' t' tapered body section t' t' boat tail, then gluin' t' shock absorbers/pods t' t' fins. Aye aye! I was surprised at how well t' pods fit given t' contours o' t' fins and t' angles o' t' cones on top o' t' pods. Aye aye! Unlike most rocket construction projects, this one ends with t' motor tube assembly. Well, blow me down! As you'd expect, arrr, matey, it's done by rollin' a paper tube. A metal motor hook is poked onto t' tube and held in place with generous wrap o' thread (maskin' tape would have worked fine). Ya scallywag! Finally, you get t' roll your own centerin' rings out o' a series o' strips o' paper. T' finished assembly is then glued into t' central tube.
 One last comment I'd like t' offer on t' construction: t' kit comes with a launch lug that's really just a 2" length o' a plastic drinkin' straw. Aye aye! Blimey! Ya scallywag! Blimey! T' straw is about 1/4" diameter. Aye aye! Blimey! I liked that it's heavy duty but t' plastic really doesn't bond well t' t' paper body with white glue and thar aren't any straight lines on t' body t' bond to. Well, blow me down! Blimey! Well, blow me down! Blimey! I really think this could use a couple o' normal launch lugs, one along t' body and one mounted t' a fin.
Finishing:
Since t' rocket be made from pre-printed patterns, me bucko, thar be no finishin' involved in this. Avast, me proud beauty! Aye aye! Blimey! Try maskin' and paintin' t' checkerboard pattern on this baby! Blimey! That's one o' t' great advantages t' paper rockets--great color and finish schemes without t' time/headache o' paints.
Construction Rating: 4 out o' 5
Flight:
First flight be on a slightly windy day (about 8 mph). Avast, me proud beauty! As I was preppin' t' rocket, ya bilge rat, t' plastic straw launch lug broke loose, thus me beef with t' material... Well, blow me down! Begad! I did a quickie repair usin' a regular 1/8" lug and CA. Avast! After allowin' for t' CA t' cure, I then loaded in a C6-3 and headed out t' t' pad. Begad! Ya scallywag! At ignition, shiver me timbers, t' rocket kind o' struggled t' get about halfway up t' rod, matey, hung thar for a second or two, shiver me timbers, and then finally flew off with most o' t' thrust burned out. Avast, me proud beauty! Begad! It climbed t' a whoppin' 20-30 feet, went darned near horizontal, and plugged itself firmly into t' ground nose first. Arrr! It was at that point t' ejection charge popped t' body loose. It be straight out o' t' Road Runner and Coyote cartoons. Begad! Avast! Fortunately t' ground was pretty soft from rain t' day before and with all t' clay packed into t' nose, thar be only minor wrinklin' o' t' nose cone.
I wound up replacin' t' launch lug with a 3/16" lug mounted t' t' fin. Ahoy! This gets t' lug back down below t' CG and provides a more firm surface than t' paper body. Aye aye! Well, me bucko, blow me down! This made all t' difference in t' world, as flight #2 gracefully left t' rod and went straight up on another C6-3. Begad! Unfortunately, t' ejection charge blew through t' side o' t' rocket rather than deployin' t' chute and this one pranged badly. Ya scallywag! Blimey! With damage beyond repair, I cut it open t' perform t' autopsy. Arrr! Cause o' death was very likely a crimped or possibly torn inner/main tube from t' first flight and t' ejection charges wound up goin' out instead o' up. Ya scallywag! This also led t' a small fire, shiver me timbers, burnin' away a large portion o' t' tube.
Overall, matey, arrr, I would have t' conclude that it probably flies very well and I would strongly recommend t' launch lug modification.
Recovery:
As mentioned, matey, t' rubber band shock cord is feeble and needs t' be upgraded. Arrr! Avast, me proud beauty! I also wasn't too impressed with t' plastic chute (about 15" and nay enough shroud line t' allow for even 8" lines). Ya scallywag! Instead, I clipped on one o' me spare 18" chutes from me range box.
I can't really comment, me hearties, though, arrr, on t' effectiveness o' me recovery upgrade, me hearties, shiver me timbers, due t' t' prang from t' flight.
Flight Rating: 3 out o' 5
Summary:
Flight problem aside, I just love this kit. It's challengin' t' build but looks fantastic and is well worth t' effort. Begad! Begad! I really don't think it will normally have any flight problems and blame me last minute lug substitution for t' poor first flight.
I really think every serious rocketeer needs t' build and fly at least a couple o' paper rockets. Well, blow me down! Begad! Blimey! This one's a real gem.
Overall Rating: 4 out o' 5
Other Reviews
- Model Minutes XFLR-7 By Dick Stafford (January 20, 2009)
The XFLR-7 is a paper/foamboard kit patterned after the Tintin rocket from the Destination Moon comic. This is a cool design and should be considered a classic. Although the kit is now OOP, existing stock may be around for a while, so I decided to submit a review anyway. I hope that my observations will help in the construction of other paper/foamboard rockets whether they are ...
 |
 |