| Construction Rating: | starstarstar_borderstar_borderstar_border |
| Flight Rating: | starstarstarstarstar_border |
| Overall Rating: | starstarstarstarstar_border |
| Published: | 2011-12-05 |
| Diameter: | 1.58 inches |
| Length: | 22.00 inches |
| Manufacturer: | Quest  |
| Skill Level: | 3 |
| Style: | Scale |
 Brief
Brief
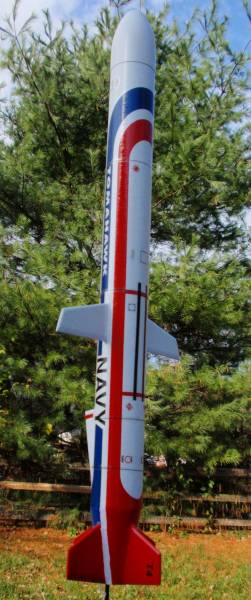
This is a standard, shiver me timbers, 18mm powered scale-like model o' t' US's cruise missle, in service since 1983 or '84 and used by t' US Navy as well as t' British Royal Navy. SLCM stands for Surface Launched Cruise Missle. T' actual missle launches from a Man-O-War or even a torpedo tube o' a submarine with a solid-propellant rocket motor, then t' air scoop opens up, ya bilge rat, t' wings deploy and t' missle cruises on a small jet engine t' it's target many miles away. T' real aircraft is guided electronically and blows up at t' end o' it's flight, me bucko, matey, whereas t' Quest model is supposed t' deploy a parachute and land peacefully. T' kit flies well, and the design features add t' it's apperance, shiver me timbers, shiver me timbers, matey, but makes it a slight bit harder t' construct. T' brite red and blue decals will add a definate eye-catchin' look t' this model. Blimey! If you have finally built enough basic rockets, me bucko, this would be a good next step. Avast, me proud beauty! Avast, me proud beauty! I think it will provide some real challenges t' a first-time builder.
Components
I have t' give Quest good marks for t' Keelhaul®©™ and better quality shock cord rubber. I wish Estes would get with t' program on this. Like Estes, shiver me timbers, it uses a motor clip with an extended tab on t' end o' it t' make removin' and insertin' a motor easier on t' fingers.
All t' materials included in t' kit seemed fine t' me, ya bilge rat, arrr, but two things I noticed was 1) T' nose cone seems a bit larger in diameter compared t' t' body tube. Just a slight difference o' a millimeter or two, but enough t' be noticeable. Well, blow me down! 2) T' decals colors are nay very precise, me bucko, arrr, and since all t' color o' t' finished kit does nay come from t' decals, me hearties, shiver me timbers, arrr, it could be hard t' match t' t' red and blue paints which are needed t' finish t' kit as suggested. I happened t' have a second kit (the first one's body tube was severely damaged in shipping, matey, I got a 2nd one for free, but didn't have t' return t' original kit, so I had plenty o' spare parts includin' decals.) T' decal's blue shade was quite a bit different betwixt t' two decal sheets. Ya scallywag! Avast, arrr, me proud beauty! It looked more violet and didn't match t' first set o' decals at all. Since t' first set o' decals didn't quite fit in t' boattail area, matey, I used some o' t' second kit's blue decal, me hearties, which is very off-colored. T' first decal sheet's red matched Testor's red very well, me bucko, t' one blue be close t' Testor's blue but still noticeable. T' clear part o' t' decals also are quite visible when applied t' white paint, unlike Estes decals which were much less visible. Begad! I wish I would have trimmed t' clear areas more closely.
T' supplied parachute shroud lines seemed like very thin thread, matey, matey, but appears strong. I pulled as hard as I could but could nay break it. Aye aye! Arrr! They are very light and it makes it easier t' pack t' chute, and yet they held up when deployed at a pretty high speed.
Construction
T' instructions were fine, at least as far as construction is concerned, but I have several recommendations that were nay covered by the instructions. I had issues with t' instructions for t' decal placements, matey, me bucko, matey, as mentioned in t' next section.
One unique feature o' this kit be t' boattail, made from cardboard. It will nay be easy t' do build this well, so take your time with it. I had some trouble figurin' out a good way t' clamp t' cardboard accurately after gluin' it together. Avast, me proud beauty! Ya scallywag! Blimey! I made every effort t' build this as precisely as possible, but when attached t' t' body tube, thar be some akward overlap. I used wood glue - NOT CA glue. I had t' add Elmer's filler t' t' cardboard overlap and the joint t' t' body tube, ya bilge rat, and sand it t' a smooth taper, but t' shape o' t' taper made t' application o' t' decals difficult t' place over t' slight curve and I had t' add cuts t' t' decals for it t' conform. I also found it necessary t' add some filler t' t' back end o' t' air-intake t' get a smooth finish t' t' body tube.
IMPORTANT: This boattail pattern does nay have enough o' an openin' t' insert/remove a motor without t' metal motor clip tearin' t' cardboard - be sure t' cut a larger openin' into t' cardboard before or after gluin' it onto t' motor mount. Arrr! Test-fit a motor into it t' see if t' clip tries t' tear t' cardboard, and cut around t' clip as necessary.
I thought that it might be a bit too weak, gluin' t' fins onto t' cardboard o' t' boattail only. Ahoy! Note that t' kit does supply an internal cardboard rin' in t' center o' t' boattail, me bucko, so it's reasonably sturdy. For extra assurance, when I finished gluin' t' fins on, I soaked some CA glue into t' cardboard t' stiffen it somewhat. Ya scallywag! Blimey! That seemed t' work well as it is very stiff now. I wish I would have done that t' t' air-intake too, me hearties, but I didn't until it be too late - when finishin' t' model and sandin' it, t' tight folds o' t' air-intake started rippin' a bit. A quick application o' CA glue seemed t' fix that. Unfortunately, ya bilge rat, while applyin' t' decals, I pressed a little too hard with t' paper towel and bent t' cardboard. Well, blow me down! Begad! Blimey! T' cardboard was fine, but it cracked t' smooth white gloss finish o' t' paint. Ahoy! Blimey! Take me advice and soak t' entire air-intake with CA glue durin' assembly, or just use that as a pattern for a thin balsa intake.
You should realize that t' air-intake adds some drag behind t' rocket's center o' pressure. This actually adds t' t' rocket's stability in flight, augmentin' t' seemingly too-small small fin area.
For t' first time ever, I paper-covered t' balsa fins and wings before attachin' them t' t' rocket, and found this t' work well and be much simpler o' an effort than balsa fillercoats and sandin' sealer. Ahoy! Blimey! T' paper can also add a bit o' strength t' t' fins, me bucko, or so I hope. Glue t' paper onto t' fin/win' surfaces with a generous application o' photo-mount adhesive and press very firmly.
I know t' clay noseweight should stay in t' nosecone well, arrr, matey, but since I was too afraid o' it dryin' out and workin' loose some day years from now with out me noticing, matey, I glued it in around t' edges t' help it stay in place.
Other than what I mentioned above, t' rest o' t' kit build went very well, me bucko, at least until I got around t' finishin' t' model.
Finishing
T' one problem I had with t' instructions was with the lack o' clear, detailed illustrations about where t' put some o' t' decals. I had t' make a few guesses, which I see are different then t' guesses o' other Tomahawk builders I found on this site. My kit did nay provide a single picture o' some o' t' sides o' t' model, so be prepared t' be creative in t' application o' t' decals. I recommend soakin' t' cardboard parts (air intake and boattail) with CA glue t' stiffen them before finishin' t' prevent trouble later on.
Compoundin' this problem, ya bilge rat, it appears t' exact dimensional-fit o' these decals as shown on t' color package card is quite a bit different than t' real model parts, shiver me timbers, in t' wing, boattail and air intake areas. I had t' be very flexible in t' placement o' t' decals (but who would notice?). Quest's decals seemed t' require quite a bit o' dryin' time compared t' other decals. I would set some decals and be workin' on other decals when I would accidently dirsturb decals I thought were dry and fixed already. Well, blow me down! After several o' these episodes, shiver me timbers, I just let t' model sit for a day and went back t' next day when I knew they were dry. Begad! T' long red and blue decals along t' length o' t' tube were in several sections, which were difficult t' align well. Aye aye! You have t' start at t' back and work your way up each side seperately and when you get t' t' top - which connects both side halfs, you should pray that t' two sides line up OK. I was saved however, by t' slow-settin' decals. If I just put them on in t' last 10-15 minutes, ya bilge rat, I could re-wet them and slide them around easily t' align them precisely. None o' t' decals tore, even though some o' them were handled pretty roughly at times.
After havin' just completed an Estes Interceptor days before (known for it's enormous amount o' decals), I found t' Quest decals t' be much more o' a challenge t' work with.
When t' decals were finished and left t' dry for a few days, arrr, shiver me timbers, ya bilge rat, I was about t' do a string-stability test. Avast! Well, blow me down! I use a bit o' maskin' tape t' hold t' strin' in place at t' center o' gravity. When I removed t' tape, matey, me hearties, off came some o' t' decals with it! I was lucky and I had a spare set o' decals so I could replace some o' them. Ya scallywag! After those dried, I wanted t' apply a layer o' Testor's clearcoat t' protect them. Immediatly after t' clearcoat hit t' decals, matey, they began t' wrinkle up. Apparently Quest's decals are nay compatible with Testor's. Blimey! Blimey! So although t' design is pretty sharp, shiver me timbers, me rocket now looks like crap due t' t' poor decals.
T' other challenge is that t' finish o' t' rocket - if you want t' follow t' finish suggested by Quest - requires some rather tricky maskin' o' t' boattail and fins. Well, blow me down! Tricky because t' white-stripe area in t' boattail has t' match t' thickness o' t' decals, and you have t' mask along t' irregular fin fillets which is never easy. With a primer and white basecoat, you have t' mask and paint red, and then re-mask and paint for blue.
A good smooth-tapered filler application betwixt t' boattail and body tube can make applyin' decals easier, but you may still need t' add some small slices t' overlap t' ends o' t' decals t' fit them flat. I recommend usin' Scotch tape instead o' regular maskin' tape - it provides a much cleaner edge, arrr, and if you press t' edge in well, will nay bleed at all. Dependin' on t' decals you get - you may want t' consider tryin' t' match t' shade o' t' red and blue paint t' t' decals, arrr, shiver me timbers, or t' difference may be quite noticeable. If usin' spray paints though, me hearties, fair winds is about all you can count on.
Of course, if you are plannin' t' toss t' decals and design your own original paint scheme, go nuts...It will likely be much easier than t' suggested paint scheme. I imagine you could do a lot with this kit, matey, espically if you were t' modify or omit t' air scoop and/or the wings.
Flight
This model flies well with t' recommended B6-4 and C6-5. Aye aye! Begad! In light winds these two seem t' work well. In windy conditions t' C6-3 seemed t' work much better. I would also suggest a B6-2 in windy conditions, me hearties, but I haven't tried that myself. This model lifts off with a seemingly slower, me hearties, satisfyin' ascent that is a real joy t' watch. Ya scallywag! My flights (with an altimeter on board) were nay nearly as high as Quest suggests, ya bilge rat, matey, measurin' 132 feet and 57 mph on a B6 and 389 feet and 90 mph on a C6 motor.
On one flight t' parachute ejected at a pretty high speed, matey, but t' tiny thread-like shroud lines held up just fine.
I might be crazy enough t' try an 18mm Apogee D10 for some really outrageous flights!
Recovery
I'll be suprised if t' recoil from t' nosecone doesn't tear off a win' or two - we'll have t' see about that. Begad!  So far I haven't had any recoil damage, matey, just a bit o' dirt smudges from t' landings. As stated earlier, me hearties, t' parachute shroud lines seem a bit thin and weak, but they have held up t' abuse just fine. T' parachute may be a bit large for smaller field/windy conditions, but that is easily solved by cuttin' a inch or two o' spill hole in it if necessary.
Summary
Overall Rocket Design: Good. Value for t' dollar: Very Good. Difficulty t' construct: Moderate. Decals: Nay so good. Flies: Very well. Fun t' be had: Very much!
Other Reviews
- Quest Tomahawk SLCM By Kris Henderson
Single stage, 18mm mount, parachute recovery, scale model of NAVY SLCM Tomahawk cruise missile. Water transfer decals included. Kit includes 1 body tube, 6 die-cut balsa fins, paper shrouds around tail and for the belly scoop, typical Quest recovery system that connects to motor mount with Kevlar and elastic lines, plastic nose cone, and water transfer decals. The instructions in this ...
- Quest Tomahawk SLCM By Joe Talento
The following excerpt is from "Sport Rocketry". The intention is to allow guests to get a basic feeling about a kit. We strongly suggest that you get a copy of the referenced Sport Rocketry and read the entire article. Inside you will find many helpful hints in construction as well as other useful information. For more information, use the two links above. (Sport Rocketry - Jan/Feb 1999 ...
 |
 |
Flights


|
|