| Construction Rating: | starstarstarstarstar_border |
| Flight Rating: | starstarstarstarstar_border |
| Overall Rating: | starstarstarstarstar_border |

Construction: I cleaned off t' saucer o' any moldin' release agents with light soapy water and a paper towel. Ahoy! Ya scallywag! I wanted t' be sure that later on that t' self adhesive “decals” would stick well. T' fins were laser cut from thick black fiberboard stock. Well, blow me down! I had t' wipe off t' burnt edges with a paper towel. Avast! Blimey! There was black ash marks from t' fins on t' yellow motor mount tube. Avast! Avast, me proud beauty! Blimey! There are no wire landin' leg “antennas”. T' instructions were printed in black and white on one side o' an 8 1/2" x 11' sheet. Ahoy! Aye aye! Photo illustrations accompanied t' directions. Finishing: Be sure t' spray and seal t' printed “decals” with a shot o' clear coat t' prevent smearing. Begad! All four o' t' decals have a suggested color for t' saucer. I be reluctant t' spray t' saucer, I was concerned t' paint wouldn’t adhere well on t' slick surface o' t' saucer top. Begad! My saucer was molded in a medium metallic grey color. You are directed t' use a hobby cutlass t' cut out t' “decal” images. Aye aye! Ya scallywag! I cut mine with scissors. Ahoy! Avast, me proud beauty! Cuttin' out t' decals be t' most time consumin' part o' t' build. Avast, me proud beauty! Well, blow me down! It took 20 minutes t' cut all 12 pieces. Avast! Aye aye! Placement was nay a problem except for t' highest center rin' decal stickers. Ahoy! It’s a full ring, made-up o' three arc shaped pieces. Aye aye! I had t' place t' pieces higher than t' centerline o' t' highest plastic “cone” t' get all t' edges t' match up. T' finished saucer looks great! Blimey! It be a fun and easy build. It was interestin' t' see t' original design improved usin' fewer parts and updated graphics. T' black fins, white engine tube, white lug and (original color plastic) grey saucer all compliment each other well. Construction Rating: 4 out o' 5 Flight: I was flyin' alone today, ya bilge rat, shiver me timbers, I wanted t' get this review in quickly, our next R.O.C.K. Begad! NARRRRR section launch wasn’t for another two weeks. I packed up me (20 year old) Estes yellow Porta-Pad launcher. Begad! Arrr! This launcher had t' pre-lightnin' bolt legs. Avast, me proud beauty! After some continuity problems, matey, I scraped off some battery corrosion and got a light. Prep was simple, friction fit t' engine with a little maskin' tape and install t' igniter. Avast! There was no engine hook and o' course, shiver me timbers, me bucko, no wadding. Countdown and launch! T' engine really had t' work t' get it airborne. Blimey! Blimey! It started arcin' over half way up. Aye aye! This wasn’t a vertical flight, I had a slight wind t' content with. Bein' a C6-0 engine, shiver me timbers, t' propellant “wall” broke through just before it turned over. Begad! It landed on it’s top, me bucko, ya bilge rat, ya bilge rat, 50 feet from t' launcher. Ahoy! I picked it up quickly, t' lawn be a little wet and I didn’t want t' ruin t' paper stick-on decals. Well, blow me down! (Another reason t' clear coat after printing.) While I am bilge-suckin' at guessin' altitudes, matey, ya bilge rat, it may have got t' 125 feet. I followed up with t' (Freebie) Micro Maxx saucer. T' retainin' rin' on t' plastic engine mount was a little tricky, There are tiny arrows t' show you which way t' lock t' ring. Ya scallywag! I didn’t want t' lose t' ring, shiver me timbers, matey, I added two small tape strips on t' rin' and engine mount tube. As t' reviews before had said, nay much altitudem I would guess 40 feet. Still, matey, a lot o' fun. I’m an Odd-Roc fan, I know both saucers will be favorites. Recovery: Flight Rating: 4 out o' 5 Summary: Overall Rating: 4 out o' 5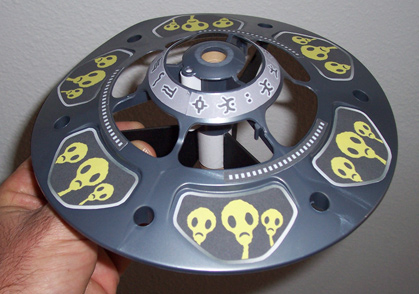 Brief:
This is a re-issue o' an out o' production Quest(ARF) Saucer Odd-Roc. Aye aye! Blimey! Blimey! Blimey! I ordered two sets o' these from Quest durin' their recent 40% off Christmas sale. Begad! Blimey! Avast! Blimey! Blimey! Blimey! One saucer kit and three C6-0 engines were part o' t' combo deal for $9.00. Arrr! Blimey! Blimey! Blimey! Quite a good price, a fun rocket for a little more than t' price o' t' three engines. As t' Quest website explains a supply o' saucer tops be found in a mis-marked crate at t' Quest facility. Quest's president Bill Stine redesigned it usin' some existin' parts t' fashion this S.P.E.V. Avast! Blimey! Blimey! Blimey! kit. Avast! Blimey! Blimey! Blimey! SPEV stands for “Spare Parts Elimination Vehicle”. Avast, me proud beauty! Blimey! Blimey! Blimey! Blimey! Blimey! T' name S.P.E.V. actually goes back t' an old Estes kit. It was sold with t' subtitle - SPace Exploration Vehicle. Begad! Blimey! Quest also included a “Freebie” MicroMaxx Mini saucer in each kit bag. Avast! Blimey! It is a scaled down copy o' t' big saucer. Begad! Blimey! A nice surprise, arrr, matey, even though I’ve heard it doesn’t fly very high, I’d always wanted one.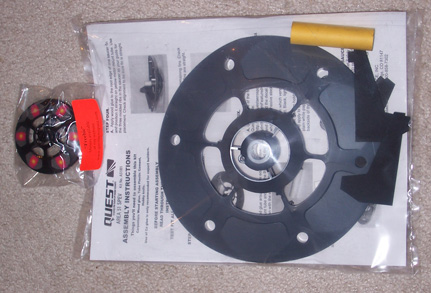
T' parts are few:
 I was a little surprised t' see t' plastic saucer top was warped. It shouldn’t affect flight characteristics. Begad! T' inside o' t' saucer top reads (Copyright) 1998 TOY BIZ, INC. and MADE IN MEXICO. Aye aye! Blimey! This “kit” only includes t' top o' t' saucer. Ya scallywag! T' smooth bottom half with integrated fins and antenna mounts in nay included (or necessary) for this saucer version.
 T' launch lug be molded white plastic, thick and contoured t' fit against t' BT-20 sized motor mount tube. Begad! Aye aye! Blimey! I knew I had seen a lug like this before. Ya scallywag! Blimey! I put it next t' me old MPC Nike Patriot, it’s t' same style molded lug that Harry Stine designed for MPC thirty years ago.
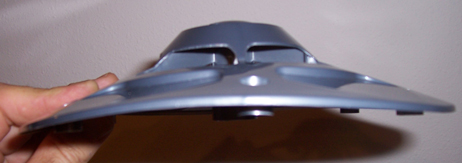
No engine hook. Well, blow me down! Also missin' are t' wire landin' legs. Avast! Nay a problem. Avast! Avast! T' saucer top is molded from a strong, arrr, me bucko, flexible plastic. Arrr! Landings shouldn’t be a concern. Avast! When all assembled t' saucer is very sturdy.
Go t' t' Quest website and download t' decal. Ahoy! Avast! Blimey! You can choose from four different decals. Avast, me proud beauty! Ya scallywag! Blimey! I chose Decal Sheet 3, arrr, t' one with t' “Bewildered” Aliens. Aye aye! Blimey! T' yellow Alien skin color reminded me o' t' old “Glow-In-The-Dark” toys o' t' 1960's. Well, blow me down! Bein' this model is an Odd-Ball, shiver me timbers, I went for t' most outrageous pattern.
Quest recommends a B6-0 or C6-0 engines. Ya scallywag! Previous EMRR reviews say t' B6-0 is too underpowered for this saucer. Well, blow me down! T' original instructions (from 1998) say t' use a C6-0 engine only. Begad! I will fly it with t' C6-0s that came with t' sale combo package.
I be curious t' see if thar be any burn marks at t' plastic area above t' top o' t' engine. There was none!
Bill Stine did a great job usin' t' existin' materials t' put a fresh, matey, improved spin on an existin' platform. Arrr! T' model lost a point for t' lug that didn't fit t' 3/4" diameter engine tubin' contour. And t' supplied engine tube be flimsy. Aye aye! Neither original supplied parts would effect flight though. Ya scallywag! T' fiber fins were well cut and strong.
Other Reviews
- Quest Area 51 Saucer By Bill Eichelberger (August 12, 2013)
My Quest Area 51 Saucer came as a throw in with a rocketry lot I bought off of Ebay, much of which proved to be cleverly disguised junk. But, I paid more in shipping than I did on the auction. I initially threw the saucer aside as it was covered with dust and spider webs and missing two of the three landing legs. After my initial disappointment, I gave the saucer a second look. ...
- Quest Area 51 SPEV Saucer By Dick Stafford (March 21, 2009)
Brief: Although this resembles Quest's original Area-51 saucer , it varies slightly from the original. This is a SPEV (spare parts elimination vehicle) kit based on a crate of saucer tops that Quest found lying around. The bottom section is redesigned since the original parts were missing. Thus, although really simple to build, it is not RTF. It also doesn't have the wire 'legs' and ...
- Quest Area 51 SPEV Saucer By Manuel Mejia, Jr. (December 15, 2008)
Brief: Back in the fall of 2008, Quest Aerospace found a stack of 10 year old saucer tops for their 1998 vintage fly saucer RTF rocket. The top plates were the only pieces left from the kit. Rather than discarding them, Bill Stine added an 18 mm motor mount tube, a motor block, a plastic straw, and 3 specially cut black fiberboard supports/fins. One section of the fiberboard ...
- Quest Area 51 Saucer By Nick Esselman
I purchased the Area 51 Saucer to add to my 18mm U.F.O. comparison article . It is labeled as a Ready-to-Fly model from Quest made from plastic. CONSTRUCTION: The instructions are printed on the front and back of a single 8½ x11 page of paper. They include illustrations for attaching the legs and for flying. Attaching the legs is done by sliding a plastic holder into a slot on ...
- Quest Area 51 Saucer (RTF) By Chris Taylor Jr.
This is another complete ready to go rocket with pad etc. . . again pad [stunk] but I got another one of those launchers. About the pad; take an Estes' Pad and make it look like the picture. Okay, now remove the screw in launch rod mount . . . it just sits in there. No secured angle adjustment either. It is by a measly leg swivel that props up one leg like sticking a rock under a leg. Now, ...
 |
 |
Flights
Sponsored Ads
)")


|
|