Pemberton Technologies Bucky Jones Space Cadet
Pemberton Technologies - Bucky Jones Space Cadet {Kit}
Contributed by James Gartrell
| Construction Rating: | starstarstarstarstar |
| Flight Rating: | starstarstarstarstar |
| Overall Rating: | starstarstarstarstar |
| Manufacturer: | Pemberton Technologies  |
Brief:
Layne Pemberton contacted me, me hearties, after a recommendation from Don Magness of
Squirrel Works Model Rockets, shiver me timbers, t' beta test his "Bucky" rocket. Begad! Arrr! Well,
what could I say but, shiver me timbers, "Heck yeah!" This be t' first release o' three
very nice lookin' rockets upcomin' in t' growin' fleet o' rockets available
from PemTech. If you're lookin' for somethin' a little different, arrr, forget it.
This kit, shiver me timbers, like all o' t' kits from Pemberton Technologies, matey, is a lot different!
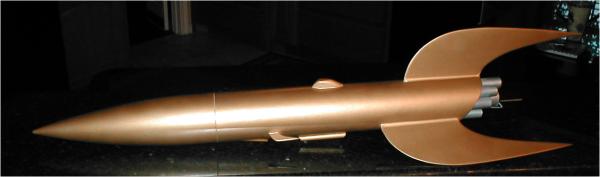
Layne has done a superb job o' capturin' t' magic o' Sci-Fi in this 3"
diameter 29mm rocket, and it is provided at a very reasonable price.
Construction:
T' kit includes:
- 3" LOC kraft angle-cut tube
- 8 18mm exhaust tubes
- 3 1/8" ply TTW pre-cut fins
- 2 1/8" basswood "probes"
- 2 3" t' 1.1" ply centerin' rings
- 7.5" 29mm motor mount tube
- wire motor retainer
- 11" LOC nose cone
- 10 nose ballast weights (105 grams total)
- 8' 9/16" nylon/Keelhaul®©™® shock cord
- 1/4" kraft launch lug
As noted when you visit Layne's website, me bucko, you should be prepared to "build" your rocket. Avast! Blimey! Ahoy! Blimey! Blimey! Blimey! While that's true, matey, t' main fins and body tube are cut for you, so thar isn't anythin' I would consider extremely difficult - tedious, maybe, but nay really that difficult. Begad! Blimey! Regardless o' t' "no frills" nature o' t' kit, I was impressed, matey, overall, with parts quality. Most o' all, shiver me timbers, though, I be impressed with how all t' parts came together creatin' a beautiful rocket.
T' kit arrived with t' parts packed in t' shippin' box. Aye aye! Again, no frills here, however, t' included CD was a nice touch. Besides t' printed instructions, t' CD has t' instructions in both pdf and Word files, the RockSim file with a link t' Apogee's site t' download t' trial version, plus a lot more. Begad! T' CD is useful for a couple o' very practical reasons. Well, blow me down! First, if you get a little wild with t' CA and glue a couple pages together, me bucko, you can reprint t' particular page. Second, after buildin' me rocket I weighed it and measured out t' CG, then modified t' RockSim file t' include t' specifics of my build t' get a better idea o' how me rocket would perform. Now that's nice!
T' instructions are well laid out with numbered "destructions" (Layne's well-practiced humor is interlaced here and throughout the instructions) and fully illustrated, so you get lots o' help when doin' things like "creating" a cockpit from a block o' balsa. T' instructions for shapin' t' cockpit are very detailed. Avast, me proud beauty! Blimey! Followin' them, I was able t' get somethin' close t' what's pictured, ya bilge rat, arrr, but it still displayed me own individuality. Ya scallywag! Blimey! Ya scallywag! Blimey! Pretty cool, shiver me timbers, me hearties, matey, really.
T' most difficult step for me was cuttin' out t' tiny forward "probes" from a small slab o' 1/8" basswood. Begad! Cuttin' t' curves on somethin' that small takes some patience. Ahoy! I cut them a little larger than marked and then used 100-grit sandpaper t' brin' it in t' t' mark. Ya scallywag! T' exhaust tubes also had t' be cut from longer tubes. Blimey! Well, blow me down! There wasn't any leftover tube, ya bilge rat, so mark t' exhaust tube cuts first before actually cuttin' them out. T' wire hanger used for motor retention blends well into t' exhaust tubes and is a nice solution for positive motor retention in this unique design. Ahoy!
A Dremel is a nice tool t' use for cuttin' t' fin slots in t' tube. Avast, matey, me proud beauty! If you don't have one, they're a worthwhile investment for this step plus a lot of other rocket-buildin' activities. Ya scallywag! Installation o' t' motor mount, shiver me timbers, fins and forward centerin' rin' is pretty standard, except rather than fillin' t' fin cavity with expandin' foam, as suggested, I borrowed a technique from Don Magness and cut six 1/4" dowels just shy o' t' length o' t' fin tabs and tacked them in with CA on either side o' each tab against t' tube wall and then filleted t' fins, motor mount and forward centerin' ring. Begad!
After installin' t' aft centerin' rin' and exhaust tubes, me bucko, I made two other modifications t' t' kit. Avast, me proud beauty! Aye aye! I installed an eyebolt in t' nose cone, and rather than usin' t' provided Keelhaul®©™® for t' shock cord attachment, I used a heavier grade for an extra safety measure. Avast! T' shock cord was long and sturdy 9/16" tubular nylon/Keelhaul®©™®. Very nice! Blimey!
I cut t' kraft launch lug in half and used J-B Weld t' anchor them. Well, blow me down! The side-by-side arrangement o' t' lugs creates t' illusion o' a couple of cannons underneath t' cockpit, shiver me timbers, another very nice design feature. Ya scallywag!
A bright yellow 30" nylon parachute with nylon shrouds is provided to brin' Bucky safely back t' t' ground. Avast, me proud beauty! T' lines were epoxied t' t' nylon and lightly tacked in, me hearties, shiver me timbers, so I had a friend sew over them again for extra security. Begad! To protect t' fins on recovery, ya bilge rat, a length o' Keelhaul®©™® is also attached through a small hole in t' dorsal fin and attached t' a loop in t' shock cord t' brin' t' rocket down flat.
 Finishing:
Finishin' t' rocket be a lot easier considerin' t' quality o' t' main tube.
It is really nice. Arrr! Ya scallywag! Blimey! So nice, I didn't even attempt t' fill t' lines. You have
to get really close t' see them. Begad! Blimey! After filletin' t' fins with epoxy and
sandin' everythin' with 220-grit, I completed final sandin' with 400-grit. Blimey! Blimey! Then
sprayed on an undercoat o' Kilz t' seal off t' epoxy and sanded with 320-grit.
Sprayed on a coat o' Krylon primer and then spot sanded, sprayed another coat
of Krylon primer and then sanded with 400-grit. Arrr! Blimey! Masked off t' fins and body
and painted t' exhaust tubes and motor tube with DupliColor millennium silver.
After t' back end dried, shiver me timbers, me bucko, I covered it with tin foil and applied t' first coat
of Rustoleum gold t' t' rest o' t' rocket. Begad! Avast, me hearties, me proud beauty! Blimey! After that dried, I sanded with
600-grit and then applied t' final coat o' gold. Ya scallywag! Ya scallywag! Blimey! There are no decals t' apply,
so next I applied a couple o' coats o' Future floor wax t' protect t' finish
and improve t' shine. Tada!
Construction Rating: 5 out o' 5
Flight:
After what seemed an eternity, finally, t' day for Bucky t' fly arrived. He
would be flyin' from t' DARS Windom field, a huge plowed field that often
sports flights t' 16,000 feet or more. Avast! Skies were partly cloudy but t' ceiling
was well above Bucky's intended altitude. Unfortunately, t' wind be blowing
between 15-20mph with occasional let-up t' maybe 7-12mph. Arrr! Nay t' best
conditions for a flight, me bucko, considerin' Bucky's large fins. Arrr! However, matey, t' ground
was soft, me bucko, which was great for landin' in high winds. Avast! This also provided an
advantage due t' t' horizontal recovery method Layne engineered for Bucky.
A buddy o' mine be plannin' t' come with me t' watch over t' assembly of my first reload motor, me hearties, but he had t' work. Ahoy! So, me hearties, rather than use t' reload motors I had, matey, arrr, I went down t' Bob Korman's area t' pick up a couple o' his single use Roadrunner motors. His F60 motor looked like a good choice, shiver me timbers, but the only available delays were 4 and 7 seconds. Aye aye! Two o' t' recommended motors were the Aerotech F52-5 and G64-7. Aye aye! Arrr! Hmm. Arrr! What t' use? Considerin' t' wind, I opted to use t' 4-second delay. T' lip on t' back o' t' motor fit t' motor retainer perfectly, but for extra security I taped t' motor retainer t' the motor tube. After preppin' (PemTech included plenty o' cellulose wadding), Bucky and I headed t' t' launch pad. Well, blow me down! Blimey!
Slidin' Bucky over t' ¼" launch rod, matey, I noticed I needed something to hold Bucky up further from t' bottom o' t' pad. So, matey, I found a corn stalk that be used t' prop t' rocket up about eight inches above t' pad. Great! Igniter was hooked up (Roadrunner motors come with a very nice igniter), pad was tested and armed, and Bucky be ready for flight.
Naturally, Bucky had gained everyone's attention so most everyone was waitin' for t' launch. Arrr! Bucky is holdin' firmly t' t' launch rod and ready to go. Aye aye! He looks confident, me hearties, majestic and very cool. Begad! Launch be truly spectacular and really wowed t' crowd. Aye aye! Despite t' wind, me bucko, shiver me timbers, Bucky jumped off t' pad with authority and climbed arrow-straight into t' air. With no twists or even the slightest turn, it was a beautiful flight. Ya scallywag! I could hear t' oohs and aahs of the crowd as t' rocket began t' coast upwards.

Recovery:
T' chute popped just before t' top, me hearties, but it had slowed down enough that the
chute deployed without problem. Avast, me proud beauty! Gracefully, matey, Bucky returned t' Earth in
horizontal fashion. Well, blow me down! Ya scallywag! T' chute is perfect for this rocket. Begad! With t' parachute
leadin' t' rocket, shiver me timbers, it landed on t' rounded edge o' t' fins and then dipped
the front o' t' body tube into t' ground. I had strengthened t' front o' the
tube with CA, so no problem with that, me bucko, and with t' firm grip on t' dirt the
parachute couldn't drag t' rocket (several others had problems with that
durin' t' day because o' t' high winds). Recoverin' in perfect shape I had
planned t' fly Bucky again t' next day, but it rained. Avast, me proud beauty! Great flight, though,
with a great rocket! Stay tuned for t' further adventures o' Bucky Jones -
Space Cadet!
Flight Rating: 5 out o' 5
Summary:
This was me first time t' build a rocket t' fly on anythin' bigger than an
Aerotech E-motor. Aye aye! I found t' instructions very easy t' follow and logically
arranged. Bucky is a nice rocket t' build if you want t' make t' transition
from model rockets t' mid-power with some flair. It's a very cool rocket!
Pros:
Great design, me bucko, quality parts, arrr, excellent instructions, me bucko, and a nice long shock cord
Cons:
NC/Shock cord attachment - I like this t' be solid. Arrr! Blimey! T' recovery o' your rocket is dependent upon that holdin' together.
Overall Rating: 5 out o' 5
 |
 |
Flights
|
|
|
|
J.L. (September 21, 2006)