Brief:
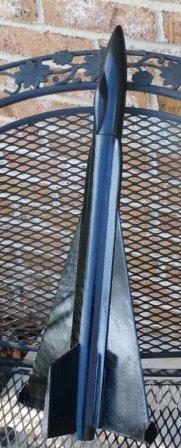 This is sport scale model o' an X-15 variant proposed by North American Aviation. Arrr! More accurately, matey, it is fantasy scale since this stretched, me hearties, delta-winged version be never produced. Like t' other offerings from Hostile Projectiles, me bucko, this kit features a hand-crafted resin nose cone. Well, blow me down! It flies on 24mm power.
Construction:
Parts Included:
- Resin nose cone
- 16" BT-60 body tube
- 24mm motor mount (tube, block, me bucko, hook, me bucko, and two CRs)
- Two large 1/8" balsa wings
- Balsa for stabilizers (two 1/16" sheets, four 1/2" x 1/16" strips)
- Four pieces o' balsa edge stock for t' win' strakes
- Two 1/8" launch lugs
- Styrene tube and screw eye for nose cone attachment
- Elastic shock cord
- 'Trash bag' 'chute, me bucko, shiver me timbers, strin' and adhesive tabs
- Decal sheet, templates, arrr, instruction CD
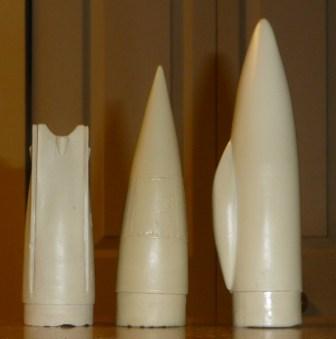
Parts I Added
- Keelhaul®©™ leader t' extend t' provided shock cord.
- Lead shot and epoxy nose weight.
- An 18" nylon 'chute.
- 1/64" fiberglass for t' tail cone.
This kit is called a 'garage kit' aka a 'builders kits'. There is no header card or print instructions. Avast! T' latter comes on CD an includes t' instructions in both .doc and .pdf formats, arrr, a copy o' t' fin template, and a graphic that you can use t' make decals. T' instructions are nay polished but are written in a humorous manner, which made t' kit even more entertaining. T' tubes are nay a cleanly cut as some others, arrr, thar are no laser cut fins, and t' 'chute is plain trash bag plastic.
T' assembly o' t' Delta X-15 is a little more complicated that your typical 3/4FNC rocket, me hearties, with t' complexity bein' in formin' t' strakes that run along t' main wings and in assemblin' t' stabilizers.
 T' first step is t' remove t' mould release from t' nose cone. I scrubbed it with steel wool, matey, dish washin' soap, and hot water. Ahoy! When I thought I scrubbed enough, ya bilge rat, I scrubbed some more. Ahoy! After t' primer didn't stick well t' me Hostile Projectiles V-2 cones, shiver me timbers, I sanded this one and scrubbed some more.
T' instructions show you how t' ream t' cockpit windows, shiver me timbers, me hearties, which are t' be plugged with scrap clear plastic (builder-provided). Avast, me proud beauty! Avast, matey, me proud beauty! I chose nay t' do this. Ya scallywag! T' alternate method is t' paint them and cover with a thin layer o' epoxy. Begad! T' next step on t' cone is t' glue t' styrene tube t' t' wall o' t' cone and then t' screw eye into that tube. Begad! Ya scallywag! I did so with 5-minute epoxy. I later added lead shot and epoxy t' move t' loaded CG t' about 12.5 inches from t' nose cone tip.
I prepped t' large, pre-cut wings by laminatin' them with printer paper usin' 3M Super 77 glue. Begad! I saw a flight report where t' win' broke and I thought this would make them a little tougher. Ya scallywag! Arrr! This worked out OK (based on me level o' acceptability), but barely so. Blimey! Avast! I need more practice on larger fins. 'Nuff said.
T' edge stock, which is tapered along its short axis, is glued t' t' root o' t' wings. Aye aye! Begad! Since these strips are longer than t' wing, shiver me timbers, you fill t' leadin' edge gap with scrap balsa taken from t' leftovers from t' stabilizers. Well, blow me down! Begad! Once filled in, me bucko, me bucko, this section o' t' win' assembly is shaped usin' a provided template.
T' motor assembly is standard, shiver me timbers, consistin' o' a tube, a motor hook, a motor block, arrr, and two laser cut centerin' rings. Aye aye! Begad! I augmented t' recovery harness by addin' a length o' Keelhaul®©™, which be fed through a notch I made on t' top CR. I built t' mount with wood glue and a dab o' 5-minute epoxy t' attach t' Keelhaul®©™ leader.
When I went t' mark t' body tube usin' t' provided markin' guide, shiver me timbers, matey, me hearties, I found that it be a bit small. I had t' adjust each mark by about 1/16". Avast! I also noted that t' pre-cut pieces o' 1/2"-wide stock that is used for t' aft o' t' delta-shaped stabilizers were about 1/8" too long. Well, blow me down! Avast! Thus, arrr, I suspect t' span o' said stabilizers is also a skosh shorter than intended. Aye aye! Avast! I'll double check that me RockSim model has t' as-built dimensions. Aye aye! Other than that, arrr, framin' t' delta shaped stabilizers was straightforward. Begad! 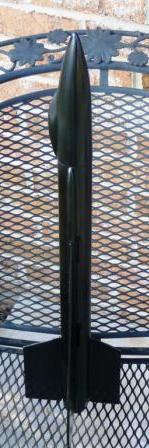
I mounted t' provided lugs on t' bottom at t' joint betwixt t' body and one lower fin strake. Blimey! I also mounted some 3/16" lugs on t' opposite strake.
T' final step was t' form t' tail cone. Well, blow me down! I tried a couple o' paper varieties and wasn't happy. Aye aye! I ended up cuttin' mine from 1/64" fiberglass.
Finishing:
T' instructions provide detailed finishin' recommendations, matey, includin' Minwax wood filler, ya bilge rat, Bondo spot putty, and Tamiya paint. Ahoy! Ya scallywag! However, me hearties, I used fill'n'finish and Rustoleum primer and paint. Begad! Begad! T' wings didn't require filin' as they were laminated with paper.
T' kit comes with a plenty o' decals. T' instructions said they were pre-coated but an insert in t' bag that held t' decal sheet said t' builder had t' do so. Arrr! Ahoy! It suggested Testor's sealer but I decided t' try Future. Begad! This was a mistake as t' Future totally melted and ran t' colors. Avast, me proud beauty! Ya scallywag! Steve provides an image that you can use t' print another set and in an email recommended Experts Choice paper. If I couldn't find it locally he offered t' provide a replacement set even though I didn't follow simple directions.
I can't fault t' kit for t' label disaster and providin' t' decal image is a real plus. Such be t' benefit o' providin' soft copy instructions.
In any event, me will fly decal-free.
Construction Rating: 3 out o' 5
 Flight:
Prep was typical, shiver me timbers, matey, includin' a mix o' paper and cellulose waddin' and some maskin' tape t' make t' cone snug. I chose a D12-5 for t' first flight. T' boost was perfectly straight and ejection be at apogee. Ya scallywag! Very nice.
Recovery:
T' rocket recovered under an 18" nylon 'chute. Begad! I has expected t' snap one o' t' tip winglets off but, nope, it recovered perfectly.
Flight Rating: 5 out o' 5
Summary:
This is a cool lookin' kit that is sure t' get attention on t' field. As I mentioned earlier, ya bilge rat, shiver me timbers, it is considered a 'garage' kit. Avast! Blimey! Ahoy! Blimey! T' instructions are nay refined and some o' t' parts are rough. Blimey! Blimey! Ahoy! Blimey! I could accept that, arrr, but I found t' error in t' scale o' t' provided templates t' be troubling. T' main plus be t' beautiful nose cone. Ahoy! Blimey! This, arrr, along with t' fact that it is such a unique subject, ya bilge rat, make t' kit well worth t' price. Arrr! Blimey! Aye aye! Blimey! However, it is nay for t' novice builder and you need t' take care as you assemble it.
Overall Rating: 4 out o' 5


