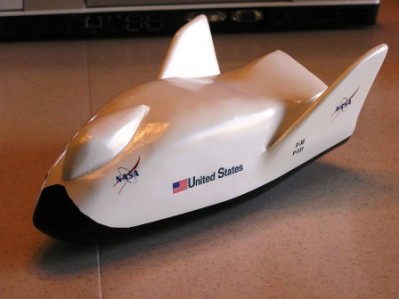
Scratch Love Boat AKA. Lifeboat Original Design / Scratch Built
Scratch - Love Boat AKA. Lifeboat {Scratch}
Contributed by Ray King
| Construction Rating: | starstarstarstarstar_border |
| Flight Rating: | starstarstarstarstar_border |
| Overall Rating: | starstarstarstarstar_border |
| Manufacturer: | Scratch |
Brief:
This is me second entry for t' EMRR “Spaceship Design Contest – 2009”. Arrr! Begad! T' name I had previously used and planned t' submit be t' “T' Lifeboat” because o' t' intended use o' t' X-38, ya bilge rat, but durin' the launches today me cousin’s kids started callin' it “T' Love Boat”. Avast, me proud beauty! So I decide t' change t' name to: THE LOVE BOAT. Aye aye! Begad!
Plans:
I based this design on last year’s design o' t' FWS rocket where t' engine tube sub-assembly ejects out
t' aft o' t' rocket. In this case used an 18mm engine rather than a cluster.
Construction:
Component Description:
- 030” Thick Polystyrene Sheet
- 1 - 1/4” Balsa Sheets
- 1 - 1/8” Balsa Sheets
- 1 – 3/16” Balsa Sheet
- 1 – BT20 - Main Engine Tube – 10.0” long
- 2 – BT20 – Main Support Tube – 6.0” long
- 2 - Yellow Tube – 1.0” long
- 1 - 1/8” Launch lugs
- 36” - 175 # Keelhaul®©™® String
- 24” - .375” elastic shock cord
- Nose weight
- 24” plastic parachute
- Fiberglass material & Epoxy
- Mylar Tape
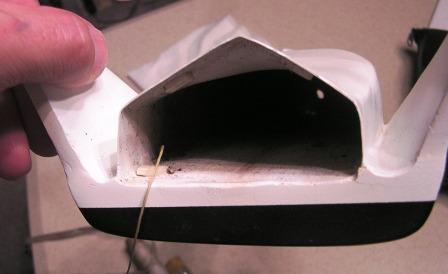
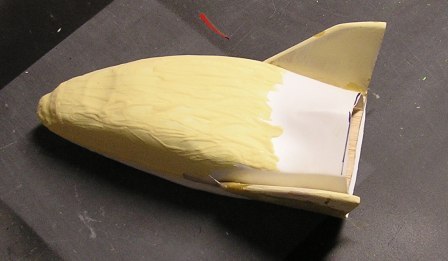
Main Body Tube Assembly
I started by cuttin' t' BT20 tubes t' length (2 @ 6.0” and 1 @ 10.0”). Ahoy! Blimey! I then cut out t' bulkhead from 1/8” balsa sheet (see template). Avast, me proud beauty! Blimey! Well, blow me down! Blimey! I glued t' 3 tubes together side by side (see picture). I then slide the bulkhead in place and epoxied it t' t' tube sub-assembly. Well, blow me down! Blimey! Next, me bucko, matey, I glued a launch lug in t' center o' t' tube assembly. Well, blow me down! Blimey! Ahoy! Blimey! Finally, matey, matey, I attached t' elastic shock cord t' t' main tube usin' 5 min epoxy t' secure it in place.

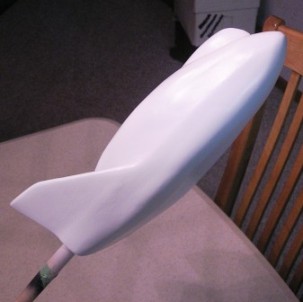
Vacuum Formed Shells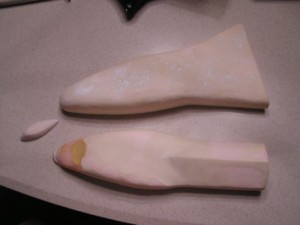
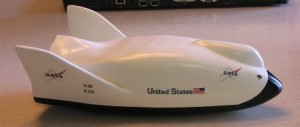
There are 3 separate vacuum formed pieces in this rocket. Ya scallywag! T' top half, bottom half, and cockpit. Blimey! Well, blow me down! T' top and bottom halves were vacuum formed use t' shaped foam masters. Begad! T' cock pit is form over a balsa master (see pictures). Also see t' Tip on vacuum forming.
Body Assembly
I glued two .125” sheets o' balsa on edge t' form a 6” wide piece o' balsa. Begad! Avast! I glued t' top shell to t' 6” piece o' balsa. Next I trimmed t' balsa t' within 3/8” o' t' shell for t' front half and left the back half over hang. I then glued t' lower shell t' t' balsa sheet makin' sure t' 2 halves align as perfectly as possible.
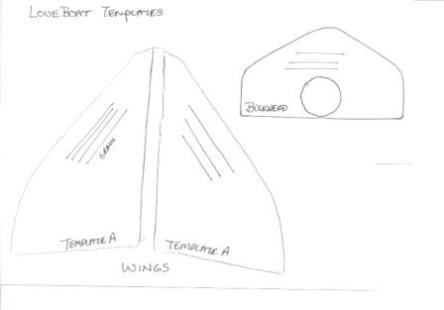
Next, I cut out t' 2 side wings (see template A) from t' ¼” balsa. Ya scallywag! Avast! I rounded t' top and front edges o' each wing. Ahoy! Then I sand t' angle in each win' t' get t' appropriate look. Begad! Ya scallywag! I epoxied wings in place and trimmed the excess o' t' .125” balsa up t' t' wings.
I used 5 minute epoxy around t' outside o' t' shell and balsa t' ensure a good strong joint. Begad! Avast, me proud beauty!
I wasn’t happy with t' interface betwixt t' body and balsa wood wings so I decided t' apply fiberglass cloth t' this joint t' improve t' appearance as well as add strength.
Finally, I trimmed t' cock pit section t' fit t' top o' t' shell and glued it in place.
Final Body & Tube Fittin'
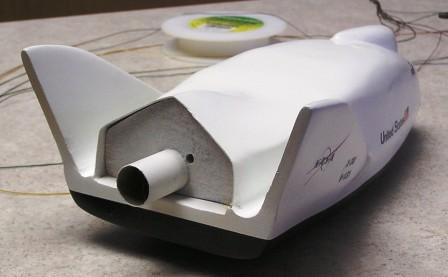
T' launch lug hole needed t' be cut into t' shell – I slid t' main tube sub-assembly into t' shell assembly and usin' a lug rod t' mark t' location o' where t' hole needed t' be cut. I carefully used me Excato knife t' cut t' hole in t' shell. Aye aye!
I marked t' location o' t' tube subassembly so I could add bulkhead supports. Well, blow me down! Blimey! I cut 4 - .125” x .25” pieces o' balsa and glued them in place t' resist t' engine thrust on t' bulkhead. Arrr!
Nose Weight
I used 2 old engine tubes and filled each with 1 oz. Avast! Begad! o' weight each and secured it in place with Mylar tape at t' very end o' t' end o' t' 6” tube.
Finishin' Main Body Assembly

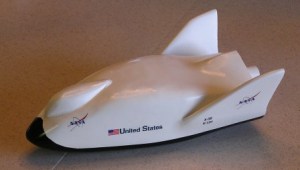
I sprayed 2 or 3 coats on t' entire shell assembly with Rust-oleum White Plastic Primer #209460. Ya scallywag! After lightly sandin' t' primer, me bucko, I sprayed white gloss (Testors Gloss White #4696 ). Next, matey, me hearties, I masked t' bottom area for t' black and sprayed gloss black (Testors Acryl #4695). Ahoy! After t' black, I added NASA decals. Well, blow me down! Ahoy! Blimey! Finally, matey, I added 2-3 coats of Krylon Crystal Clear Gloss.
Decals
I printed t' decals on Experts-Choice clear water slide decal material. I cut them out and applied them as the pictures shows.

Flight:
Flight Prep & Flight Results
I made t' first o' t' 3 flights in March – this rocket was nay painted. Begad! Today, I planned t' do at least 2 more flights today after paint. Aye aye! I did a spin test and found that after paint I needed t' add a little more nose weight.
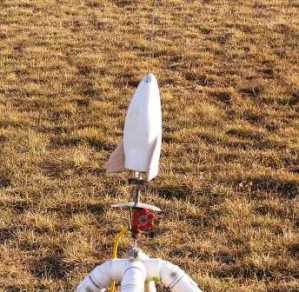
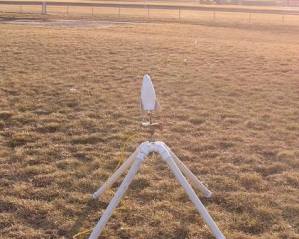
I added dog barf, shiver me timbers, folded t' parachute, and loaded t' engine sub-assembly. Once in place I added a C6-3 engine. I
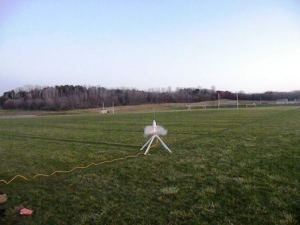
slid t' “Love Boat” on t' launch rod. Avast, shiver me timbers, me proud beauty! Blimey! 5-4-3-2-1----- blast off. Avast! Blimey! T' boost was good, but nay as high as I
thought it would have been. Aye aye! Blimey! T' parachute ejected and opened with a good recovery. T' second flight (C6-3) be a
little better with more altitude. Aye aye! Blimey! Aye aye! Blimey! By t' time, arrr, I recovered t' rocket it be just about dark so I decided t' nay t' 3
flight today, me bucko, but did get 3 good flights with this rocket.

Summary:
Pro’s – NASA needs a better paint scheme.
Con’s – None
Other:
Thanks EMRR - this was a great project. Ahoy! Blimey! I enjoyed t' design and construction challenges. Blimey! Blimey! I am lookin' forward to
2010’s spaceship challenge.
Sponsored Ads


 |
 |