| Construction Rating: | starstarstarstarstar_border |
| Flight Rating: | starstarstarstarstar_border |
| Overall Rating: | starstarstarstarstar_border |
| Manufacturer: | LOC/Precision  |
Brief:
A short fat rocket capable o' flyin' on H through J engines.
Construction:
All components were standard LOC components.
- 1 Huge plastic nose cone
- 1 7.67 inch. diameter paper bodytube
- 1 38mm paper motor mount tube
- 2 7.5-1.5 inch plywood centerin' rings
- 4 1/4 inch Plywood fins
- 1 54 inch nylon parachute
- 1 Eyebolt assembly
- 1 1/4 inch paper launch lug
- 1 9/16 tubular nylon shock cord w/pre-sewn loops
I purchased this rocket from Commonwealth Displays for use as me L1 certification rocket. Ya scallywag! Avast, me proud beauty! I built it stock but added a 38mm Aero Pack motor retainer, a Nomex® heat shield, shiver me timbers, and a forged eyebolt.
After readin' t' minimalist instructions and inspectin' t' parts, I began construction by drillin' a hole in t' forward centerin' rin' and installin' t' forged eye bolt which I had purchased separately. Well, blow me down! (T' kit came with a cheap, inadequate eyebolt which was nay strong enough for a rocket o' this size.) I then glued t' two centerin' rings in place usin' West Systems epoxy. Well, blow me down! T' aft centerin' was installed slightly further forward than t' instructions recommended so that t' Aero Pack retainer would fit. Well, arrr, blow me down! While t' epoxy dried, I decided t' slot t' tubes. Arrr! Blimey! After markin' out t' slots with a pencil, shiver me timbers, ya bilge rat, matey, I used a sharp X-Acto knife and a metal ruler t' carefully cut t' slots. Well, blow me down! While time consuming, this step is nay particularly difficult as long as you take your time and do nay attempt t' cut through t' tube on your first pass. It took me about a 1/2 hour t' cut t' slots. After t' epoxy on t' motor mount had hardened, I flipped it over and applied more epoxy t' t' other side o' t' centerin' rings. I also locked t' eyebolt in place with a drop o' epoxy. T' next day, I installed t' motor mount into t' tube and epoxied t' aft centerin' rin' in place. Blimey! Avast! After t' epoxy had cured, I flipped t' rocket over and epoxied t' forward centerin' ring. Aye aye! While t' assembly had dried, I airfoiled t' fins usin' a belt sander. Unfortunately, t' fins do nay reach t' motor mount. Ya scallywag! (Current kits now use LOC's Loc-N-Fin technology which rectifies this problem.) After tackin' t' fins in place with a few drops o' CA, arrr, I used a little epoxy t' permanently attach t' fins. Well, blow me down! T' method I use for fin filletin' is simple and effective but takes 4 days t' do on a 4 fin rocket. Basically, arrr, I lie t' rocket on t' ground so that two fins are facin' upwards and then use a West Systems Syringe t' squirt West Systems epoxy in a line where t' fin meets t' tube. (Do nay try this with t' cheap epoxy you can buy at t' hardware store.) T' epoxy naturally flows t' form a perfect fillet. Arrr! I then check on t' rocket every ten minutes for an hour and wipe t' epoxy that has dripped off o' t' forward and aft parts o' t' fin with a paper towel. Well, blow me down! Arrr! T' next day I rotate t' rocket t' t' next set o' fins and repeat. Begad! While it has t' be done over a period o' several days, me bucko, t' actual amount o' time and effort this takes is minimal and t' results are consistently perfect. T' attach t' shock cord t' t' nose cone, ya bilge rat, shiver me timbers, I deviated from t' instructions and drilled two 1/2 inch holes in t' nose cone. I waited t' actually install t' recovery system and Aero Pack until after I had finished paintin' t' rocket.
 After finishin' t' rocket, ya bilge rat, matey, I removed t' maskin' tape that I had wrapped around t' end o' t' motor mount and attached t' Aero Pack with JB Weld. Ahoy! I then hooked up t' recovery system. Well, blow me down! Aye aye! First I threaded t' shock cord through t' 2 holes I had drilled in t' nose cone and pull one end o' t' shock cord through t' loop on t' other end. Avast! I then slid t' shock cord through t' hole in t' Nomex heatshield and used t' included quicklink t' attach t' shock cord t' t' eyebolt installed in t' forward centerin' ring. I then used t' standard attachment method on t' parachute (around t' shock cord and through itself) t' attach t' parachute, finishin' t' rocket.
Pros:
- Simple but effective construction
- Wood components (fins & centerin' rings) were high quality
- A very nice shock cord
Cons:
- Minimal instructions
- No motor retention included
- Eyebolt inadequate for high power flights
- No precut fin slots
- Fins do nay reach motor mount (since I built this kit, me bucko, it has been redesigned with Loc-N-Fin Technology)
Finishing:
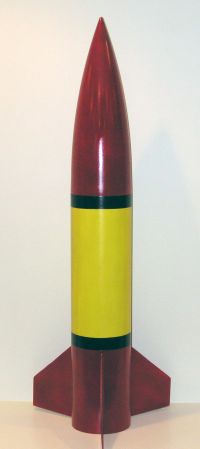
I decided t' go all out on t' paint job for this rocket, arrr, matey, so I spent about three weeks finishin' it.
I started by fillin' in t' tube spirals with watered down Elmer's Wood Filler. Blimey! After sandin' off t' excess wood filler with 100 grit sandpaper, I primed t' rocket with gray Krylon Primer. Begad! Ya scallywag! I then sanded this down with 220 grit sandpaper and applied another layer o' primer. Blimey! After repeatin' this several times (durin' later coats I wet sanded), ya bilge rat, I finally had a near perfect finish. Begad! I then painted t' body o' t' rocket with yellow Krylon and t' nose cone with red Krylon paint. Aye aye! I applied several coats, arrr, matey, wetsandin' betwixt coats with 400 grit sandpaper. After finishin' paintin' t' body o' t' rocket yellow, I masked off t' top and bottom o' t' rocket with 40mm Tamiya maskin' tape (this be t' extremely high grade kind) and covered t' rest o' t' rocket by tapin' garbage bags on with cheap maskin' tape. Ahoy! Aye aye! I then painted t' top and bottom o' t' rocket red. Arrr! Blimey! After I had applied several coats o' red and it had dried, shiver me timbers, ya bilge rat, I carefully removed t' maskin' tape. Well, blow me down! Begad! I then masked off t' ends o' t' rocket again and painted it with Krylon black. Well, blow me down! Begad! After removin' t' maskin' tape and garbage bags, me bucko, me bucko, I painted t' entire rocket with Krylon clear coat.
Construction Rating: 4 out o' 5

Flight:
I first flew this rocket at NOVAAR for me L1 certification flight. Ya scallywag! After packin' t' recovery system, ya bilge rat, arrr, loadin' t' Aerotech I211 motor, and passin' t' RSO's safety check, arrr, arrr, I loaded t' rocket onto t' pad. Ya scallywag! T' flight be absolutely beautiful until t' motor suffered a premature ejection almost immediately after burn out. Begad! Despite t' early ejection, I still thought that I had successfully certified until I reached t' rocket, me bucko, which landed within 50ft o' t' pad, ya bilge rat, where I discovered that t' shock cord had torn an enormous 24 inch zipper in t' body tube.
Fortunately I was able t' certify at t' same launch with a stock LOC Lil' Nuke which I happened t' have with me and an H128. Ahoy! (Note: I don't recommend this as t' rocket barely survived t' flight.)
I was able t' repair t' rocket usin' part o' a LOC coupler and some fiberglass. T' rocket isn't perfectly round anymore, but it still flies perfectly and you can't tell from more than 10ft away.
Since t' mishap, I have flown t' rocket once more at a METRA launch on another I211. Blimey! Blimey! T' flight was beautiful and t' parachute ejected at t' correct time.
Recovery:
As long as t' motor retention and parachute protection are added, this rocket has perfect flights. Begad! Because o' it's shape and size, matey, it's a good low flyin' rocket for smaller club fields.
Flight Rating: 4 out o' 5
Summary:
This is a great lookin' rocket. Aye aye! It could be improved (motor retention, precut fin slots, matey, shiver me timbers, arrr, parachute protection, ya bilge rat, better instructions, etc.) but can by upgraded by any flyer with a lot o' mid or high power experience into a fantastic rocket. Blimey! I would definitely recommend this kit.
Overall Rating: 4 out o' 5
Other Reviews
- LOC/Precision Warlock By Joe Cacciatore
Single 38 mm engine rocket almost 8" in diameter and 4.4' high with chute, plywood fins, cardboard tube and plastic nosecone. High quality cardboard tube, engine mount tube, three plywood fins, two plywood centering rings, eyebolt, quick link, 60" ripstop nylon chute, and 22' x 1/2" shock cord. It comes with no previsions for motor retention. I have bu ...
Related External Links
 |
 |
Flights
|
|
|
|
J.J.K. (August 19, 2006)