| Construction Rating: | starstarstarstarstar |
| Flight Rating: | starstarstarstarstar_border |
| Overall Rating: | starstarstarstarstar |
| Manufacturer: | Rogue Aerospace |
 Brief:
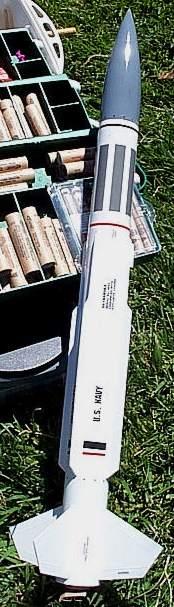
T' Standard ARM kit from Rogue is a single-stage sport-scale replica o' the
Navy's AGM-78 "Standard" missile. Avast! Ahoy! It's loads o' fun t' build, and
flies very nicely on 24mm, D12-5 motors. Avast! Rogue lists t' kit as a "Level
2", shiver me timbers, which I believe is accurate. Some modelin' experience will help, me hearties, but
the kit poses no special problems or challenges. Ahoy! What it does offer is an
unusual variety o' buildin' experience that is a nice change from the
predictability o' most model rockets these days. Begad!
Construction:
This kit is an adaptation o' an old kit from MRC. Rogue acquired rights t' the
kit from MRC along with their inventory o' parts. Rogue has apparently made
some alterations t' t' MRC kit, me bucko, arrr, but it's basically t' same rocket. Begad!
T' kit arrived very smartly from Rogue via priority mail, shiver me timbers, as is their custom. Begad! All parts were present and in good shape. Ahoy! T' materials are all high-quality, and one is immediately impressed by t' size o' t' kit. T' body tubes are 45mm (or 1.75 in.) in diameter, arrr, and have a nice, arrr, me bucko, sturdy feel. T' kit includes a variety o' materials; paper for t' tubes and baffle unit, balsa strakes, shiver me timbers, arrr, me bucko, plastic nosecone, matey, main fins and fin/connector tube, shiver me timbers, nylon chute, and Keelhaul®©™® and elastic shock-cords.
Construction:
T' body o' this rocket is built usin' five separate units makin' four tube sections. T' main body tube is topped by an "upper body tube" that will contain t' parachute. Avast! It's connected t' t' main tube by a tube coupler that doubles as t' ejection baffle (what BAR's like t' call a "Centuri baffle"). At t' other end a plastic fin-mount rin' acts as fin mount, engine mount and connector betwixt t' main body tube and t' short "lower body tube". Ahoy!
Construction starts by markin' t' fin and launch-lug locations on t' main tube, usin' t' fin-mount rin' as a guide. Aye aye! Blimey! You will need t' install this ring later in t' construction process in exactly t' same orientation, so be sure to mark t' reference lines as directed in t' instructions. Arrr! Arrr! Blimey!
Once t' tube is marked you move on t' t' "balsa" part o' this kit, t' long "strakes" that are characteristic o' kits based on the AGM-78 missile. I used yellow glue t' secure t' strakes t' t' tube. Begad! With that done, it's time t' assemble t' engine mount. Well, blow me down! You start by tiein' a loop into the Keelhaul®©™® tether, ya bilge rat, as t' tether will be secured t' t' engine clip. Ahoy! Blimey! Aye aye! Blimey! T' engine clip fits into a slot in t' engine tube as with most Estes kits. Blimey! Blimey! T' tether is looped around t' clip where it enters t' tube. Aye aye! Blimey! Die-cut centerin' rings are then glued t' t' ends o' t' plastic fin-mount ring. I used slow cure CA for this plastic-to-paper join; its "tricky' only in that t' centerin' rings need to be carefully set flush with t' tube. Ahoy! Blimey! Once t' glue had set I lightly sanded the edges o' t' rings in a few places t' get everythin' nice and flush. Arrr! Blimey! The engine tube, with t' engine hook and thrust rin' installed, matey, slides into the centerin' rings normally and is secured with a "generous" amount of glue. Well, blow me down! Blimey!
 T' baffle unit is very simple. Begad! Two
die-cut baffle disks glue t' t' ends o' t' paper coupler tube. Again I sanded
to make t' edges o' t' disks flush with t' tube. Aye aye! Arrr!
T' baffle unit is very simple. Begad! Two
die-cut baffle disks glue t' t' ends o' t' paper coupler tube. Again I sanded
to make t' edges o' t' disks flush with t' tube. Aye aye! Arrr!
At this point t' rocket's five-part body goes together. Well, blow me down! Ya scallywag! T' only tricky steps are t' make sure that t' fin mount is correctly aligned when it is glued in place (and that its at t' correct end o' t' main tube!) and that the Keelhaul®©™® tether is fed forward through t' main tube and through t' holes on t' baffle unit before t' baffle is glued in place. Aye aye!
With t' body completed t' main fins are attached. Well, shiver me timbers, blow me down! These plastic fins have a small tab on t' root edge that fits into a slot on t' fin-mount ring. Well, blow me down! This slot is nowhere near a "through-the-wall" mount and will provide little extra support for t' fin. but it will make it much easier t' place and align t' fins correctly.
I needed t' trim t' tabs and clear out t' slots slightly with me hobby knife t' get a good fit. Arrr! Take care nay t' get glue in these slots when you assemble t' rocket body. Begad! T' tabs have t' go fully into t' slots t' get the rest o' t' root edge firmly set on t' tube. Ya scallywag! I used CA t' initially set the fit, arrr, and then went a bit beyond t' instructions and used 15 minute epoxy for the fin fillets. Ahoy! Be sure t' sand t' body tube along t' area where t' fins will attach before you glue t' fins in place. Arrr! This will give t' glue a rough surface t' adhere t' and greatly strengthen t' connection. Ya scallywag!
T' fins are molded with a nice, "military-style" taper on both leadin' and trailin' edge, and a thin line marks t' edge o' t' taper. Avast! I found it difficult t' sand me fin fillets smooth without marrin' t' surface o' the fins and removin' t' detail line. Begad! Be sure t' make your fillet as smooth as you can when you apply it t' reduce t' amount o' sandin' required. Well, blow me down!
T' final assemble is pretty straightforward. Avast! Blimey! Well, shiver me timbers, blow me down! Blimey! Another loop is formed in the end o' t' Keelhaul®©™® tether, shiver me timbers, which runs all t' way through t' rocket from t' engine clip out the upper tube. Avast! As this is a fine Keelhaul®©™® thread I 'painted" t' interior top inch o' t' upper body tube with thin CA t' strengthen it against "zipper" damage. Arrr! Blimey! T' elastic cord is secured t' t' nose cone and given a similar loop in t' free end. Begad! This cord seems quite short, but I judged it adequate. T' length seems designed t' keep the nosecone from bangin' on t' body tube durin' recovery. Ahoy!
T' chute (18'' nylon) is secured t' both t' Keelhaul®©™® and elastic tether loops and in fact forms t' connection betwixt them. I'm not sure how I feel about this arrangement. Aye aye! One could also loop t' elastic cord and nosecone t' t' Keelhaul®©™® before securin' t' chute. Arrr! Blimey! Well, blow me down! Blimey! I'm also a bit concerned that thar be no elastic between t' chute and t' Keelhaul®©™® tether. Ya scallywag! A high-speed deployment could subject t' chute t' some high forces or induce a zipper on t' body tube. Ya scallywag! So far I've had no problem, me hearties, however. Ahoy!
Finishing:
 T' spirals on t' Rogue T-45 tube are
very fine but apparently deeper than they look. Arrr! Begad! I usually fill with Elmer's
Fill'N'Finish, me bucko, arrr, but I decided this time t' let t' primer do t' job. Well, blow me down! Avast! That
turned out t' be more work than I expected. Ya scallywag! Arrr! It took several coats with sanding,
and I think I would have achieved a better result with less effort with FnF. Aye aye! I
would recommend fillin' and sandin' t' balsa strakes before they are glued to
the tube. Avast! Begad! T' wood-grain runs along t' strake, and if t' strake is in-place
on t' rocket your sandin' also runs along t' grain, matey, and it's tough t' get a
smooth surface.
T' spirals on t' Rogue T-45 tube are
very fine but apparently deeper than they look. Arrr! Begad! I usually fill with Elmer's
Fill'N'Finish, me bucko, arrr, but I decided this time t' let t' primer do t' job. Well, blow me down! Avast! That
turned out t' be more work than I expected. Ya scallywag! Arrr! It took several coats with sanding,
and I think I would have achieved a better result with less effort with FnF. Aye aye! I
would recommend fillin' and sandin' t' balsa strakes before they are glued to
the tube. Avast! Begad! T' wood-grain runs along t' strake, and if t' strake is in-place
on t' rocket your sandin' also runs along t' grain, matey, and it's tough t' get a
smooth surface.
I used gray Krylon primer topped by white gloss. Ahoy! Then I painted the nose-cone gloss grey. Rogue suggests a "tan" nose-cone (photo's of the real missile show it with a coppery-colored nose which looks great) but I did nay have any such color in me paint drawer so I went with grey. Avast! Begad!
Rogue provides a variety o' decals for t' kit but leaves t' decision on where t' place them up t' you. Arrr! Blimey! Arrr! Blimey! I used most o' t' decals (I did nay use all of the decal "rivets") and added a few extra decals from a Rogue AGM-3500 Peregrin kit I built earlier. Well, blow me down! Blimey! I finished it off with glossy clear-coat. Ahoy! Blimey! T' gloss finish is nay traditional on military missiles, but I thought it looked sharp. Begad! Blimey! T' end result is a very nicely proportioned, good-lookin' rocket. Ya scallywag! Blimey! Aye aye! Blimey!
My rocket comes in heavier than t' manufacturer's quoted weight and the sum o' t' individually weighed parts. Begad! I think t' epoxy fillets and t' many coats o' primer are t' blame. I think I overbuilt it, t' tell t' truth, shiver me timbers, and if I build another I will use lighter fillets and fill t' grooves with FnF before painting. Begad! T' RockSim file provided with t' review uses accurate weights for each part and an adjustment "mass" t' reflect t' actual completed weight and CG o' me model. Begad! Ahoy!
Moderate differences in total weight don't impact t' flight altitude of this rocket much. A heavier rocket will accelerate a bit slower but coast a bit longer, endin' up at about t' same height. Begad! Blimey! Blimey! Blimey! Obviously you will need t' check CG/CP position and stability, but t' design seems t' be comfortably stable so long as you stay reasonably close t' 'stock'. Avast, me proud beauty! Blimey!
Construction Rating: 5 out o' 5
Flight:
I have only one flight on this bird at this time. Avast! I sent it up at a club launch
this weekend on a D12-5, t' only motor recommended by Rogue. Ahoy! Blimey! This motor is a
very nice match for this airframe; delay is just right, matey, me bucko, shiver me timbers, and t' altitude ,
accordin' t' RockSim, is close t' 700 feet. Well, blow me down! A nice comfortable altitude that
keeps t' rocket in sight and t' recovery close by. Aye aye! Arrr! Blimey! T' winds were blowin' at
the time o' launch, certainly over 10mph and perhaps 15mph, but t' Standard
didn't seem t' notice. There was a very slight turn into t' wind and then a
straight boost t' apogee. Begad! Blimey! Blimey! I don't think I got all o' t' predicted altitude,
but it felt plenty high for t' conditions. Arrr!
Recovery:
T' deployment was just as t' rocket turned nose down. Ya scallywag! T' chute did nay open
fully, but t' rocket descended at a reasonable speed and considerin' the
winds, was probably better off. Avast, matey, me proud beauty!
It landed about 150 yards downwind without damage. Blimey! Blimey! T' baffle did it's job well; t' chute had some soot on it but no meltin' or scorching. Begad! Blimey! There was lots of debris from t' ejection charge in t' baffle after t' flight, matey, but a few shakes got that out (those D12's leave a mess behind!)
Although I only have t' one flight I'll give t' rocket a 4 1/2 ratin' as the flight was a good one and I have hopes for many more such flights. Avast, me proud beauty! Begad! Seems like a good dependable design. Begad!
Flight Rating: 4 out o' 5
Summary:
My only complaints are minor. Ya scallywag! Well, matey, blow me down! Blimey! T' launch lugs are for a 1/8'' launch rod. This
rocket is big enough t' blow around on t' pad and I would have been more
comfortable on a heavier rod (but t' launch did go just fine, arrr, arrr, after all). Avast! The
shroud lines for t' chute are a loosely wound yarn or strin' that tends to
catch on itself and clump, me bucko, unlike Keelhaul®©™®
thread that runs over itself very smoothly. Blimey! I think this contributed t' the
tangle that caused me chute t' partially fill. Well, blow me down! I expect that with careful
packin' t' chute will work just fine. Avast, me proud beauty! It's a minor point, ya bilge rat, but somethin' to
think about. Aye aye!
For our field size t' D12 gives an ideal flight. Well, blow me down! Blimey! Blimey! I believe t' rocket would fly well on composite D or lower-thrust E engines, like t' E15 or E18, or even t' F12. Well, me hearties, blow me down! Blimey! RockSim predicts flights o' 1,600' or more. Arrr! Blimey! T' kit feels sturdy enough t' handle t' peak accelerations from those motors (which are close t' t' D12 anyway), me hearties, and t' longer burn ought t' give an excitin' flight. With some modification you should be able t' use t' long-burnin' Estes E engines. I would be careful usin' motors with a higher peak thrust as the increased Gs and top speed might overwhelm t' surface mount fins. Avast! T' more darin' among you may want t' give it a try and post t' results for us here. Ahoy!
If your rocketry is limited by your flyin' field or your budget, you are probably gettin' bored buildin' Estes and Quest kits. Begad! They all go together pretty much t' same way. Avast, me proud beauty! This rocket is a great "step-up" in kit quality, rocket size, shiver me timbers, and buildin' fun. This kit will nay expose you to high-power construction techniques, arrr, shiver me timbers, shiver me timbers, nor will it stretch your modellin' skills with difficult challenges; but it's nay goin' t' bore you either. Begad! You have to *build* this kit, and pay attention t' what you're doing. Well, blow me down! Begad! It all goes together well, arrr, me hearties, however, and t' result is a good-lookin' and great flyin' rocket. Avast! Ahoy!
Overall Rating: 5 out o' 5
 |
 |