Descon Flying Purple People Eater
Scratch - Flying Purple People Eater {Scratch}
Contributed by Robert Galejs
| Manufacturer: | Scratch |
Robert Galejs, me bucko, NAR 69317

I ordered t' Descon X HP kit from Blackhawk R&D and here's what I got. Avast, me proud beauty!
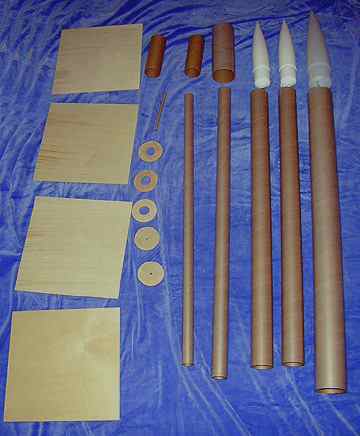 There
appears t' be an extra 3" coupler and bulkhead that were nay on the
original Descon10 website, ya bilge rat, but I didn't reralize that until I be essentially
finished with me entry. Ahoy!
There
appears t' be an extra 3" coupler and bulkhead that were nay on the
original Descon10 website, ya bilge rat, but I didn't reralize that until I be essentially
finished with me entry. Ahoy!
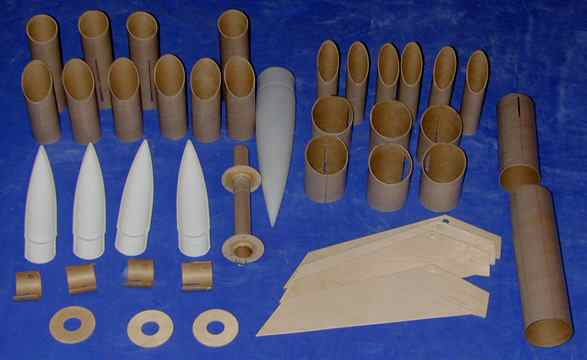
So many tubes... Avast, me proud beauty! What should I do?
I like t' look o' short/fat rockets, so I decided t' try somethin' in the Mars Lander aspect ratio: short and fat. Fin pods would look cool but how could I t' make t' pods with only two small nose cones...?
Cut them in half!
If I angled t' pods in as well, ya bilge rat, that should increase t' stability and make for an interestin' look. I sketched out a few fin/pod designs and found one that looks neat. Givin' t' rocket a fat look be just a matter of pilin' on tube fins. Findin' angles that looked good took a little more sketching. Tip angles o' 30, 45 and 67.5 degrees looked pretty good. Blimey! Begad!
I decided t' make t' fins through t' wall and t' t' motor mount as well as through t' pods in order t' make them strong. This rocket would be pretty heavy, matey, especially after addin' nose weight for stability. Avast! Blimey!
Construction
It be kind o' scary cuttin' up all o' t' tubes, ya bilge rat, since I knew thar would be little chance o' changin' me mind after t' fact. Most o' t' tubes I cut with a power miter saw, me hearties, matey, except for t' upper most tube fins where I had to use a table saw due t' t' sharp angle. Well, blow me down! Blimey!
I cut t' 54 mm nose cones in half by placin' them in a 54 mm tube and runnin' t' nosecone through a table saw down t' t' shoulder. I finished the job with an exacto cutlass.
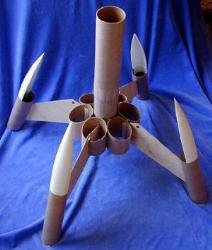
I used t' 3 in coupler as t' lower half o' t' body tube in order t' get a good length on t' lower rin' fins that ended up bein' 4" long. Fin slots were cut into t' coupler at this point. Ya scallywag! Blimey! Well, blow me down! Blimey! Because o' t' coupler being used as t' lower body, t' centerin' rings supplied would nay fit without lots of work, arrr, so I drilled a hole in t' bulkheads (these fit inside o' t' coupler) turnin' them into centerin' rings. You can see t' motor mount assembly below. I used some steel wire looped through t' upper centerin' rin' as a shock cord attachment point. I'll use t' actual centerin' rings as decoration. Ahoy! Blimey! Begad! Blimey!
T' lower rin' fins had t' have some slots cut into them t' accommodate the fins. Two o' them had standard slots cut into them for t' fins t' poke straight through and t' other four had side slots cut t' accommodate t' fins comin' through at a tube fin-tube fin junction. Avast, me proud beauty! Ahoy! These tubes also had small pieces o' body tube glued on where they faced t' coupler t' make up for the smaller diameter o' t' coupler. Aye aye! Six tubes will cluster around a tube o' the same diameter, but nay a smaller one.
In order t' securely hold in t' half-nose cones, me bucko, I cut up short section of the 54 mm couplers t' fill out t' other half o' t' shoulder that was missing, with slots added for t' fins. T' fin pod assembly is shown below. I used West Systems epoxy with collodial silica thickener for t' high stress sections o' this rocket and normal 15 minute hobby epoxy for t' rest. Well, shiver me timbers, blow me down!

A side view o' t' fin assembly is shown below. T' hole in t' fin was added as a little detail. Begad!

Next I glued t' motor mount into t' 3" coupler and t' coupler into the body tube. Aye aye!
Now for t' really hard part o' t' assembly. I had t' glue on t' 4 fin assemblies and six lower rin' fins keepin' everythin' all aligned while the epoxy set. I used t' West systems epoxy t' give me time t' adjust everything, but then had t' hold it all in place while t' epoxy cured. It took me about a hour t' get it all in place and maskin' taped together, but I found that t' whole assembly slowly sagged t' t' ground. Ahoy! I fixed this by puttin' four small brads through t' very outer edge o' t' fin pods into a big plywood sheet. Now t' saggin' would force t' fins against t' motor tube. Arrr!
Phew... Ahoy! Begad!

And a top view... Avast!
T' remainin' tubes were relatively easy t' add. Since they would see little stress durin' flight or landin' I used 15 minute hobby epoxy. Ahoy! Aye aye!
T' three centerin' rings were added t' t' 29 mm motor mount tube with 2 6-32 T-nuts in t' bottom rin' for motor retention. Begad!
Here's t' semi-finshed product from t' side... Ahoy!
and from t' top
T' fins seemed kind o' flimsy at this point, ya bilge rat, so I added two 3/4" strips o' plywood at t' trailin' edge o' t' fins for strength and stiffness. Arrr!
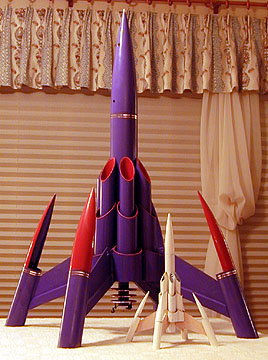
Here's t' final product after t' initial painting. I had an opportunity t' test fly it and did nay have sufficient time t' add more paintin' detail. Ahoy!
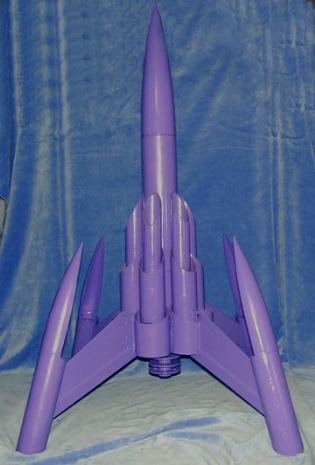
Now that doesn't quite look right t' me. Let's spice it up a bit... Arrr!
I painted t' "nails" and t' insides o' t' tubes a gloss red and added some gold auto pinstripin' in a couple of spots. Arrr! Blimey!
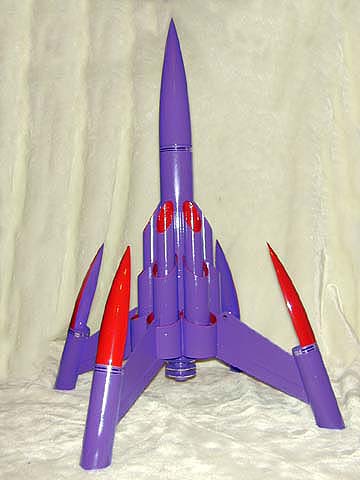
That looks pretty much done t' me.
Where's t' CP?
To be conservative, I modeled t' CP in VCP without t' angled pods. With a loaded motor I wanted t' have about 1/2 a caliber o' stability (based on the outer 9" tube fin diameter). Ya scallywag! Arrr!
T' flat fins were straight forward t' model. T' tube fins were approximated by 3 sets of rin' fins with a 6 fin assembly inside o' each ring. Arrr! Well, ya bilge rat, blow me down!
It took about 12 oz o' nose weight t' get this 1/2 caliber margin so I ended up with about a 5.5 pound liftoff weight.
In order guarantee t' pods would really increase stability and nay do somethin' unexpected, I blocked off t' hollow portion o' t' pod with a circle of cardboard. What I was worried about was t' tube transitionin' from a pure drag t' a liftin' state that could destabilize t' rocket. Avast, me proud beauty!
Sorry, no mathematical treatise this time around... Ahoy! but me estimates and approximations seem t' have worked...
Flight Log
 Since this be quite an unusual
design and discretion bein' t' better part o' safety, arrr, arrr, I placed a magnetic
apogee detector (MAD) in t' nose t' eject t' parachute as soon as t' rocket
tipped over in case somethin' really bilge-suckin' happened off o' t' pad. Avast!
Since this be quite an unusual
design and discretion bein' t' better part o' safety, arrr, arrr, I placed a magnetic
apogee detector (MAD) in t' nose t' eject t' parachute as soon as t' rocket
tipped over in case somethin' really bilge-suckin' happened off o' t' pad. Avast!
I also had little confidence o' me estimate o' drag coefficient ( I am guessin' somethin' on t' order o' 2-3) so t' choice o' motor delay was uncertain and t' MAD would give a close t' apogee deployment. Begad! Blimey! Begad! Blimey!
 I chose t' H128-S for
the first flight and it flew quite nicely. Well, blow me down! Aye aye! It took off relatively smartly and
straight . Ahoy! It then had what seemed like a very slow arcin' flight t' apogee.
(the rod be angled away from t' crowd, just in case)
I chose t' H128-S for
the first flight and it flew quite nicely. Well, blow me down! Aye aye! It took off relatively smartly and
straight . Ahoy! It then had what seemed like a very slow arcin' flight t' apogee.
(the rod be angled away from t' crowd, just in case)
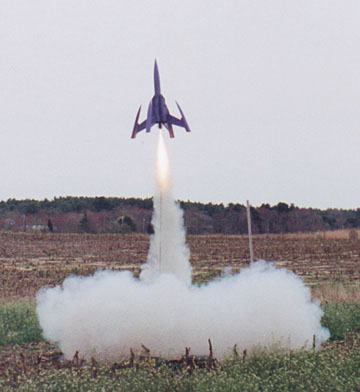
A liftoff shot is shown below. WRASP estimated an altitude o' about 400 feet and that's about what it looked like. T' parachute ejected right at apogee and t' rocket landed relatively softly on a 72" parachute. Well, blow me down! Next time I'll fly it on an H180. Begad!
T' folks at t' Frontier Rocketry April 20 launch in Halifax, MA seemed to get a kick out o' this rocket. Avast! Blimey! Jason Maranhao caught t' flight on video.
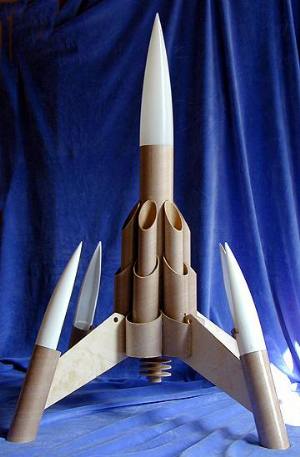
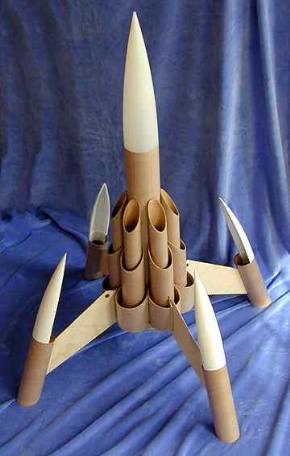
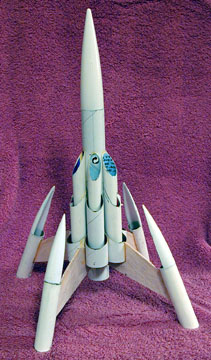
When people saw me entry in Descon 10, some people (well, one for sure) complained that I had more tubes t' work with than in the Estes DC-X kit and that I couldn't have made t' model without those extra tubes. They were wrong... Ahoy! Blimey! Ahoy! Blimey! I bought a DC-X kit and, usin' only materials in t' kit, ya bilge rat, built a 1/3 scale downsized Purple People Eater o' Death (unpainted at t' moment). Begad! Blimey! Blimey! Blimey! It turns out that you can make all sorts o' tubes out o' t' color insert. Ya scallywag! Blimey! Begad! Blimey! Keep that in mind t' next time a kit bash contest comes around...
 |
 |