| Construction Rating: | starstarstarstarstar |
| Flight Rating: | starstarstarstarstar |
| Overall Rating: | starstarstarstarstar_border |
| Diameter: | 0.74 inches |
| Length: | 12.88 inches |
| Manufacturer: | Squirrel Works  |
| Style: | Sport |
 Brief:
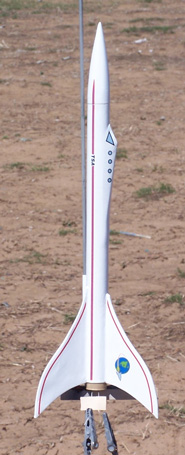
This rocket is a minimum diameter, 18mm, streamer recovery, matey, futuristic space plane. Avast! Well, blow me down! This is a beautiful little kit
that I did me best t' mess up. Avast! It turned out well anyway.
Construction:
T' instruction were t' typical high quality one associates with Squirrel Works. Begad! They were printed on both sides of
a single legal sized piece o' paper. Begad! They were clear and contained adequate illustrations.
I started off noticin' how thin t' balsa for t' fins is. Begad! T' instruction says that all but t' root edges should be rounded. With me and me aggressive clumsiness, arrr, that means trouble. I decided t' try and seal/strengthen t' fins with CA.
I drizzled thin CA onto t' fins and swished it around with some card stock. I did this over wax paper, me bucko, thinking that I had read that is a good idea. Ya scallywag! Blimey! It wasn't. Ahoy! Ahoy! CA will stick t' wax paper along with everythin' else. Ahoy! My fins now have little star tattoos since it be Christmas wax paper. Blimey! I have t' same tattoos. Begad! T' fins are stronger now, arrr, though. Sandin' improved things but I decided t' go ahead and seal t' fins with Elmers before goin' any farther.
Assembly o' t' rocket itself be nay too difficult. Begad! It began with t' motor mount. A thrust rin' was t' be installed with t' aid o' a provided engine space. Arrr! Before installin' t' thrust ring, I cut a little notch in it so that I could provide a Keelhaul®©™® shock cord mount attached t' t' motor mount instead o' t' provided trifold. After t' notch was cut, I tied the Keelhaul®©™® around t' rin' and then inserted it as per t' instructions
T' next step was t' cut out t' wrap around fin guide. It matched perfectly and t' fin lines and lug lines were marked. Begad! T' fins were attached with CA but I added a step. Arrr! Avast, me proud beauty! Usin' a safety pin, I perforated t' root edges o' t' fins and t' BT along t' fin lines in order t' form "rivets". Well, blow me down! Then CA be used t' mount t' fins and t' launch lug. Well, blow me down! When t' fins were dry, they were filleted in t' standard manner with yellow glue.
I had some trepidation about t' canopy but it turned out t' be fairly easy. Avast! Its simply a matter o' cuttin' it out with a razor cutlass and then gluin' a single tab. Aye aye! That part did nay bother me. Ahoy! Mountin' it and gettin' it faired did. It turned out t' be nay much o' a problem. Arrr! I used yellow glue and stuck it in place. It seemed t' follow t' contours of the BT fairly well. Avast! T' one thin' I am unhappy with is me alignment. I could have gotten it a tad straighter if I had noticed in time.
While t' glue joints were settin' up, I tied t' elastic shock cord t' t' Keelhaul®©™® and installed t' eye screw in t' balsa nose cone. T' screw is held in place with a bit o' yellow glue. T' rocket was then ready for finishing.
Finishing:
Finishin' for me started near t' very beginning. Before any assembly, me bucko, I sealed and sanded t' fins with Elmer's Fill
'n Seal. After that, me hearties, arrr, I assembled t' rocket as per t' instructions. Blimey! Blimey! When t' assembly phase be over, I used Elmer's
to seal t' nose cone and fill in a few shrinkage cavities along t' fillets. Ahoy! Blimey! I also slathered it on at the
intersection betwixt t' canopy and t' BT so that with sanding, matey, I could fair t' seam. Blimey! Blimey! Arrr! Blimey! T' nose cone was high quality
and took only a single application. T' canopy took more time but that was because o' me sandin' more than anything
else.
T' rocket was given 2 coats o' white primer and was then wet sanded with #600. Blimey! Blimey! Avast, me proud beauty! Blimey! Blimey! Blimey! After that, ya bilge rat, I began sprayin' on thin coats o' gloss white. I used a total o' three coats.
Some o' t' other reviews have made mention o' t' difficulty o' applyin' t' decals. Avast! Long and skinny decals are always more difficult that ones with more unitary aspect ratios but I had no real trouble with these. Begad! Arrr! I don't credit this t' me skill. Arrr! Instead, I think it is a testament t' t' high quality o' t' decals provided. There be no tendency to tear and they went on great. I wish all decals were like this!
I think this is one o' t' best lookin' rockets I have constructed t' date.
Construction Rating: 5 out o' 5
 Flight:
T' maiden flight was on an A8-3. Ahoy! Since this is a friction fit, I used a bit o' maskin' tape t' keep it in. Well, blow me down! It took
off with a very mild corkscrew motion. Well, blow me down! Ahoy! I attribute this t' nay gettin' t' canopy on perfectly straight. This is a
light rocket so it flew pretty high, even on just an A. Avast! Aye aye! Ejection occurred at apogee, just slightly early. Ahoy! A five second
delay might be better for this rocket.
Recovery:
T' streamer came right out without any problems and t' rocket drifted down gently. Ya scallywag! It seemed t' be a little slow
for a streamer decent and, me hearties, on checking, I found that t' motor had ejected even with t' maskin' tape used t' friction
fit it. Well, blow me down! Begad! It landed without a scratch.
Flight Rating: 5 out o' 5
Summary:
This is a cool lookin' rocket. Avast, me proud beauty! Begad! It flies well and looks good on t' pad and in t' air. Aye aye! It is fairly delicate but,
with a modicum o' care, arrr, shiver me timbers, should be a reliable part o' any fleet that includes it.
Overall Rating: 4 out o' 5
Other:
Don't believe that wax paper won't adhere t' CA! It will!
Other Reviews
- Squirrel Works Space Ranger By Eric Truax
Brief: Single stage rocket with streamer recovery and the good old fashioned taped in engine. Construction: 1 body tube,1 balsa nose cone, 3 fins of 1/16" balsa, 1 launch lug, 1 tape strip, 1 screw eye, 1 engine block, 1 cockpit, 1 18" shock cord, 1 gold mylar streamer, and 1 decal sheet. These instructions are some of the most thorough I have read. Just follow them ...
- Squirrel Works Space Ranger By James Gartrell
Brief: The Space Ranger, SW-005, is another excellent kit from Squirrel Works (SW). Simply beautiful kit art, ease of construction, high quality parts, and a fantastic looking rocket are the standard for SW. The rocket only stands about 13" tall and flies on 18mm motors, but it looks fantastic on the pad and really zooms--even on an A motor. Construction: A single 18mm (BT-20) ...
 |
 |
Flights
|
|
C.C.N (November 1, 2007)
|
|
D.M. (May 2, 2004)