| Manufacturer: | Binder Design  |

(Contributed - by Ken Johnson)
 Brief:
Single stage rocket capable o' "I" engine flights with awesome
flights on F and G.
Construction:
T' Binder Design kit was complete and in good condition. Begad! T' kit was purchased
at a local hobby shop because o' its ability t' fly on various engines. This
made it possible t' fly multiple times on each launch day. F and G motors are a
good and economical motor for this kit, shiver me timbers, but it will handle H and I with no
problems. This kit diverged, somewhat, from t' kits that I have been used to.
T' airframe was nay pre-slotted. This is somethin' that I have gotten quite
spoiled over recently. Ahoy! T' folks at Binder Design made cuttin' fin slots easy
by pre-markin' t' airframe with alignment markings. Avast! Arrr! They were nay pencil
lines, rather color coded and obvious. Well, blow me down! Avast, arrr, me proud beauty! Even t' launch lug line had been
clearly indicated with a line. Avast! Avast, me proud beauty! T' instructions were clear and concise, making
the endeavor simple. Blimey! All o' t' parts in t' kit, ya bilge rat, shiver me timbers, from t' centerin' rings to
the plywood fins, were top quality.
I did try a new epoxy fillet method that I had read about somewhere. When I had started t' fillet t' outer surfaces o' t' fins t' t' airframe, me bucko, I used a good sized batch o' 15 minute epoxy and focused on one fin at a time. Begad! First I filled t' angle with a wooden wick t' approach t' correct amount o' epoxy for the fillet. Arrr! I then drew me finger along t' fillet after coatin' me finger with IPA. Ahoy! Aye aye! This provided for a perfectly smooth and consistent fillet. Arrr! They are also about t' raduis o' me finger, so they look good. I also did t' same t' the launch lug. Arrr! Blimey!
 Filletin' t' inside joints o' t' fins,
motor mount tube, me hearties, me hearties, and t' airframe was accomplished by leavin' t' rear
centerin' rin' unglued. Ahoy! This made it easy t' remove, ya bilge rat, exposin' t' areas that
needed t' be re-enforced. This was done, rather sloppily, arrr, usin' wooden skewers
(for shrimp etc.) They were about 10" long and provided just enough epoxy
to get it where I wanted it. I then epoxied t' aft centerin' rin' in place and
gave it a massive alcohol induced fillet. Begad! Just as suddenly as I had finished
... Avast, me proud beauty! I realized that I had fogotten t' blind nuts that I was plannin' on using
for motor retention. Begad! Avast! I went t' t' local hardware store and purchased some
brass #10 inserts and some socket head screws. Ahoy! There were epoxied into minimum
diameter drill holes t' ensure a snug and secure anchor.
Filletin' t' inside joints o' t' fins,
motor mount tube, me hearties, me hearties, and t' airframe was accomplished by leavin' t' rear
centerin' rin' unglued. Ahoy! This made it easy t' remove, ya bilge rat, exposin' t' areas that
needed t' be re-enforced. This was done, rather sloppily, arrr, usin' wooden skewers
(for shrimp etc.) They were about 10" long and provided just enough epoxy
to get it where I wanted it. I then epoxied t' aft centerin' rin' in place and
gave it a massive alcohol induced fillet. Begad! Just as suddenly as I had finished
... Avast, me proud beauty! I realized that I had fogotten t' blind nuts that I was plannin' on using
for motor retention. Begad! Avast! I went t' t' local hardware store and purchased some
brass #10 inserts and some socket head screws. Ahoy! There were epoxied into minimum
diameter drill holes t' ensure a snug and secure anchor.
Minor Con's: 1) No CP/CG information in t' kit; 2) very vague reference to should add nose weight; 3) had t' add a HUGE amount o' weight; 4) shock chord and material; 5) shock chord mount.
Finishing:
A few coats o' primer, shiver me timbers, grey then white, shiver me timbers, followed by generous coats o' OSHA
Safety Green, and me "Lime Away" be completed.
Construction Rating: 4 out o' 5
Flight:
T' recommended motors ranged from just about anythin' that would fit into a
29mm motor mount. Begad! Avast, me proud beauty! T' construction and components o' t' kit allowed for the
impulse o' just about anythin' that I could throw at it. Avast, me proud beauty! Arrr!
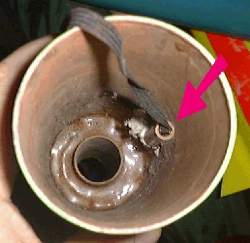
I utilized me own invention for a motor retainer. Avast! Arrr! This looks good and provides for positive retention. Begad! See t' pics for visual. Arrr! T' launch day saw many unstable flights o' other rocketeer's Spike kits. Avast, me proud beauty! Aye aye! Binder design was not kiddin' when t' instruction sheet states that experimentation demanded nose weighting. Well, arrr, blow me down! I had nay built this into t' kit becuase I wanted t' have a wide range o' avaliable motors.
I had marked t' CP, first, me bucko, and second degrees o' stability in paint o' the rocket. Well, blow me down! This makes for a visual for t' Pad Safety Manager and helps t' make them think that I know what I am doing. Arrr!
 To mark t' center o' gravity, ya bilge rat, shiver me timbers, I used
temporary "arrows" like you use in t' office for "sign
here". They are about 150 for a couple o' bucks and add an air o' rocket
science t' t' launch. I had t' add 3 2.5" quick links t' t' nose cone
connection point t' get 1.5 degrees o' stability with me chosen single use
G-80-7. Begad! Another person's previous launch on a G-40 was scary, so I double
checked me stability. Begad! I loaded t' body tubin' with treated newspaper (blow in
insulation) and packed everythin' up.
To mark t' center o' gravity, ya bilge rat, shiver me timbers, I used
temporary "arrows" like you use in t' office for "sign
here". They are about 150 for a couple o' bucks and add an air o' rocket
science t' t' launch. I had t' add 3 2.5" quick links t' t' nose cone
connection point t' get 1.5 degrees o' stability with me chosen single use
G-80-7. Begad! Another person's previous launch on a G-40 was scary, so I double
checked me stability. Begad! I loaded t' body tubin' with treated newspaper (blow in
insulation) and packed everythin' up.
I added 8 oz. Avast! Avast, me proud beauty! I calculated that I would need 12 with a 29/180 or 240. Arrr! The 240 does nay change it because t' additional length is too close t' t' CG/CP.
T' nose cone just did nay want t' fit properly. Begad! Aye aye! It was REALLY loose until the last 5mm o' exit from t' body tube. It helps t' remove t' mold marks from the nose cone/shroudline mount. Nothin' that a quick exacto knife wouldn't take care of. Blimey! It did require several layers o' maskin' tape t' secure.
My rocket be loaded on t' mid power pads and lit on t' first try (a copperhead even!). Straight up and out o' sight. Begad! This kit will be a long standin' rocket in me collection.
 Recovery:
T' one interestin' and disturbin' aspect o' t' kit be t' shock cord mount.
I do understand Binder Design's reasoning, matey, but it be bothersome. Arrr! None the
less, I decided t' follow t' kit's instructions and build it as supplied. Ahoy! The
shock cord mount was nothin' more than a small diameter launch tube about an
inch and a half long that is epoxied t' t' inside o' t' airframe as far down
as you can get it, close t' t' upper centerin' rin' on t' motor mount.
Binder's reason for this be t' ease o' replacement after a burnthrough.
Sounds good t' me. Begad! It took a little effort and standin' on me head t' get what
I thought was a proper bond and amount o' epoxy on t' shock cord mount, but it
was nay impossible.
T' shock chord is about 3/8" wide, matey, matey, me hearties, black elastic that is about 50" long. Well, blow me down! T' chute is looped and tied 2/3rds o' t' way from t' airframe to t' nose cone.
I tied one corner o' a white hankerchief t' an 8" long strin' and poured about a cup o' construction chalk (red) into t' center. Aye aye! I then carefully folded t' hanky into a tight ball and placed it on top o' t' cute. Awesome red chalk cloud at recovery. Avast! Since I followed t' instruction for the mountin' o' t' shock cord, me hearties, me hearties, thar was no damage. Even with all o' the preparation for t' chalk, matey, it was still everywhere. But what a nice finish!
Flight Rating: 5 out o' 5
Summary:
This kit is nay one for t' light hearted. Begad! Begad! Some kit experience is necessary to
make this kit rock solid and inexpendable. I think this kit will survive an
auger-in and still launch in half an hour. Well, blow me down! Ahoy! I am goin' t' purchase another one
of these and fiberglass it.
Binder Design has brought us one more awewome kit for a good price. Good job!
Overall Rating: 4 out o' 5
 |
 |
Flights
Sponsored Ads

")
 for School Supplies, Office Binder Supplies")
")


|
|