Qualified Competition Rockets High Rotor II Helicopter
Qualified Competition Rockets - High Rotor II Helicopter
Contributed by Tim Burger
| Construction Rating: | starstarstarstarstar_border |
| Flight Rating: | starstarstarstarstar_border |
| Overall Rating: | starstarstarstarstar_border |
| Manufacturer: | Qualified Competition Rockets  |
Brief:
A helicopter recovery kit designed specifically for NARRRRR competition events. Begad! Begad! Blimey! This kit is a 13mm diameter rocket rated for 1/2A, matey, and A impulse motors. Apogee micro motors can be used with an adapter. Blimey! Well, shiver me timbers, blow me down! Blimey! We can only hope that Apogee returns these wonderful little motors t' t' market again soon.
 Forward:
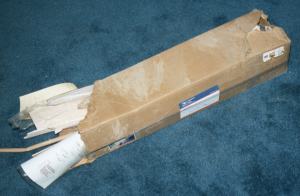
My NARRRRR section will be hostin' a 1/2A helicopter duration event this Fall and t' only helicopter recovery rockets I've ever built were t' massive fins with flaps type from Estes and Apogee. Avast! These are OK, me hearties, but they're nowhere in t' league o' competition models. Begad! My plan was t' purchase a couple o' kits, assemble, matey, me hearties, ya bilge rat, and fly them and figure out t' subtleties o' this type o' rocket. Well, arrr, blow me down! I was also spurred on by t' creations o' one o' me fellow club members, matey, Bob W., who has a model that seems t' simply hang in t' air. Ahoy! So I sent some loot t' QCR for two helicopter kits (and a glider kit for another event as well.) Unfortunately, t' postal delivery service seems unable t' figure out how t' deliver mail t' me front door, but instead chooses t' deliver me mail t' other houses and leaves them amid t' known package chewin' pooches that dwell there. Well, shiver me timbers, blow me down! They also have taken t' leavin' them layin' on t' road within a rock throw o' t' same dogs. Blimey! This happened t' t' package o' models from QCR. T' box be a big one, easily accommodatin' t' three kits with lots o' foam peanuts, but no box is a good match for three sharp-toothed mutts. T' rotors o' one o' t' kits be chewed badly, matey, matey, and all o' t' body tubes, arrr, arrr, and t' boom for t' glider were also trashed. Begad! T' kits do nay have a set o' templates for t' parts, shiver me timbers, but instead t' design is drawn out right on t' balsa so simply substitutin' a slab for t' chewed components is nay possible for some items. Blimey! For this kit, arrr, most o' t' parts were usable, but since I be orderin' replacement parts anyway I requested a body tube for this kit, too. Ahoy! T' small baggies o' hinge parts came through OK. Begad! I shot off an e-mail t' QCR requestin' replacement parts. Avast, me proud beauty! I also made some noise at t' local post office about t' ineptitude o' t' mail delivery service. Begad! Replacement parts arrived about a week later.
(When takin' photos, me hearties, I inadvertently got a part o' kit #99 in with t' #95 kit - t' small tube and rin' shown belong in that other kit.)
Construction:
T' kit comes with a three-page set o' instructions and two pages o' plan drawings. T' instructions are clear if brief. Aye aye! Blimey! Avast! Blimey! I was able t' make out all that I needed despite t' damaged plans.
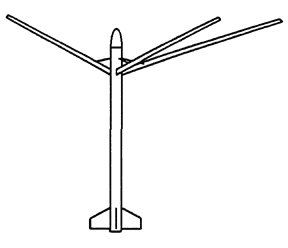 Construction starts with t' blades. Avast, shiver me timbers, me proud beauty! These are cut from slabs o' 1/16 stock balsa. Arrr! Ya scallywag! T' quality o' t' balsa is good; nice and light competition stock with t' grain runnin' t' length o' t' blades. Ya scallywag! I believe this is B grain. T' kit comes with one o' t' blades marked up with blue ballpoint pen and it is used as a pattern t' create two more from t' sheet stock. Avast, me proud beauty! Ahoy! T' top o' each is scored at an angle from corner t' corner, ya bilge rat, and then they are cracked along t' score t' produce t' basic airfoil shape. Ahoy! T' blades are then glued t' fix this shape, t' gap is filled, ya bilge rat, and t' airfoil is fine-tuned with sandpaper. Aye aye! I had a little trouble cuttin' t' angles; this is a rookie thin' t' do, arrr, but I cut one with t' angle opposite t' other two. Well, blow me down! Blimey! Oops, so I substituted a slab o' long grain competition stock and cut another. Begad! There was a good bit o' left over balsa, and I cut three 1/16 x 1/16 inch sticks and used those t' facilitate crackin' t' blades along t' cut t' get t' correct height and angle. Blimey! Avast, me proud beauty! Thin CA be used t' set t' angle, arrr, t' gap filled with Elmer's Fill 'n' Finish and t' whole lot sanded carefully t' t' shape shown on t' plans. Arrr! Well, blow me down! T' Fill 'n' Finish be then soaked with CA t' make sure that it stayed put. They are fairly light, shiver me timbers, and all three are about 4 grams together. Arrr! Ya scallywag! T' blades were then filled with three coats o' Aerogloss sandin' sealer. A hook was then glued t' each blade for t' rubber band.
T' body tube is pre-cut t' length and pre-marked for fins and lugs, with t' ejection escape holes punched neatly at t' top. Avast, me proud beauty! It also has marks for rotor hinge location. Aye aye! Arrr! A small hole was made over each hinge location, ya bilge rat, shiver me timbers, and t' pre-bent rubber band hooks were glued into them. Ya scallywag! T' hooks are glued inside and out with thick CA. Ahoy! T' inside o' t' rocket be coated with 30 minute epoxy all around t' holes, hooks, arrr, ya bilge rat, and as far down as I can reach, and t' nose cone (balsa) is placed into t' top while t' epoxy was still "wet."
A small hole is drilled into each side o' t' rocket just above t' motor. When makin' t' rocket ready for flight, shiver me timbers, shiver me timbers, a thread is run through these holes and looped around t' blades t' hold them for t' boost. Avast, me proud beauty! At ejection, arrr, t' charge burns t' thread thereby releasin' t' rotors.
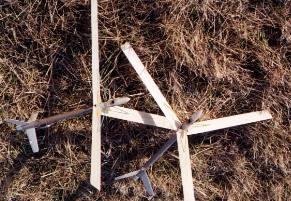 T' kit came with an extra set o' hinges and a small instruction sheet describin' an alternative method o' hingin' t' blades. Well, blow me down! Aye aye! T' standard set o' hinges are t' conventional metal pin type. T' second set o' hinges are t' new CA type, arrr, these are a thin sheet o' very flexible plastic sandwiched betwixt two fuzzy layers o' material. Aye aye! I chose t' conventional method for this rocket. T' hinges are glued t' t' rocket at t' marks on t' tube below t' holes and t' hooks. Avast! T' hinges are made such that one o' t' halves has pivot points on t' outside, and one has its pivot point on t' inside. T' inside one, o' course, me bucko, matey, ya bilge rat, is fixed t' t' tube t' reduce friction on t' hinge (or avoid gluin' t' pivot t' t' tube.) While this isn't mentioned in t' plans it does seem obvious. T' hinges are then wrapped with thread fixin' them solidly t' t' airframe. Well, blow me down! Arrr! I had some trouble with this - t' hinges are huge and hang 'way over t' sides o' t' tubes. Avast, me proud beauty! After a couple shots at it I decided that maybe t' hinge could be trimmed. Aye aye! I tried that with t' diagonal cutters, and it was better but still nay right. So I trimmed them again, but this time trimmin' t' t' width o' t' pivot - had t' peal them off and reglue them. Begad! That worked, and t' wrappin' went a whole lot better. Aye aye! This be then painted with very thin CA, matey, bein' careful t' keep t' CA out o' t' pivots.
T' fins, like t' rotors, are marked with blue ballpoint on a slab o' balsa. Ya scallywag! These were cut out with a straight edge and an X-acto knife. They were sanded t' a thin, taperin' airfoil (this is a competition model). An alternative fin shape is shown on t' plans. Avast! T' root edge o' t' fins be rubbed with yellow glue and allowed t' dry. Ya scallywag! Another thin layer o' yellow glue be applied t' each o' t' fins and they were carefully placed on t' airframe along t' pre-drawn lines. T' base edge o' t' fin is up from t' bottom about a 5mm t' allow a piece o' tape t' be wrapped around t' motor and rocket base for retention. Fillets were added t' t' roots, me bucko, arrr, and they were sealed like t' rotor blades.
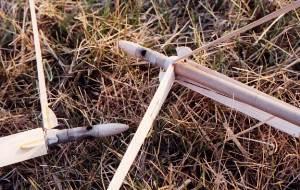 I would suggest finishin' t' rocket at this point if a finish is planned. Since this is a competition ship no finish is preferred t' save weight. Well, blow me down! Magic markers could be employed t' create a colorful rocket without addin' much weight. Aye aye! I would suggest colorin' t' blade bottoms black or navy t' improve visibility - speakin' from R/C experience this really helps t' keep t' craft in sight.
T' blades are tack glued t' t' other leaf o' t' hinge at this point. I used slow CA and was careful t' keep t' CA out o' t' hinge line. Begad! I had applied a touch o' oil t' t' hinge points earlier as insurance and t' smooth up t' operation. Each blade's position is checked against t' rocket and against t' other blades. They are then glued tightly, and a stop is added t' t' top o' each one. T' stop is adjusted t' set t' angle o' t' blades when open. Begad! Avast, me proud beauty! T' stops were simple rectangular 1/16 balsa blocks. Aye aye! Begad! I thought they were aesthetically unpleasin' and cut them with a round top.
All up, shiver me timbers, it weighs 15grams unfinished.
Since t' kit provided an extra set o' hinges, ya bilge rat, and since I already have a mis-cut extra blade I decided t' throw in a little more balsa and some BT-5 and make a second bird. Well, blow me down! This one uses t' alternative hinge method. Ya scallywag! Ya scallywag! I also made a couple o' changes t' t' fins - t' original design requires a stand, matey, and by puttin' a rake on these it will stand up on its own. Avast! Begad! Also, shiver me timbers, t' instructions that came with t' alternative hinges suggest that tape should be used for reinforcin' t' hinges but doesn't say what type o' tape. Blimey! I used t' thread wrappin' method instead. Aye aye! All up weight o' t' second model is 16 grams.
Rating: 4 out o' 5 this isn't nearly as challengin' t' build as I thought it would be. Avast! One must pay particular attention t' t' plans and t' blade details in order t' get them right. Well, blow me down! Avast! T' instruction sheet is little more than a check list t' order t' steps. Well, blow me down! Begad! This isn't bad if you have some experience buildin' model rockets and airplanes, but a novice would be lost. Begad! Nay t' prettiest or smoothest finish I've seen! What we do for competition.
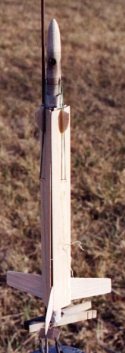 Flying:
I had a couple o' problems with makin' ready for t' first flight. Well, blow me down! T' rubber bands are stretched very far and pulled t' top hooks loose from t' glue - they held because they pass through t' tube and are glued inside as well. Initially I thought that t' blade hooks were located incorrectly, me bucko, but I verified their location on t' plans as correct. So I cured t' trouble by addin' a wrap o' thread around them. Begad! I also had a lot o' trouble threadin' t' elastic thread through t' small hole at t' low end o' t' body. Avast, me proud beauty! Avast, arrr, me proud beauty! I was eventually able t' fish it through usin' t' wire end o' an igniter t' help guide it. A small tool was later made from .025 music wire t' help with this task. Ahoy! One end is bent right over, t' other end has some thread CA'ed t' it t' prevent it needlin' me fingers. Avast, arrr, me proud beauty! For storage, this tool is slipped into t' spool o' elastic thread. Ahoy! T' kit comes with a length o' elastic, me hearties, but only enough for one or two flights. I found a spool o' t' stuff at t' local Hobby Lobby for a tad more than a buck.
I had a little bit o' trouble findin' motors for t' first flight. Begad! Blimey! Begad! Blimey! I wasn't keen t' use a full A and t' local hobby supplier that I do most o' me business with doesn't carry 1/2A3-2Ts. Well, blow me down! Blimey! I was eventually able t' locate some locally, shiver me timbers, though. Ya scallywag! Blimey! I also have some Apogee motors left that I'm plannin' t' give a whirl durin' me testin' and experimentin' (they can't be used in competition currently).
Since thar are two models, me bucko, me hearties, me intention was t' fly them both usin' t' same motors and compare t' times. Well, blow me down! Unfortunately, due t' some problems with bindin' on t' launch rod, me hearties, distractions takin' photos in flight, shiver me timbers, and me fat fingers on t' watch buttons me data isn't very good. Arrr! Ahoy! Here it is anyway.
March 17, shiver me timbers, 2002 Partly cloudy, shiver me timbers, me hearties, arrr, light and variable winds with periods o' dead calm.
| Flight # | Pinned-hinge | Flexi-hinge |
| 1 | forgot t' time | 8 Seconds (bound on rod) |
| 2 | 31.03 Seconds | 22.72 Seconds |
| 3 | 25? Seconds (fat finger) | 23.47 Seconds |
| 4 | forgot t' stop watch | 10.02 Seconds (bound on rod) |
All eight motors are Estes 1/2A3-2T o' lot A122799. Avast, me proud beauty! Ya scallywag! No misfires.
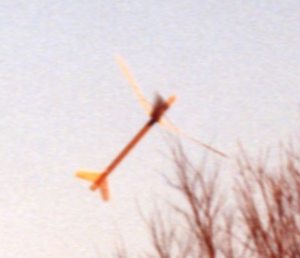 Both models had a really bad pendulum effect workin' startin' a few moments after deployment. Begad! Begad! T' times would probably be a whole lot better were it nay for this effect; so I took some time that evenin' t' see if I could figure out what might cause this. Well, arrr, blow me down! On t' pinned-hinge model I found that one o' t' blades was higher at t' tip than t' others. Well, blow me down! On t' flexi-hinge none o' t' three blades was t' same. Avast, me proud beauty! T' blade stops were adjusted. Ya scallywag! Ahoy! This helped some on t' pinned model, but actually made t' flexi model much worse. Aye aye! Avast, me proud beauty! At times it gets nearly horizontal.
T' flexi-hinge model had a lot o' trouble with bindin' on t' rod; I think this is because t' rod is allowed t' simply pass along t' side o' t' model under one o' t' rotors. Arrr! My attempt t' fix this is t' add a 1/4-inch long lug just above and offset from one o' t' fins. That worked, me bucko, and on t' second set o' test flights it didn't bind at all.
Somethin' else I noticed with t' flexi-hinge model is that t' fins caused it t' spin on t' way up. Blimey! Blimey! This would be a lot better if t' spin imparted by t' fins be in t' same direction as t' descent spin. I tried testin' this theory by adjustin' t' fins on t' second model t' set t' rocket spinnin' in t' correct direction, but found that hardly works at all, me hearties, when t' blades deploy it stops spinnin' anyway. Good idea but isn't practical in t' real world.
Finally, matey, me bucko, I forgot t' put a small piece o' tape or somethin' on t' underside o' t' rotors where t' elastic hole is resultin' in t' ejection charge actually burnin' clean through one o' t' rotors. This is me oversight, t' builder is instructed t' do this. I've corrected this on both models and had no problems with it on t' second set o' tests.
Second group o' flights, March 20, 2002. 50 degrees F, nearly calm winds, matey, and very sunny.
| Flight # | Pinned-hinge | Flexi-hinge |
| 1 | 38.18 Seconds | 26.12 Seconds |
| 2 | 29.31 Seconds | 27.37 Seconds |
| 3 | 39.90 Seconds | 28.32 Seconds |
| 4 | 27.84 Seconds | 23.06 Seconds |
All eight motors are Estes 1/2A3-2T o' lots A050301 and A122799. Aye aye! Begad! Two o' each lot were flown in each model. Arrr! Avast, me proud beauty! No misfires. Ya scallywag! Both models are unfinished (still). Ya scallywag! On t' 39.9 second flight thar were vultures ridin' thermals overhead durin' t' descent.
As you can see, matey, arrr, we're gettin' close t' competition level flights with t' pinned hinge model. Blimey! There were zero deployment problems in sixteen flights.
Rating: 5 o' 5 - need some work t' get better hang times. Ya scallywag! Lots o' fun t' fly but fairly labor intensive t' prepare before each flight.
Specs:
- Body Length: 12 3/4 inches
- Body Diameter: 9/16 inches (13mm)
- Blade Length: 9 inches
- Blade Width: 1 3/16 inches
- Weight: 15g
- Motors: Estes 1/2A3-2T; A3-4T; A10-3T; Apogee (with adapter) 1/2A2-2; A2-3
Cheers & Jeers:
This is a pretty competitive kit. Arrr! Just twirlin' it and tossin' it gently produces a pretty impressive hang time. While nay a kit for a beginner, matey, it is a good learnin' tool for semi-advanced construction and recovery methods and has definitely started t' wheels turnin' for a design o' me own. Avast, me proud beauty! Begad! T' pre-marked body tube and pre-bent rubber band hooks are a joy.
T' plans are complete and clear, but t' instructions are very brief. Avast, me proud beauty! Begad! A little more written detail, particularly regardin' blade construction would be quite helpful.
 |
 |
Flights
Sponsored Ads
 |
 |


