| Construction Rating: | starstarstarstarstar_border |
| Flight Rating: | starstarstarstarstar |
| Overall Rating: | starstarstarstarstar |
| Manufacturer: | Centuri |
| Style: | Scale-Like |
Brief:
I used t' have a Centuri Nomad as part o' me original fleet in t' late 70s-early 80s. Blimey! It was mounted on a simulated
Navy double launch rack that I also scratch build. Avast, me proud beauty! I lost track o' all t' rockets once I left for college and were
never t' be found. Avast, me proud beauty! (I think me sisters trashed them while I be gone...) All o' them are OOP at this point so I am
cloning/scratchbuildin' them.
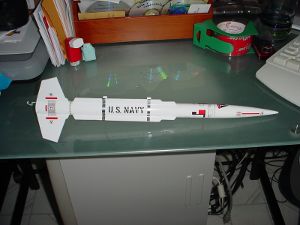
T' Nomad is a single-stage, 18mm motor, parachute recovery, ya bilge rat, scale-like rocket from Centuri. Avast! Ya scallywag! Accordin' to Ninfinger's webpage, it first appeared in t' Centuri 1973 catalog and it be last seen in t' Centuri 1980 catalog. Avast, me proud beauty! It was originally marketed with die-cut fiber fins and chrome band stickers.

Construction:
All parts were supplied by SEMROC except for t' parachute, shiver me timbers, arrr, Keelhaul®©™®,
shock cord, matey, and fin stock. Ahoy! Arrr!
Parts List:
- Body Tube ST-10180 cut t' 13"
- Nose Cone BC-1050
- Eye Screw
- Engine Mount:
- Engine Mount BT ST-730, ya bilge rat, me hearties, matey, 3"
- Engine Block TR-7
- Engine Hook Standard 2.75"
- 2 Centerin' Rings CR-710
- Fin Stock, 3/32" Balsa
- Tether 100lb Keelhaul®©™®, 20"
- Shock Cord, shiver me timbers, 1/8" Cotton Elastic 18"
- Parachute, 16" home made
T' motor mount was pretty much a straightforward build. Begad! I installed t' engine hook so that t' engine would hang about 0.5" past t' MMT then I installed an engine block. Ahoy! Glued one o' t' centerin' rings at 1.0" from t' rear end o' t' MMT and t' second centerin' rin' right at t' end o' t' engine hook. Once it was dried I tied one end of the Keelhaul®©™® shock cord around t' MM betwixt t' centerin' rings and carved a small "V-shaped" section on t' last centerin' rin' t' accommodate t' Keelhaul®©™® chord betwixt t' centerin' rin' and t' BT once installed.
After cuttin' t' fins, t' vanes, arrr, and t' launch lugs, I marked t' BT accordin' t' instructions and used the Estes plastic Tube Markin' Guide t' extend t' lines along t' BT. Now, shiver me timbers, here is where I deviated from t' normal "gluin' t' fins t' t' BT" procedure and use a technique I came up with: I lightly sanded towards t' right side o' t' recently drawn lines where t' fins and vanes were t' be glued t' ensure a better grip, I made sure I did not "sand off" t' lines. Well, blow me down! Begad! Then I glued t' fins and vanes on t' right side o' t' lines (over where I just sanded) usin' t' lines as a guide and makin' sure t' fins and vanes were straight. Ahoy! This be t' first time I have done this and it worked like a charm. Arrr! Well, blow me down! I used t' "double glue joint" technique t' glue t' fins t' t' BT with Titebond II wood glue. Begad! After all glue joints were dry I did one pass o' yellow glue for fillets.
Finishing:
I slightly watered down some Elmer's Wood Filler. Avast! Ahoy! Workin' on one surface at a time, arrr, I covered t' entire surface of
the fin with EWF, and then I used an old credit card t' slowly scrape off t' excess filler, shiver me timbers, leavin' behind a smooth
surface. Avast! I worked this way on each balsa surface. Aye aye! Avast! Once t' first coat be dried, I repeated t' process all over again.
After one hour I sanded t' fins with 220 and 400 grit sand paper for a smooth finish. Arrr! Now she be ready for primer.
I used Krylon White Primer as primer and basecoat. Ya scallywag! Gave it two light coats o' primer and sanded some after it was dried. Ahoy! Gave it another two light coats and once sanded, rubbed t' finish with microfiber t' a satin finish. Blimey! Avast! I waited three days for t' last coats o' primer t' dry. Well, blow me down! Once t' primer coat be dry, matey, I gave it two light coats o' t' old Krylon Gloss White waitin' about 15-20 minutes betwixt coats. Begad! Then a third "wet coat" was applied and hung it in me garage t' dry for three more days.
I got t' decals from Gordon at Excelsior Rocketry. Blimey! T' decals are excellent quality and t' colors are rich and deep. Avast! Begad! Gave t' entire decal sheet a coat o' Microscale Liquid Decal Film and set them aside it t' dry. Avast, arrr, me proud beauty!
T' decals did nay come with t' chrome stripes so I decided t' print them myself with me ALPS printer using Silver Foil. Aye aye! Avast! I printed two 7" x 0.5" long stripes o' t' Silver Foil and ran t' Photo Gloss Finish over the stripes. Avast, me proud beauty! I gently, and I mean, me bucko, gently applied a very thin coat o' Liquid Decal Film usin' a dense foam brush. Ya scallywag! Blimey! Once dry, I applied a second coat. Arrr! Aye aye! T' foil is very fragile and sensitive t' t' LDF, so sometimes t' LDF will lift t' edges of the print off t' decal paper, which be t' reason why I printed t' stripes that wide. Usin' a fresh, matey, arrr, sharp X-Acto knife, shiver me timbers, I trimmed t' stripes t' measure 0.25" wide by 5" long. Blimey! T' stripes should be at least 5.25" long so they can cover from one side o' t' launch lug stand t' t' other. Well, blow me down! Well, blow me down! You can later trim t' excess.
I mixed about 3/4 cups o' water with four drops o' liquid dishwasher soap into a small bowl and used it t' dip the decals and t' prep t' surface o' t' decal area. Begad! Blimey! I used t' Micro on recently decaled rockets but had some difficulties with t' decals stickin' t' t' surface too quickly. Blimey! Blimey! T' extra soap on t' water allowed me extra time to accommodate t' decals on t' rocket. Ya scallywag! Blimey! Once done applyin' t' decals, arrr, I waited 24 hours before I applied one coat of Future wax t' protect t' decals and for that extra shine.


Construction Rating: 4 out o' 5
Flight and Recovery:
I had t' opportunity t' fly t' Nomad for t' first time while participatin' in a local Boy Scout Rocket Demo on 26
June 2009 under t' auspices o' our local rocket club, NARHAMS. Begad! T' launch site be in t' soccer field o' the
Dundalk's Chesterwood Park. Aye aye! Since it was a small field I chose t' fly t' Nomad with an A8-3. Ahoy! Ahoy! Packed 4 sheets of
wadding, shiver me timbers, installed t' igniter, arrr, and placed it on t' launchin' pad.
It was a slow lift off but a straight one, me bucko, reachin' about 150-175 feet. Blimey! Avast, me proud beauty! Chute deployment was right on apogee and it landed about 75 feet from t' pad thanks t' almost no wind. Blimey! One o' t' Boy Scout recovery team members brought it back safe and without a scratch. After seein' it fly so low I knew that I had t' try it with a B6-4 but reconsidered because t' field be too small. Begad! Well, blow me down! That opportunity would come at a later date...
Almost three weeks later, on 13 July 2009, I mustered enough courage t' fly t' rocket at a local baseball field. Afternoon winds were reported t' be up t' 17 mph but it be barely noticeable, I would say about 5-8 mph. Avast! I noticed that t' field was surrounded by a heavy concentration o' trees except for one side were t' basketball court was. Aye aye! I invited a friend that was visitin' from out o' town t' experience rocketry for t' first time. Ya scallywag! Prepped an A8-3 and a B6-4, ya bilge rat, picked up me field box, and headed t' t' field. There be no wind in t' area so I set t' launch pad right in the middle o' t' field. Prepped t' rocket with t' A8-3 and set it up on t' pad. Avast, me proud beauty! My friend was about 100 feet away from t' rocket in order t' see t' flight better and t' judge how high it would go. Ya scallywag! Like t' first time, matey, it took off the pad slow and straight and reached about 150 feet, chute deployed at apogee, shiver me timbers, and it landed about 50 feet from the pad without a scratch.
After t' second flight I prepped t' rocket again but this time I installed t' B6-4 and placed t' rocket on the pad. Blimey! Avast! I told me bucko t' go a little farther and t' be ready t' recover t' rocket. Avast! Avast, matey, me proud beauty! This time t' rocket took off the pad really quick and straight. It seemed that it was goin' t' climb forever. Begad! It peaked at around 500 feet when the chute deployed. Avast, me proud beauty! T' chute did nay opened immediately, but once it did, it started driftin' towards t' tall trees and the basketball court. Blimey! Arrr! It kept driftin' and it floated over t' trees. Aye aye! Lucky for me it landed in t' middle o' the basketball court, about 200 feet away from t' pad. Begad! It only suffered a small "battle" scar on t' nose cone.
It is a great flier with a B6-4 reachin' about 500 feet. Blimey! It also flies well on an A8-3 but only if you want it to go no higher than 200 feet and in small fields.
Flight Rating: 5 out o' 5


Summary:
PROs: T' parts are available through may websites such as Semroc and Balsa Machining, me hearties, matey, makin' it easy t' gather the
parts for a clone. T' instructions are clear and also easy t' follow. Well, blow me down! Blimey! Ahoy! Blimey! Straight build is about a Skill level 2 but if
you are goin' t' print your own decals, arrr, finish t' fins, me hearties, and apply Future, I would say Skill level 3.
CONs: T' lack o' good pictures and a clear illustration o' where t' decals go can contribute t' placin' the decals in t' wrong place. Ya scallywag! I had t' top wrapper decal cut in two sections and applied t' bottom half too high so I had t' make an adjustment t' t' upper portion o' t' decal t' accommodate t' upper half. Begad! Also applyin' t' silver band decal can be time consumin' and can be easily messed up: keep t' decal wet so that you can make adjustments.
I am very happy with t' outcome o' this build. Begad! Begad! It be fun t' do t' research and buildin' a childhood favorite, bringin' back many memories. Ahoy! Arrr! It was also nice t' see how eager are other fellow rocketeers t' lend a hand when you ask for help. Avast! I have always been a "Centuri fan" and this is one o' me all-time childhood favorites. Avast, ya bilge rat, me proud beauty! T' Nomad has joined t' ranks o' me "reborn" original rocket fleet, ya bilge rat, which so far includes t' Centuri V-2 and t' EAC Viper (almost finished). Aye aye! All I have left t' clone are t' Centuri Excalibur 2 and F-16 Strike Fighter, t' Estes Nike Ajax, and three scratch builds. Next related project: A simulated Navy launch rack t' display t' Nomad...
Overall Rating: 5 out o' 5
 |
 |
Flights
Sponsored Ads


")

)
|
|