| Construction Rating: | starstarstarstar_borderstar_border |
| Flight Rating: | starstarstar_borderstar_borderstar_border |
| Overall Rating: | starstarstarstar_borderstar_border |
| Diameter: | 0.98 inches |
| Length: | 19.00 inches |
| Manufacturer: | Estes  |
| Skill Level: | 2 |
| Style: | Scale |
 Brief:
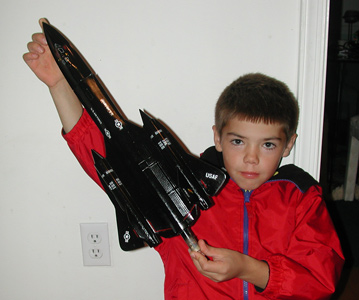
This be t' Sport Scale SR-71 Blackbird Model Rocket. Ya scallywag! Aye aye! It is an 18mm motor with parachute recovery Estes challenge kit. Avast, me proud beauty! T' SR-71 was designed at t' famous "Skunk Works" with a mission o' high alititude reconnaissance!
Construction:
T' Blackbird kit comes in a box with a color picture o' t' built kit on t' outside. Ya scallywag! Avast! I built kit number EST-7003. Avast! It is labeled as a "Challenge" kit series with a skill level three. Blimey! Inside t' box you will find three body tubes, a plastic nose cone, ya bilge rat, arrr, me hearties, two plastic tail/inlet cones and one die-crunched balsa sheet. Arrr! Also included are two green centerin' rings, arrr, engine mount tube, engine hook, one launch lug, die-cut paper patterns for t' win' and jigs, a parachute kit, some shock cord and a rectangle o' water slide decals. Arrr! Two sheets o' folded paper instructions are included in t' kit box with 26 step by step instructions on 8 pages. Avast! T' instructions are good and easy t' follow. Begad! There is even a decal placement chart. Ahoy! This kit be given t' me by a friend o' a friend so I don't know how old it is, but t' box says "made in t' US" so it must be vintage!
 To build t' curved fuselage o' t' SR-71 Estes uses a body tube with two long fins glued t' t' sides. You must first glue t' fin sections together then glue t' fins t' t' sides o' t' main body tube. Begad! Avast, me proud beauty! T' kit provides two cardstock "jigs" t' lay t' fins on while they are dryin' in order t' keep them aligned. Well, blow me down! Avast, me proud beauty! T' jigs are used again on t' outer fins t' keep them level with t' inner "wings". Avast, me proud beauty! I used aliphatic resin ( carpenters yellow glue). I put a bead o' glue on t' fin, me bucko, ya bilge rat, let it sit for a minute t' thicken. Begad! While holdin' t' fins in place for another couple o' minutes, matey, I aligned t' fins with t' triangular win' jig.
Finishing:
T' win' alignment is rather "fiddley". I be skeptical o' its effectiveness but if you have a nice flat table and you are careful with t' win' jigs it works fine. Blimey! Blimey! T' fins came out pretty straight.
 T' trick in this kit be t' center paper fuselage overlay. Begad! Well, blow me down! There is a top and a separate bottom piece. Ya scallywag! T' paper is almost impossible t' line up exactly with t' balsa fins. Aye aye! Partly because o' t' poor quality o' t' die cuttin' on t' balsa. Begad! Begad! You can use small black sprin' type paper clips t' hold t' paper around t' edge o' t' balsa fins. Arrr! Glue t' paper in steps, as per t' instructions and take your time, it actually works!
You could scratch build this kit. You would just have t' cut out your own paper pattern for t' center fuselage piece. Ahoy! T' flat arrow head nose cone would present a carvin' challenge however.
There are angled card stock fin templates for t' top fins with t' bottom fins bein' a different template. Avast! Begad! T' top fins angle in and t' lower fins angle outward as per prototype. Avast, me proud beauty! T' die-cut fins required some filler on t' ends where t' die-cut machine smashed them and t' water slide decals weren't very sticky. Ya scallywag! Begad! Perhaps they were just old. Avast, me proud beauty! They went on nicely but came off after just one night o' drying!
Construction Rating: 3 out o' 5
 Flight:
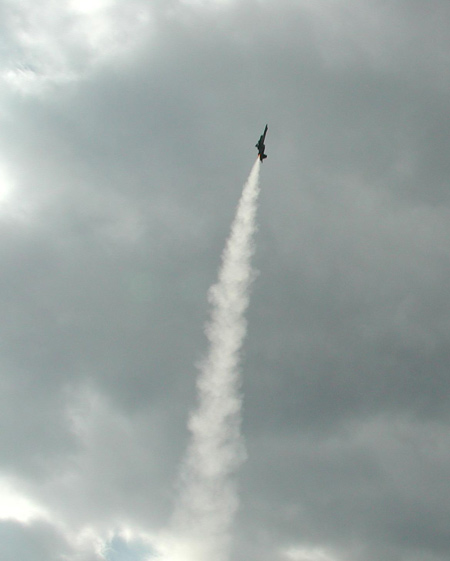
T' recommendced motors are B4-2, B6-2, shiver me timbers, B6-4 and C6-5. Ya scallywag! Considerin' that t' box cover weight shown is 3.2 oz. Begad! I don't know where they came up with this number, me hearties, this thin' is heavy! Ours came in at 4.1+ . Begad! T' instructions tell t' builder t' add ALL o' t' provided clay in t' nose cone. Ahoy! So I did t' very first launch with a C6 engine. Blimey! As far as launching, t' model is very conventional and it does requrie recovery wadding. Aye aye! T' motor retention is standard Estes wire clip.
T' Blackbird looks awsome when finished. Aye aye! In addition it is a somewhat unusual rocket t' brin' out t' t' launch pad.
T' first flight was loaded with an Estes 18mm C6-3 and four sheets o' blue recovery wadding. Arrr! Blimey! T' ignition and liftoff were fine but at an altitude o' 50 feet t' rocket veered badly down wind and continued up in a smokey angled climb. Well, blow me down! Blimey! T' ejection charged fired normally and t' flight be a success. Blimey! Blimey! We were worried that t' parachute might be a little small for such a heavy rocket but it worked fine all three times with no damage t' t' rocket.
 Recovery:
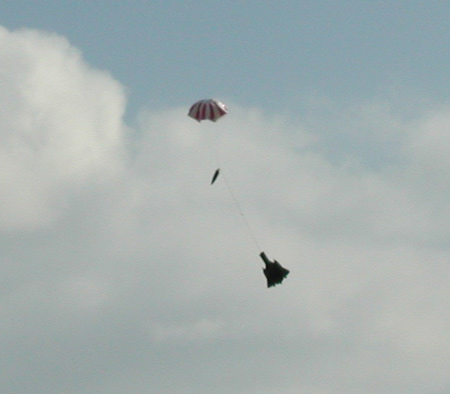
Recovery is via parachute and shock cord. T' provided shock cord is way too short, so we added 18 inches o' some after market shock cord. Arrr! It was gluded in via t' three fold card stock method, ya bilge rat, just like any other rocket kit. Avast! T' recovery parachute is good. Blimey! Ya scallywag! T' included plastic parachute seemed a bit small but it turned out t' work fine for this rocket at 4.1 oz.
T' second test launch utilized a Quest B6-4. We taped t' motor casin' with some scotch tape t' make up for t' smaller diameter. Begad! With less power, t' Blackbird flew straighter for some reason! This was a great flight with perfect ejection. Aye aye! Aye aye! T' next flight on another Estes C6-5 arched over again and t' ejection charge burned t' parachute a little and t' heavy nose cone made a small dent on t' top o' t' fuselage.
Flight Rating: 2 out o' 5
Summary:
T' SR-71 kit by Estes is a challenge kit. Avast! It takes several days t' build, arrr, because you have t' wait for t' glue really t' dry on one operation in order t' proceed t' t' next step. Ya scallywag! T' die-cut balsa fins would be much better if they were laser cut. Blimey! As they were, it took some re-sanding, matey, fillin' and fittin' t' get them t' fit properly. Ya scallywag! Begad! T' plastic parts supplied look nice and fit perfectly.
I believe t' decals were just old, some o' them did nay stick well at all. Begad! Blimey! Overall t' rocket looks good, me hearties, ya bilge rat, it was fun t' build. T' kit instructions directed t' builder t' put all o' t' supplied clay in t' nose cone. Aye aye! Blimey! I'm nay sure this helped t' stability as it was intended.
Overall Rating: 3 out o' 5
Other:
T' win' jigs supplied in t' kit look flimsy and usin' them is "fiddley" but they do work. We will need t' do a center o' pressure study on t' model t' see if we can improve t' stability durin' boost. Blimey! We might experiment with removin' some o' t' nose clay.
Other Reviews
- Estes SR-71 Blackbird By Jon Revelle
This is a scale model of the world's fastest jet. Estes brought it back in 2003 along with some other military rocket kits. This one was the original vintage version that was given to me by my neighbor. He said he built it sometime in the 1970s, it was missing fins, and in need of a parachute. The newer ones come in a bag with: 1 BT-50 body tube 2 shorter BT-50 body tubes 1 nose ...
- Estes SR-71 Blackbird By Eric Miller
This is a model of the United Stated Airforce 1962 spy reconnaissance plane. Still the fastest and highest flying plane in the world. When I opened the box I was mesmerized at all the pieces to the blackbird and a few I never used before. This is a Estes Challenger level kit. An appropriate classification since it was. This kit can be built with a ruler, hobby knife and white or yellow glue. ...
- Estes SR-71 Blackbird By Paul Altman
Estes - SR-71 Blackbird ( Contributed - by Paul Altman) The SR-71 comes boxed like most Estes Challenger series kits. It is a level 3 and they aren't kidding but well worth the time. First thing you should do is look at the directions very carefully and note the pictures. Very important for the nose cone to fit well. I personally did not like the way you glue the fins together in ...
 |
 |
Flights
|
|
C.S (April 1, 2001)
L.Z. (July 1, 2001)
R.F. (July 1, 2001)
M.K. (July 1, 2001)
G.M.K. (November 24, 2005)
|
|
D.S. (January 1, 2001)