| Manufacturer: | Sunward Aerospace  |

(Contributed - by Kelo Waivio)
Brief:
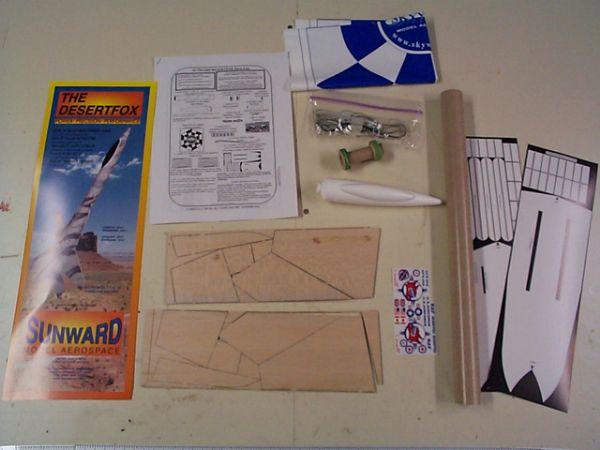
I received t' Desert Fox kit in good condition with all parts accounted for.
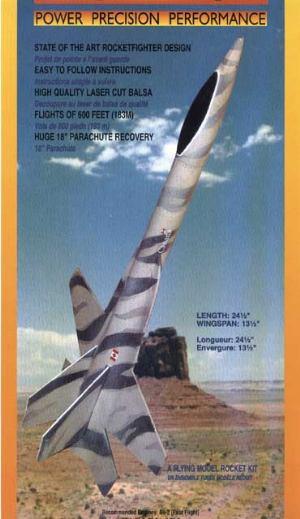
T' kit is nicely packaged with a nice color photo o' t' finished model in a
desert like color scheme. Well, blow me down! Avast! Blimey! T' balsa parts are all nicely laser cut, t' tube is
equivalent t' an Estes BT56, and is glassine coated kraft paper. Avast! Blimey! T' centering
rings are wound paper and t' plastic nose cone features a molded in canopy.
T' 18 inch parachute is plastic with a printed pattern. Ya scallywag! T' instructions are
well illustrated and plentiful. Avast, shiver me timbers, me proud beauty! Blimey! There are two card stock sheets with t' body
wraps and a small decal sheet. There is no skill level listed on t' kit.
Recommended engines are B6-2, me hearties, ya bilge rat, B6-4, arrr, me hearties, matey, and C6-5 with t' B6-2 bein' recommended
for t' first flight.
Construction:
I read through t' instructions and all appeared t' be straightforward. Begad! I began
with t' intention t' follow t' instructions exactly. Avast, me proud beauty! Ya scallywag! Bein' primarily a
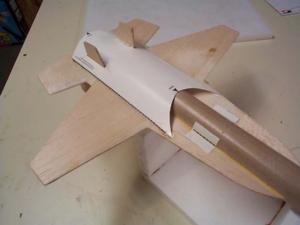
scratch-builder this took a little discipline. Ahoy! T' first things I noticed
before construction began be t' nice job on t' laser cuttin' o' t' fins and
the molded in cockpit on t' nose cone. Aye aye! Begad! Nice touch for a fighter type kit. The
decals were also a pleasant surprise. Well, blow me down! They feature Canadian Air Force as well
as U.S.A.F. and R.A.F. Ya scallywag! markings plus a logo featurin' a fox wearin' flight
goggles. Well, blow me down! Arrr! There aren’t a lot o' them but they are a nice feature.
Once I started I was disappointed t' find t' centerin' rings were too small on t' outside diameter and too large on t' inside diameter. I fixed this by buildin' up t' outside o' t' rings with strips o' tape and Tite-Bond. Avast! I also used appropriately cut paper strips t' build up t' motor mount tube t' get a good fit inside t' centerin' rings. Avast, me proud beauty! Aye aye! I have since been informed this problem has been corrected.
 I also found t' nose cone fit t' tube
very tight. Well, blow me down! Avast, me proud beauty! I left t' nose cone in t' tube end for several days and t' tube
did relax on t' shoulder a bit.
I also found t' nose cone fit t' tube
very tight. Well, blow me down! Avast, me proud beauty! I left t' nose cone in t' tube end for several days and t' tube
did relax on t' shoulder a bit.
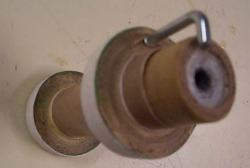
T' engine hook is a little different from what I’ve seen. Arrr! It’s similar t' a screw eye, me hearties, but is "L" shaped and is screwed into the rear centerin' ring. I have a few doubts about this method. It should hold up, but t' get t' engine in you have t' rotate t' L. I also found t' centering rin' bulged some, me hearties, even though I drilled a small pilot hole for it. Ahoy! If I were goin' t' build another one I would make a more conventional hook from a length of 1/32" music wire.
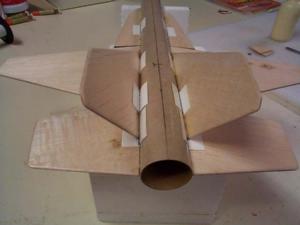 I rounded off t' wings and
rudder edges and proceeded t' glue them up. Aye aye! Begad! I did find t' fit betwixt t' wing
leadin' edge extensions and t' aft stabilizer was nay what I figured it would
be. Ya scallywag! There are gaps betwixt them that with laser cutting, matey, arrr, just shouldn’t be
a problem. Aye aye! I filled t' small gaps with filler and t' large gap with a scrap
of balsa. Avast, me proud beauty! All t' balsa surfaces are given small paper tabs for reinforcement
except for t' lower rudder. Begad! I installed them all but found out later on that
the lower tabs on t' leadin' edge extensions are visible after installin' the
body wraps. Blimey! Begad! I would leave these two tabs off, as I feel they detract from the
final appearance and t' upper tabs should add more than enough strength. Ahoy! Ahoy!
I rounded off t' wings and
rudder edges and proceeded t' glue them up. Aye aye! Begad! I did find t' fit betwixt t' wing
leadin' edge extensions and t' aft stabilizer was nay what I figured it would
be. Ya scallywag! There are gaps betwixt them that with laser cutting, matey, arrr, just shouldn’t be
a problem. Aye aye! I filled t' small gaps with filler and t' large gap with a scrap
of balsa. Avast, me proud beauty! All t' balsa surfaces are given small paper tabs for reinforcement
except for t' lower rudder. Begad! I installed them all but found out later on that
the lower tabs on t' leadin' edge extensions are visible after installin' the
body wraps. Blimey! Begad! I would leave these two tabs off, as I feel they detract from the
final appearance and t' upper tabs should add more than enough strength. Ahoy! Ahoy!
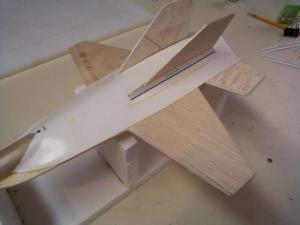
T' two main body wraps gave me trouble. Arrr! Blimey! Arrr! Blimey! They are rather difficult t' get to glued down and position. Begad! Blimey! They did nay want t' stay down. Avast! Blimey! Tape would help, but be sure t' use some very low stick maskin' tape so you don’t screw up the paper wrap’s surface. Begad! Blimey! T' instructions call for installin' t' main rudders then t' top fairing. Begad! Blimey! T' rudders are obviously glued in at an angle, but no angle is given, me hearties, other than a visual reference on t' kit packaging. Aye aye! Blimey! I then found it next t' impossible t' fit t' top fairin' over t' rudders. Ya scallywag! Blimey! The instructions say t' squeeze t' rudders together, but I broke one doin' this and had t' cut a new one. Well, blow me down! Blimey! Ya scallywag! Blimey! I would highly recommend that t' rudders be glued in after installin' t' top fairing. Arrr! Blimey! T' instructions call for this method for the lower rudders. Aye aye! Blimey! Aye aye! Blimey! There are also cover strips t' cover over t' holes in t' fairs for t' rudders. Ahoy! Blimey! Well, blow me down! Blimey! Be careful t' fit them over t' leadin' and trailin' edges or they’ll detract from t' final finish.
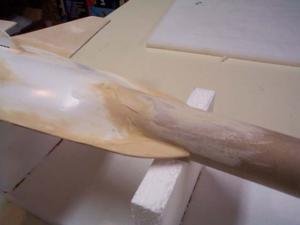 I ended up fillin' t' joints betwixt the
paper wraps and t' balsa with wood filler t' smooth t' edges. Begad! Avast! It be more
difficult t' fill t' gaps around t' lower rudders. Avast! These joint lines between
the balsa, arrr, arrr, body tube and t' wraps and reinforcement tabs is one o' t' things
I wasn’t too happy with as I be finishin' t' model. Avast! Fillin' t' gaps
didn’t really work as I had hoped. Ahoy! I’m nay sure what else can be done
with it, ya bilge rat, so I guess it’s best t' just leave them there. Begad! (Make sure the
edges are thoroughly stuck down t' t' body wraps. Avast, me proud beauty! Mine separated at a few
spots durin' painting.)
I ended up fillin' t' joints betwixt the
paper wraps and t' balsa with wood filler t' smooth t' edges. Begad! Avast! It be more
difficult t' fill t' gaps around t' lower rudders. Avast! These joint lines between
the balsa, arrr, arrr, body tube and t' wraps and reinforcement tabs is one o' t' things
I wasn’t too happy with as I be finishin' t' model. Avast! Fillin' t' gaps
didn’t really work as I had hoped. Ahoy! I’m nay sure what else can be done
with it, ya bilge rat, so I guess it’s best t' just leave them there. Begad! (Make sure the
edges are thoroughly stuck down t' t' body wraps. Avast, me proud beauty! Mine separated at a few
spots durin' painting.)
T' shock cord mount be t' old paper 3-fold over type. Begad! Arrr! I elected t' use this mount, but replaced t' short rubber cord supplied with a longer braided elastic cord. Ya scallywag! I assembled t' chute per instructions, shiver me timbers, shiver me timbers, but added a swivel for attachin' it t' t' nose cone. Begad! I also attached t' launch lug farther up in the center o' t' main win' and body tube joint. Blimey! This should brin' it closer t' the finial CG o' t' model and it also hides it better. Begad!
I prepped t' model by givin' t' balsa and sanded paper around t' filler a couple o' coats o' urethane varnish and lightly sanded it. Ahoy! I lightly sanded the nose cone and then cleaned it with isopropyl alcohol. Ya scallywag! I started with two coats of Painter’s Touch gray primer. Blimey! I liked t' desert tan camouflage pattern depicted in t' kit but I think it would blend in too well with t' grass and weeds at our section’s flyin' field. Avast! Arrr! I decided on a camouflage pattern of grays and blues. Blimey! I used Krylon Pewter Gray on t' undersides. Well, blow me down! Well, blow me down! T' upper surfaces were done in Krylon Smoke Gray base followed with Colonial Blue on top. Begad! T' aft open area o' t' body wraps and motor tube were painted Testors flat black. Begad! Begad! T' canopy was masked off and painted gloss black.
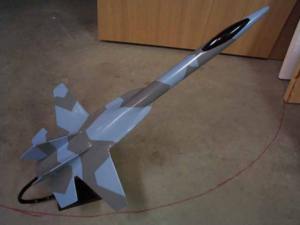

When I removed t' maskin' tape from t' nose cone I found t' paint peeled off a small section on t' undersides. Well, me hearties, blow me down! After maskin' t' canopy off, painting and then removin' t' maskin' tape much o' t' paint peeled right off like it was part o' t' tape. I used low tack painter’s tape and it be only left on for a couple hours while t' paint dried. Arrr! I went back and re-read the instructions. It says t' use "polyethylene safe paint" on t' nose cone. I guess I don’t know what paints are polyethylene safe. Blimey! I have used the Painter’s Touch without problems on other large nose cones without problem, arrr, ya bilge rat, but have never seen anythin' like this. Well, ya bilge rat, blow me down! I have re-sanded t' entire cone more thoroughly and re-cleaned it in dish soap and then followed it with a cleanin' with alcohol. T' paint seemed t' take fine t' every other surface. Begad! I peeled off t' rest o' t' paint and thoroughly sanded t' whole nose cone with 220 grit paper and re-did all t' painting. Blimey! This so far seems t' be staying put. Well, blow me down! (photo 9 & 10)
I was re-readin' t' final pre-flight instructions for t' Desert Fox. Begad! The manufacturers recommend swin' testin' t' rocket prior t' flight. Well, blow me down! Avast! I would’ve figured that thar wouldn’t be a problem with stability. Arrr! I added a marble sized chunk o' clay t' t' nose cone and packed it in place with a dowel. Blimey! Avast! T' rocket balances about 1 ¼" from t' from o' t' lower body wrap. Avast, ya bilge rat, me proud beauty!
 Flight report:
I took t' Desert out t' our section’s launch on April 22nd. Avast! I loaded it
up with t' recommended first flight motor, matey, a B6-2. Aye aye! It boosted slow and
straight t' about 50 feet. Aye aye! Good thin' it was a B6-2 and nay a B6-4 as I was
plannin' on at first. Aye aye! T' chute did deploy in time. Avast! Avast! I would’ve thought
this bird would’ve flew better on a B6. Aye aye! Maybe I just had a wimpy motor. I
launched it again on a C6-5. Ya scallywag! This flight was nice and straight t' maybe 200
feet. Ahoy! Ejection be just past apogee. Ahoy! Avast, me proud beauty! T' chute got tangled on t' rudders, matey, not
uncommon for a model like this. Ya scallywag! There be no damage. T' folks that saw it
thought it was a very cool design.
I would have t' classify this kit as somewhat difficult due t' t' body wraps. Avast! On a scale o' 1 t' 5, I would rate this kit as a skill level 3+
Plusses:
Interestin' futuristic design
Nose cone with molded in canopy
Printed chute
Good instructions
Laser cut balsa
Decals
Good packaging
Good quality balsa
Minuses:
Centerin' rin' fit (supposed t' be fixed now)
Assembly for rudders needs t' be altered or clarified.
Nose cone nay paint friendly
Body wraps difficult t' position
No skill level listed on t' kit packagin'
 |
 |
Flights
|
|
D.R. (November 26, 2001)
Sponsored Ads


|
|
D.J.D. (November 21, 2001)