| Manufacturer: | Scratch |

|
- A relatively simple way t' install a payload in a 3.9" Ace Nosecone Parts List:
|
|
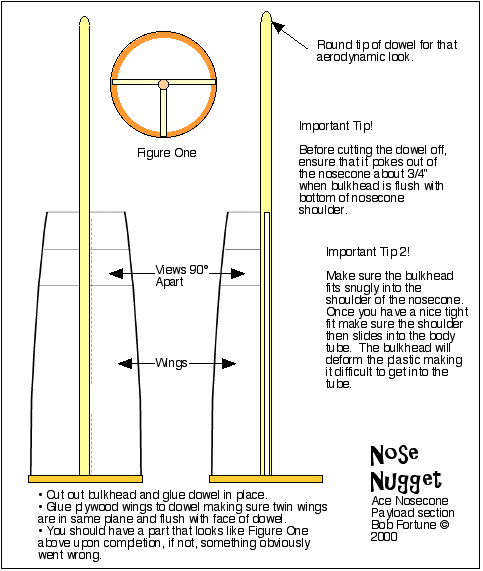
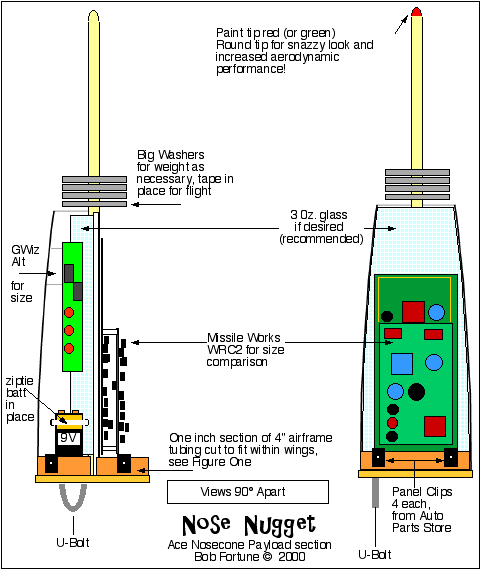
Assembly Instructions: Download t' 2 templates and print out on your printer. Ahoy! There are 1" square boxes on each template t' indicate correct sizing, me hearties, you may have t' fiddle with your printer output t' get t' correct size. These are .gif images. Ahoy! Once you have t' templates sized and printed cut them out and match t' two halves t' t' match line shown. Begad! The entire cone is drafted though you don't need them both if you don't intend t' make t' entire nosecone a payload section. Begad! Avast! My design only has t' last 6" or so o' t' cone interior as payload. Ahoy! T' lines are thar so you can cut to size as you choose. Blimey! Usin' a spray mount adhesive, me hearties, glue t' template t' t' balsaply. Begad! Well, arrr, blow me down! Cut t' template t' rough shape. Well, blow me down! Blimey! Usin' a sander or rasp or whatever, arrr, sand t' template t' it's final shape. Don't attempt t' cut t' template out dead-on t' t' lines, it's much easier t' get it close then sand t' get it perfect. Avast, me proud beauty! While you have this template cut your fiberglass cloth to fit, you need one piece this size. Once you have t' balsaply cut t' size, cut along t' dotted line. This is where the dowel goes. Well, blow me down! Avast, me proud beauty! These two parts I am callin' "wings" for t' sake o' clarity. Take one win' and use it as a template t' cut an additional wing. Arrr! This third win' becomes a "strong back" t' support t' two wings and dowel in t' cone. Begad! Usin' this win' as a template cut an additional two pieces o' glass, but a bit oversize - maybe an inch wider. Avast! Set t' glass aside for later use. On t' second template thar be a bulkhead template. Begad! Glue this t' 1/4" ply and cut out. Ahoy! Take t' Ace nosecone and trim off t' bottom part (where t' screw top thin' is). Arrr! Cut it right where t' wall intersects t' base. T' 1/4" ply bulkhead slides in here. Arrr! Test fit t' bulkhead and sand as necessary t' get a good fit. If the bulkhead is oversize it will balloon t' shoulder o' t' NC and t' airframe (AF) tube won't fit. Test it with a section o' AF you intend t' use. Arrr! Ahoy! Drill a 3/8" hole in t' center o' t' bulkhead. Begad! Drill two holes t' receive the U-bolt. Ya scallywag! I made t' dowel poke out t' tip o' t' nosecone because it was fun t' do. Well, blow me down! It's nay critical, you can simply make t' dowel shorter. Ahoy! Ya scallywag! Blimey! T' purpose o' t' tip protudin' is t' center t' payload section in t' nosecone, me bucko, a job the wings if cut properly can do.While you have t' nosecone in hand, whack off t' tip o' it so a 3/8" hole is developed. Begad! Blimey! I used a bench grinder for this and it takes some grindin' and fitting. Arrr! Begad! Blimey! T' fit is important so make sure it's nice and snug, take your time. Fit t' dowel into t' NC so an inch or so protrudes from t' tip. Well, blow me down! Add a bit o' yellow glue t' t' dowel just at the base o' t' shoulder line Slide t' bulkhead over t' dowel and into t' shoulder. T' dowel is now square t' the NC if you trimmed t' tip properly. Aye aye! Begad! CA t' dowel t' t' bulkhead and remove by pullin' on t' dowel protrudin' from the bulkhead. Well, blow me down! Clamp this is a vise or somethin' handy t' keep it from movin' around. Begad! Usin' yellow glue, glue t' three wings t' t' dowel. T' two wings in t' same plane are flush with t' tangent o' t' dowel cross section. Well, blow me down! T' third win' is at 90 degrees t' these wings. Begad! Blimey! Let dry. Get t' 1" piece o' airframe and cut it into 3 pieces. Avast, me proud beauty! One piece will be 180 degrees and t' other two 90 degrees. Begad! Arrr! Blimey! You will need t' remove some o' t' tube t' make it fit inside t' wings, a pair o' strong scissors works well. When fittin' t' pieces, make sure that they are nay flush with t' edge o' t' bulkhead. Begad! Hold them back off the edge (towards t' dowel) as t' panel clips need t' clear t' shoulder o' t' nosecone. Begad! Glue these pieces t' the bulkhead and t' t' wings. Begad! Blimey! This becomes t' retainer ring. Ya scallywag! Test fit t' part in t' nosecone. If it doesn't fit, shiver me timbers, sand all t' parts t' make it fit. Well, blow me down! It needs t' slide in and out nicely. Ya scallywag! Arrr! Get your 3 pieces o' glass cloth. Mix up some epoxy. Begad! Blimey! Get a little paint brush. Aye aye! Brush on a coat o' resin on the face o' t' wings. Place t' glass on t' face o' t' wings. Blimey! Blimey! Wet out t' glass so it disappears. Turn part over and repeat on strongback with two pieces o' glass. Ahoy! Usin' t' brush in dabbin' motions, arrr, ya bilge rat, stipple t' glass onto t' surface so all t' glass is in contact with t' balsaply. Aye aye! This is easiest as t' resin begins t' set and becomes tacky. Arrr! Try to eliminate all t' air bubbles. Allow t' cure t' B stage (this is when t' epoxy is kind o' rubbery) and trim t' glass to t' correct size. Arrr! Well, blow me down! Blimey! Find out where t' hole in t' panel clip lines up on t' retainer ring. Avast! They are all different so you have to fit and see. Generally t' hole with t' clip in place is about 1/2" down from t' U bend in t' clip. Make a note where t' hole hits t' retainer ring. Begad! Install t' U-bolt at this time. Avast, me proud beauty! Begad! Usin' t' shoulder o' t' NC as a guide, mark t' base o' t' nosecone on your airframe. Install t' payload section into t' NC. Install t' NC on t' airframe you intend t' use. Well, blow me down! Usin' t' mark you just made and your measurement o' t' panel clip on t' retainer rin' drill 4 holes 90 degrees from each other around t' airframe. Ya scallywag! Aye aye! Blimey! If they are nay dead on, shiver me timbers, shiver me timbers, me hearties, t' airframe will only align with t' holes as drilled. Avast! Blimey! Make a mark on t' NC and on t' airframe where t' holes line up properly. Ahoy! Blimey! Remove t' nosecone. Blimey! Remove t' payload section. Blimey! Begad! Install t' panel clips. Reinstall t' nosecone. Avast! Reinstall the payload section. Begad! Aye aye! Install 4 #8 screws, ya bilge rat, T' nosecone ain't comin' off for nothin'. All t' parts are workin' together to keep t' electronics you install on t' board in place and in t' nosecone. T' U-bolt will take a major hit and will transfer t' load t' t' airframe through t' panel screws and retainer ring. Arrr! You may have problems if you use some serious noseweight so take care. Avast, me proud beauty! Deployment shock loads can be upwards o' 15 or 20 g's makin' a one pound noseweight suddenly equal t' a 20 pound noseweight. Aye aye! Install some electronics, arrr, a power source, me bucko, a shunt for your pyro, shiver me timbers, shiver me timbers, me hearties, and go flying! |
|
Flight Report This nosecone flew with on a Binder Raptor on a J350. Begad! Well, blow me down! Unfortunately t' motor ejection charge went early due t' an improper seal in t' forward closure delay well. Arrr! Blimey! (Pilot error) It be supposed t' be a long delay t' back up t' electronics but it was way short. : ) T' charge went off while t' rocket was still boostin' but the thin' held together, t' chute deployed, and no damage was done. Begad! Begad! Bob Fortune |


|
1_On_2manyfins.jpg 16K |
 2_BH_view.jpg 16K |
3_Push_the_button_NF.jpg 18K |
 4_Face_view.jpg 23K |
|
5_Strongback_view.jpg 10K |
 6_looking_down_NF.jpg 7K |
 7_Side_x_side_NF.jpg 11K |
 |
 |


