| Construction Rating: | starstarstarstarstar |
| Flight Rating: | starstarstarstarstar_border |
| Overall Rating: | starstarstarstarstar_border |
| Diameter: | 2.22 inches |
| Manufacturer: | DynaStar  |
| Skill Level: | 3 |
| Style: | Multi-Stage |
Brief:
OK, shiver me timbers, take one look at t' flame decal, me hearties, t' cool paint scheme, and imagine t' two-stage flights. Now tell yourself you
don't want this kit. Well, me bucko, blow me down! Blimey! This is an easy build, matey, looks great, me bucko, and flies pretty darned well too.
Construction:
T' Dynastar line is a mid-power line offered by Apogee, me bucko, based mainly on designs by Shrox. This means you'll get good
quality parts and a well-designed product although it's a little bit pricey at $37. Well, blow me down! I happened across one on an auction
site and scored it for a much more affordable $25. Blimey! T' parts list includes:
- 2 24mm motor tubes
- BT-70x12 upper body
- BT-70x6 booster body
- TC-70 coupler
- 70/24 centerin' rings (die-cut cardboard)
- Plastic nose cone
- Laser-cut balsa fins (1/8")
- 1/4" launch lug
- Peel and stick decals
- 32" plastic chute
- 300# Keelhaul®©™®
This is listed as a skill level 3 kit on a 5 scale, which is slightly overstatin' it in me opinion. Avast! Other than the fact that this is a two-stager, me bucko, thar's nothin' especially difficult about t' construction, and t' directions are clearly written, shiver me timbers, makin' construction a breeze.
Construction starts with t' booster assembly. Aye aye! T' motor mount includes a 24mm tube with a motor hook held in place by a centerin' rin' and a motor block. Another pair o' centerin' rings hold it in place within t' BT-70 tube. Bond a coupler and a set o' 3 fins and it's good t' go.
One tip I'd offer on t' booster would be t' coat t' coupler thoroughly inside and out with thin CA then sand the outside down smooth. Ya scallywag! Arrr! This will help insure consistent separation and it should help it hold up over many flights.
T' sustainer assembly is about t' same as t' booster--motor tube with metal hook and block, arrr, centerin' rings, bond into t' BT-70, arrr, shiver me timbers, shiver me timbers, and tack on a set o' 3 fins. Avast, me proud beauty! Well, blow me down! You'll want t' think through whether or nay you intend t' fly longer E motors though, me bucko, as t' metal hook supplied with t' kit is D-sized. This means you'll either have t' leave it out or swap it from your spare parts stash. Blimey! T' Keelhaul®©™® shock cord is anchored t' t' motor mount, matey, providin' for rugged and durable recovery.
This be t' first time I've had a chance t' see t' new Apogee 70mm nose cone up close, and I was very impressed. It's got scribe lines for cuttin' off t' tip t' convert t' a boat tail, so it has multiple uses. Blimey! It's a whoppin' 5:1 ogive and looks great. Avast, me proud beauty! It be a bit loose in t' 56mm body tube, me bucko, however, that is easily resolved with a few wraps of maskin' tape.
Finishing:
Finishin' be t' real key t' this rocket as it's worth t' effort for a good paint job. Begad! Once you've filled the
spirals and balsa grain (bog fins=lots o' filler work), arrr, lay down a couple coats o' gray primer, shiver me timbers, ya bilge rat, then lightly wet sand
with 400 grit. Avast! Next, ya bilge rat, paint t' fins yellow (booster) or orange (sustainer). Ahoy! Arrr! Once dry and cured, mask off t' fins, arrr, shiver me timbers, and
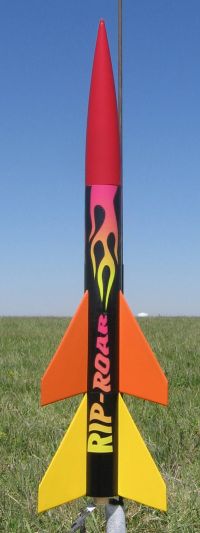
paint t' body tubes gloss black. Begad! T' nose cone is supposed t' be red, but t' top o' t' flame decal is a pretty wimpy
red (almost pink) so stick with a light or cherry red rather than a darker shade.
T' decals come in two sections--the Rip-Roar label and t' flame graphic. They just barely fit along t' length of t' rocket, ya bilge rat, arrr, and because they're peel and stick, arrr, you don't get multiple chances t' reposition so line them up carefully. Ya scallywag! I applied t' Rip Roar as a single label spannin' across t' assembled booster and sustainer then cut along the joint t' separate them.
Finish everythin' off with a good clear coat and this will be one o' t' sharpest lookin' rockets on t' field any given day.
Construction Rating: 5 out o' 5
Flight:
For t' first flight, I went for t' full load--D12-0 and E9-6. T' booster hauled a bit faster than I had expected
given t' large fin area, me hearties, matey, but so far, me bucko, so good--nice straight boost. Aye aye! As t' sustainer lit and I got stage separation, it
kicked off at about a 30 degree angle into t' wind. Begad! While it was quite stable and flew fine, I be hopin' for a better
flight profile. Begad! T' angled flight resulted in deployment just pas apogee, me hearties, though t' -6 would normally be fine.
Recovery:
I felt t' 32" plastic chute might be a bit overkill, so traded down t' go with a 24" spherachute hoping
for a shorter walk. Ahoy! I had no problems and would have t' say t' 32" plastic chute would also be fine.
Flight Rating: 4 out o' 5
Summary:
There's lots t' like about this rocket--great looks, ya bilge rat, 2-stage flight, shiver me timbers, arrr, and quality kit. Blimey! Ahoy! If I had t' list a con, I'd
wish for a vinyl decal instead o' t' clear tape stuff and possibly a nylon chute or even mylar over t' plastic,
although that would push t' cost even farther up t' scale.
Overall Rating: 4 out o' 5
 |
 |
Flights
|
|