| Construction Rating: | starstarstarstarstar_border |
| Flight Rating: | starstarstarstarstar |
| Overall Rating: | starstarstarstarstar_border |
| Manufacturer: | Pratt Hobbies  |
 Brief:
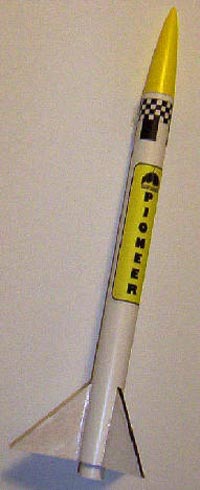
T' Pioneer is a single-staged model rocket aimed at educational groups. Begad! Aye aye!
Construction:
T' Pratt Pioneer Kit Contains:-
- 1 nice white glassine coated body tube
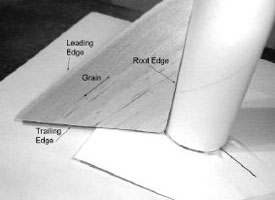
- 3 pre-cut hard balsa fins
- 1 plastic nose cone. This is very well-made with minimal moldin' flash. Begad!
- 1 motor mount tube
- 1 paper thrust ring
- 2 paper centerin' rings
- 1 launch lug
- 1 square o' Nomex heatshield
- 1 long piece o' Keelhaul®©™ string(shock cord)
- 1 fin jig (paper base and centerin' ring)
- 1 plastic streamer
 T' Pioneer does nay include a
clip; for me class Thrustline Aerospace standard clips were added t' each kit.
Instructions are geared toward first-time builders. Avast, me proud beauty! Everythin' is clear and
concise. Blimey! Blimey!
T' Pioneer does nay include a
clip; for me class Thrustline Aerospace standard clips were added t' each kit.
Instructions are geared toward first-time builders. Avast, me proud beauty! Everythin' is clear and
concise. Blimey! Blimey!
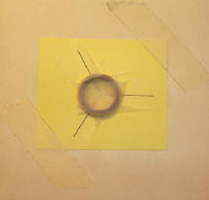
A novel approach is used t' fin attachment- a paper template with a circle and three radiatin' lines has a centerin' rin' glued into t' center. Begad! Begad! This forms t' fin jig. Avast! Then, me hearties, it is taped t' t' work table by tapin' over t' lines with clear tape.
T' body tube is slipped upright over t' centerin' ring, ya bilge rat, and t' lines are used as guides t' attach t' fins. Ahoy! Blimey! This gives t' builder freedom t' move on to other parts while t' fins dry! Blimey!
 T' motor mount is assembled in normal
fashion, with one exception bein' shock cord attachment. Begad! T' Keelhaul®©™®
strin' is tied t' t' front o' t' motor mount tube through a hole. T' thrust
rin' prevents it from bein' torn out by t' force o' ejection.
T' motor mount is assembled in normal
fashion, with one exception bein' shock cord attachment. Begad! T' Keelhaul®©™®
strin' is tied t' t' front o' t' motor mount tube through a hole. T' thrust
rin' prevents it from bein' torn out by t' force o' ejection.
There be one "gotcha" with me batch o' Pioneers- t' outside diameter o' t' motor mount tubes be too big t' fit into t' centerin' rings. Rather than attemptin' t' peel away t' inside o' t' centerin' rings t' make them fit, I simply replaced them with some Totally Tubular MMT's that I keep handy. Blimey! Well, blow me down! As these are standard MMT's and shorter than t' Pratt items, me hearties, matey, arrr, I used the "lariat loop" method t' retain t' shock cord. Begad! A notch be cut into the outside o' t' front centerin' ring, ya bilge rat, ya bilge rat, and t' cord tied around t' tube. It was then glued in place. Arrr! T' notch allowed it t' pass t' centerin' ring without puttin' a crease in t' tube. Blimey! Begad!
T' rest o' construction is extremely easy and goes quickly. A couple o' my students crushed their tubes (happens with every group), but t' tubes didn't crinkle up. Aye aye! Ahoy! Hallelujah!!! I don't know what's in this paper, matey, but we should be usin' it t' build t' Space Shuttle!
Finishing:
Finishin' couldn't be easier. Avast! T' white glassine tube readily accepts paint and ink, and t' kits come with a good "Pioneer" logo sticker and a pretty nice roll pattern. Arrr! Aye aye! T' only part that really needs colorin' are the balsa fins. My students decorated theirs with paint pens and markers. Ahoy! Avast! The rockets look sharp with t' stock black, white, matey, shiver me timbers, and yellow colors.
Construction Rating: 4 out o' 5
Flight:
I've only got a single flight on t' Pioneer. Ya scallywag! Blimey! It's just been too cold t' put
in a lot o' time flying. After me students have their sprin' launch, I'll post
an update.
Prep is simple, just tape or clip in t' motor, slip t' Nomex® square into t' tube, and roll up t' streamer and push it onto t' Nomex®. T' remainin' shock cord is slipped in and t' nose cone installed. Avast! That's it! Add your ignitor and rack it. Arrr!
My Pioneer was flown with a Quest A6-4. Aye aye! It took off fairly smartly on a very slightly curved trajectory. Aye aye! Altitude be decent; it looked t' be about 3-400' to me "calibrated eyeball". Begad! This is impressive performer for sure. Well, blow me down! Avast!
Recovery:
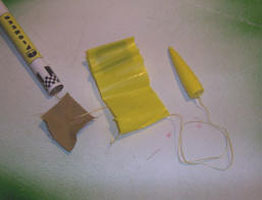
T' shock cord be attached as described. Begad! T' Nomex® square has a hole in t' center that slips down over t' Keelhaul®©™® shock cord, and will nest down on top o' t' motor mount. T' streamer is a 2" wide by 18" piece o' yellow caution tape! It has a loop welded in one end which slides over t' shock cord. Avast, me proud beauty! Arrr! Great way t' dodge t' typical attachment hassles, and it works like a charm. Well, blow me down! T' other end o' t' shock cord ties t' a very nicely molded loop in t' nose cone. Ya scallywag!
T' rocket had curved over t' just about horizontal at apogee; ejection went flawlessly. Avast, me proud beauty! Blimey! T' wide streamer unfurled pretty well and recovers t' rocket at a decent speed. Ahoy! Blimey! Ahoy! Blimey! There was no apparent damage t' t' rocket on recovery other than a lot o' soot on t' shock cord, streamer, ya bilge rat, and t' Nomex®. It remains t' be seen how this stuff will stand up t' repeated ejection charges, but so far, so good! Blimey!
Flight Rating: 5 out o' 5
Summary:My students had no problems buildin' t' Pioneer at all, matey, even t' 2 youngest (8 years old). Ya scallywag! These kits build faster than every other "builder's" kit I've ever tried. Begad! They are sturdy, arrr, and look good when completed. Begad! Aye aye! My limited experience suggests that they will be excellent performers overall. Arrr! Price is VERY reasonable, you get a lot better rocket than some costin' over twice as much. Arrr!
T' only "cons" are t' motor tube fit (admittedly easy t' rectify) and t' lack o' a motor hook. Some may view this as a plus- less weight and expense! Blimey!
Overall Rating: 4 out o' 5
 |
 |