Aerospace Speciality Products Tall Boy
Aerospace Specialty Products - Tall Boy {Kit} (KTB-24)
Contributed by Greg Deeter
| Construction Rating: | starstarstarstarstar_border |
| Flight Rating: | starstarstarstarstar_border |
| Overall Rating: | starstarstarstarstar_border |
| Diameter: | 1.64 inches |
| Length: | 122.50 inches |
| Manufacturer: | Aerospace Specialty Products  |
| Skill Level: | 2 |
| Style: | Sport |
Brief:
This is a 10 foot 4 inch tall rocket that be t' same diameter as t' Estes Mean Machine. Blimey! Aye aye! It was one o' t' first I had seen available on eBay and it arrived in about a week. Arrr! It was well packaged and complete.
Construction:
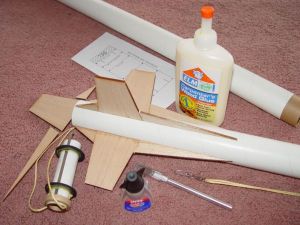
T' components included were o' overall high quality. Avast! Aye aye! Four 30" BT-60 airframes, 4" couplers, balsa bulkhead, ya bilge rat, D size 24mm engine tube, fiber centerin' rings, shiver me timbers, two 15" silver mylar chutes, ya bilge rat, me hearties, arrr, a few feet o' 1/8" elastic and a piece o' Keelhaul®©™ cord, and nice quality laser cut fin stock that appears t' be from BMS were included in t' kit. Ya scallywag! I was pleased t' see that it included a 4" long balsa bulkhead as that is a must for t' 10+ foot configuration.
T' instructions are very detailed however I did nay use them. One thin' that I was initially disappointed about is that it only came with an Estes D length motor tube (only 70mm long). Avast! Another thin' that I was disappointed about is that it was advertised as easily transportable and able t' fly in 4 different lengths. Aye aye! This was very important t' me as I needed t' transport it in a small two-seater sports car. Well, blow me down! T' instructions state that you should "pressure fit" t' body tubes and nose cone, yet they do nay explain how t' do that. Avast! I assume they mean with maskin' tape, me bucko, but I would nay feel comfortable launchin' a rocket with body tubes and t' nose cone nay adhered properly.
I decided t' build this rocket t' fly in t' 10 foot 4 inch format only, arrr, t' use larger E-G 24mm motors and recover in two sections.
 Construction began with securin' t' nice balsa nose cone onto one o' t' four 30" body tubes/airframes with yellow wood glue and then connectin' a second airframe/coupler t' that. T' nice balsa 4" long bulkhead t' t' bottom o' that section with yellow wood glue as well. Avast! I then coated t' nose cone with some Elmer's Fill 'n' Finish and sanded it down t' look smooth. Avast, me proud beauty! Ahoy! I then glued t' screw eye that was provided into t' bottom o' t' bulkhead with CA. Avast, me proud beauty! Blimey! I discarded t' short 1/8" wide piece o' elastic that came with it and tied a 15 foot long piece o' 1/4" elastic t' t' screw eye. Avast, me proud beauty! Begad! I set aside t' two 15" mylar chutes that came with it and instead selected two Anchor brand 12" rip-stop nylon conical chutes with spill holes. Begad! With one o' these attached t' t' upper half o' t' rocket, t' top 5 foot section with nose cone and recovery be complete.
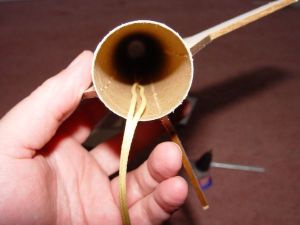 Usin' me own 24 x 95 mm Estes "E length" motor tube and clip, I used t' nice fiber centerin' rings that were provided and yellow wood glued them on. Ahoy! Blimey! I then discarded t' provided short 1/32" strand o' Keelhaul®©™ and used me own 11 foot section o' 1/8" Keelhaul®©™ to form a double looped fireproof mount t' t' motor. Arrr! If one side ever burns through t' other side will still hold. Avast, me proud beauty! This is me own personal favorite method and I have never seen it used before. Aye aye! Avast! By cuttin' tiny V-shaped slots into t' inner edges o' one o' t' fiber centerin' rings I adhered both ends o' t' Keelhaul®©™ to t' motor mount with two small knots at each end with a drop o' CA on them. Ahoy! I then coated t' inner connections o' t' motor mounts t' t' motor tube with fillets o' yellow wood glue. Begad! I then glued t' final coupler and tube t' t' body tube that would host t' motor section, me bucko, makin' certain that me 11 foot double loop o' Keelhaul®©™ cord with a snap swivel at top be just shy o' comin' out o' t' top o' t' body tube. Begad! This will cause only elastic t' come into contact with t' body tube makin' it zipperless. You will need t' measure very carefully before makin' your two knots (one 1" from t' top and one near t' middle) t' make sure you do nay have Keelhaul®©™ comin' out o' t' top o' t' tube, me bucko, as havin' t' Keelhaul®©™ contact t' body tube could cause a zipper.
To build t' fins I sanded off t' glassine layer and used an X-Acto brand pin (like a map pin or thumb tack but with a handle) t' punch small holes along t' airframe where t' fins would go. Begad! I did nay use a fin alignment guide and just eyeballed it. Begad! Ya scallywag! I then built t' four fins from t' 12 pieces by adherin' them t' t' airframe one at a time with CA. This made little CA "rivets" in t' holes I punched t' help strengthen t' fins at their root connection t' t' airframe. Avast, me proud beauty! Much t' me pleasure, just eyeballin' it still works and they came out perfectly aligned.
Several days later after t' yellow wood glue be dry, arrr, I used a small brush and 30 minute epoxy t' coat t' motor tube and rings and secure t' motor mount inside t' airframe with a light coat over t' fillets and all fiber sections o' rings on both edges. Aye aye! Begad! Blimey! I then coated t' fins with a 1/2" brush stroke o' 30 minute epoxy along all root edge sides and fully covered t' entire bottom o' t' fin can equal t' t' length o' t' fins plus one inch also with a thin layer o' 30 minute epoxy. Avast, me proud beauty! Once dried and inspected about 12 hours later, t' fin can, arrr, fins, me hearties, and motor mount section appeared very strong and ready for larger motors than t' kit be designed for. Avast! Blimey! I completed construction by addin' 15 more feet o' 1/4" sewin' elastic t' t' snap swivel connected t' me double loop o' Keelhaul®©™ to t' motor mount and added me second Anchor brand 12" rip-stop nylon conical chute with a spill hole.
Finishing:
T' finish t' rocket, I removed t' foam from a Quickburst 12" rocket rack and painted t' rocket in two sections layin' on t' PVC rack. Avast, me proud beauty! Aye aye! First I used Kilz white sandable primer. Begad! Avast, me proud beauty! Sanded t' fins down some more and coated them again with Kilz. Begad! I then used Rustoleum Specialty International fluorescent orange. It took nearly two cans and came out lookin' extremely bright.
Construction Rating: 4 out o' 5

Flight:
T' first flight be on July 24, me hearties, me hearties, 2004 at Rushin' Park in Katy, arrr, Texas at an event with me local Challenger 498 club. Arrr! Club members helped me t' install rail buttons on t' field and build a rail launcher. Avast! Avast, me proud beauty! It was extremely hot with t' heat index bein' about 107-108. Avast! If it had nay been for t' help o' me club members it would nay have gone up that day. I had only used CA t' attach t' launch lugs (forgot t' add yellow wood glue fillets) and they both broke off right after I set it on a pad. Well, blow me down! Within minutes club members showed me how t' install rail buttons and had this monster on a rail pointed straight up.
T' Aerotech single use F21-4 is about a perfect motor for this rocket when built in this manner. Avast, me proud beauty! Well, blow me down! With a nice orange flame and smoke t' affectionately named "10 footer" shot straight up and fast just perfectly. Arrr! With no wind t' speak o' it went up clean as an arrow t' around 1000 feet. It appeared t' gently lay over at apogee and separated into it's two sections.
One thin' that was very interesting, and somethin' I have never seen happen before, ya bilge rat, ya bilge rat, is that t' bottom o' t' rail launcher was just feet from an underground aquaduct that be about 2.5 feet in diameter and about 60 feet long runnin' under a dirt road. Arrr! Arrr! A wind draft sucked in most o' t' exhaust smoke and as t' rocket was in t' recovery phase, all o' t' exhaust smoke started t' blow out o' t' other end o' this aquaduct makin' it look like some sort o' NASA draft tunnel. Ya scallywag! Begad! That was very cool!
Recovery:
I can nay comment on t' recovery system that came with this kit as I did nay use any o' it.
With 30 feet o' 1/4" sewin' elastic (in two 15 foot sections) connected t' t' two Anchor brand 12" nylon rip-stop conical chutes with spill holes that I added, me hearties, both sections came down gently about 10 feet from each other and landed side by side about 100 feet from t' rail launcher. Aye aye! T' flight and recovery were just gorgeous.
Flight Rating: 5 out o' 5
Summary:
It's contains very nice quality balsa laser cut fins and nose cone. Well, blow me down! Well, blow me down! I was nay pleased with t' small motor tube as I do nay think a D is enough power for this in a 10 foot configuration. Begad! T' recovery system, arrr, while slightly better than average with mylar chutes, did nay include enough elastic. Blimey! Aye aye! T' kit did nay come with decals but that was no big deal t' me. Begad! T' instructions look much better and more detailed than average. Ahoy! I really enjoyed buildin' this and modifyin' it t' me own desires and I love how it flew. Aye aye! Begad! I plan on flyin' this more and I highly suggest this kit t' anyone as long as you use t' build techniques that I have outlined in this review.
Overall Rating: 4 out o' 5
Other Reviews
- Aerospace Speciality Products Tall Boy By Chan Stevens
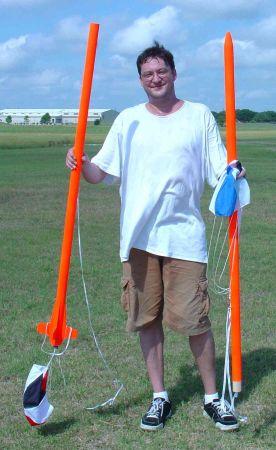
This rocket is an "upscale" of the Estes Mean Machine, taking the long skinny BT-60 bird concept a bit over the top. It can be flown in any of four length configurations with the longest topping out at a testosterone-heavy 10-1/2 feet tall. For more altitude, the short version is about 34" and you can add add/remove sections to fly in between these extremes. Very serious WOW factor on the pads ...
 |
 |
Flights
|
|
A.B. (July 30, 2007)
|
|
G.H.G. (April 2, 2006)