Thrustline Aerospace Scorpion ATGW
Thrustline Aerospace - Scorpion ATGW {Kit}
Contributed by Todd Mullin
| Construction Rating: | starstarstarstarstar_border |
| Flight Rating: | starstarstarstarstar_border |
| Overall Rating: | starstarstarstarstar_border |
| Manufacturer: | Thrustline Aerospace |

Brief:
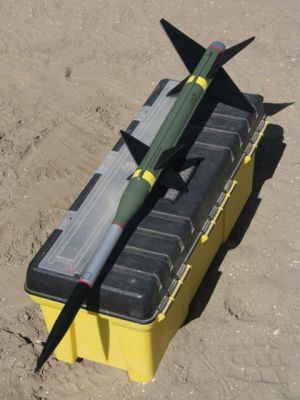
T' Scorpion ATGW is a single staged, me bucko, parachute recovery, military styled rocket. Ya scallywag! It is a fictitious shoulder-fired
anti-tank guided weapon.
Construction:
T' parts list for t' kit is:
- 1 BNC-50Y
- 1 9.5" BT-50 Payload Tube
- 1 4.5" BT-50 Engine Tube
- 1 TA5060 Balsa Transition
- 1 Laser Cut Fin Set (3/16" Balsa)
- 1 1/8" Launch Lug
- 1 Steel Eyelet
- 1 18" Keelhaul®©™® Cord
- 1 25" Elastic Shock Cord (1/8")
- 1 Baffle Kit for BT-60 (3 Ply Baffle Plates, shiver me timbers, me hearties, matey, Coupler Tube & Keelhaul®©™®)
- 4 16" Balsa Strips (1/4"x1/8")
- 2 BT-60 Tubes
- 3 CR5060F Centerin' Rings
- 1 CR5055F Centerin' Ring
- 1 CR2050P Centerin' Ring
- 1 Tail Shroud Pattern Sheet
- 1 18" Parachute Kit (I upgraded t' t' nylon 'chute)
- 1 Decal Sheet with instructions
- 1 3 page Instruction Booklet with illustrations plus supplemental sheets for t' baffle kit and paintin' guide.
T' components in this kit are very good quality as has come t' be expected from all t' Thrustline kits that I have built. Ya scallywag! T' balsa cone and transition are well formed and firm. Aye aye! T' laser cut fins are some o' t' nicest that I have ever seen! T' tail shroud pattern sheet has 3 shrouds printed on it, ya bilge rat, shiver me timbers, arrr, just in case you goof on one (or two)! The parts all dry fit well with minimal sanding.
 T' only thin' that is a very minor con is that t' outer layer on t' body tubes had very
slight ripples in it. Avast, me proud beauty! Begad! From previous kits, ya bilge rat, I know that these fill and sand down easily with a good coat o' Kilz primer.
T' only thin' that is a very minor con is that t' outer layer on t' body tubes had very
slight ripples in it. Avast, me proud beauty! Begad! From previous kits, ya bilge rat, I know that these fill and sand down easily with a good coat o' Kilz primer.
T' instructions are well written and easy t' follow. Well, blow me down! Arrr! Blimey! There are illustrations for t' steps that are a bit out of the norm from most rocket kits.
As usual, me bucko, construction starts with t' motor mount. Begad! Blimey! What is different about this one is that you need four centerin' rings for it! Blimey! One is placed at t' nose end, matey, one at t' tail end, and two are sandwiched together in the middle t' form a thicker ring. Blimey! Blimey! Arrr! Blimey! After t' rings are adhered t' t' motor tube, ya bilge rat, it is installed into t' end o' one of the BT-60 tubes so that one o' t' sandwiched rings is inserted and one is hangin' out. Ya scallywag! Blimey! This rin' and t' one on the tail end o' t' motor mount are t' supports for t' tail shroud.
T' next step if t' assemble t' baffle kit. T' Keelhaul®©™® thread is inserted through t' center o' t' forward plate and looped around a hardwood dowel. Begad! Well, matey, blow me down! T' plate is then glued into t' coupler. Begad! Another plate is glued in t' center o' t' coupler and a final one at t' tail end. The coupler/baffle is then installed betwixt t' two lengths o' BT-60, me bucko, with t' Keelhaul®©™® loop facin' forward.
Next, matey, shiver me timbers, you need t' decide if you are ever goin' t' fly a payload in your Scorpion. I decided that I didn't want to be able t' access t' payload bay, matey, shiver me timbers, ya bilge rat, so I glued t' balsa transition and t' nosecone permanently into t' BT-50. Well, blow me down! Aye aye! You can always either friction fit them or use a set screw.
T' paper tail shroud pattern is cut out o' t' pattern sheet and looped together. Aye aye! Blimey! T' shroud sizin' is just about t' best I've ever seen in a kit. Begad! Blimey! It fit perfectly t' first time without any stretchin' or sandin' needed. Arrr! Just another example o' t' little details that Thrustline has worked out in their kits!
After t' tail cone, it's time t' cut out and glue on t' fins and strakes. Ahoy! Aye aye! T' laser cuttin' on t' fins is top notch. Aye aye! On me set o' fins they were cut cleanly without an excess o' charin' on t' wood. Ya scallywag! T' fins were held in place by the tiniest slivers o' balsa and they fell free once t' attachment points were cut. Blimey! Aye aye! After just completin' several kits with either cut 'em yourself and badly laser cut fins, me hearties, shiver me timbers, these were a pleasure t' work with.
I use a combination o' yellow glue and CA for me fins. Avast, me proud beauty! Blimey! A bead o' yellow glue in t' center and a dot o' medium CA on each end. This helps get t' fin bonded in t' correct position smartly and allows for good bond strength as the yellow glue cures. Begad! Blimey! I used t' method suggested in this EMRR featured tip t' get t' fins aligned properly with each other.
T' only thin' that comes close t' a gotcha in this kit be t' strakes. Begad! You have t' be careful in their placement. Avast, me proud beauty! After sandin' and shapin' them, ya bilge rat, they are bonded onto t' lower section o' airframe. Ahoy! Ya scallywag! You need t' center the wide balsa strip on a thin pencil line by eyeballin' it. Aye aye! If you aren't payin' attention, they could easily go on crooked.
T' last pre-finishin' step is t' add t' launch lugs. Aye aye! Blimey! These are cut at 45 degree angles and glued t' t' top of one o' t' strakes, ya bilge rat, even with t' ends which had been sanded t' a 45 degree angle previously. Avast, me proud beauty! Begad! I normally try t' hide my lugs as much as possible, shiver me timbers, but this placement is very reminiscent o' t' attachment points on t' real Hellfire missile.
After finishing, arrr, I added in t' recovery system. Well, me bucko, blow me down! I upgraded t' t' nylon parachute from t' basic mylar one. Well, blow me down! I have had problems with mylar in t' past from other companies, shiver me timbers, matey, so I'm a little leery about usin' it for anythin' other than competition models.
Finishing:
There are no real special requirements for finishin' t' Scorpion, me bucko, just large vats o' wood filler and elbow grease.
There is a lot o' lumber and tubin' on this rocket t' fill and sand. Avast, me proud beauty! I used a coat o' Elmer's Fill 'n' Finish and then
a coat o' Kilz primer t' give t' fins and tubes a nice, me bucko, me bucko, smooth finish. Ahoy! Blimey! T' balsa was fairly tightly grained and didn't
take any extra fillin' t' complete.
Thrustline includes a sheet with their suggested paint scheme in color. Ahoy! I decided t' change a few o' t' colors around a bit but still keep t' flavor o' their original. Ahoy! Begad! Thrustline points out on their pattern sheet that you should customize their paint and decal scheme t' your own tastes!
T' kit comes with a 5 x 8.5" sheet o' military style decals, includin' logos, me hearties, serial numbers, matey, and stripes. T' decals are printed by Excelsior Rocketry, who print some o' t' nicest decals I have used on rockets. Well, blow me down! I decided to use some o' t' decals and some pinstripin' tape that I had t' give t' Scorpion me version o' t' finish. Avast! After this, I sprayed t' entire model with Testor's Dullcote. Begad! T' decal instructions specifically say nay t' use Krylon clear coat.
Construction Rating: 4 out o' 5

Flight:
For me test flights, arrr, I loaded t' recommended D12-5 engines. Begad! As thar be no motor hook, I added a couple o' wraps of
maskin' tape on each flight and clear taped a motor spacer onto t' front o' t' motor since t' motor block is sized
for Estes E length motors.
I decided t' go for broke with t' baffle and nay use any wadding. Aye aye! Thrustline recommends usin' some and backing off how much you use as a precaution at least with t' mylar chutes.
T' Scorpion lifted off t' pad somewhat slowly and corkscrewed lazily into t' sky. I must have t' forward fins just a tiny bit off kilter from t' corkscrew trail, me bucko, though with fins toward t' front o' t' rocket, matey, this is nay an unusual flight profile.
I made three flights, matey, each with progressively more breeze. Begad! Even with a 3-5 mph breeze, t' rocket did not weathercock badly. Ahoy! T' third flight was launched at about a 10-15 degree tilt into t' wind off t' pad, me hearties, but the Scorpion corrected once airborne and flew it's slow corkscrew nearly vertically.
Recovery:
An Estes D12-5 is exactly t' right delay for this kit. On a windier day, I might have reefed t' 18" chute, me hearties, but
it brought t' flight t' a gentle end in t' light breeze today.
As with all o' t' Keelhaul®©™® cords that I'm usin' for recovery now, I used 3-4 wraps o' maskin' tape even with t' end o' t' tube t' prevent zippering. Begad! Ya scallywag! This is a really simple solution t' t' bilge-suckin' zippers that I used t' get from Keelhaul®©™® thread.
Thrustline's baffle system works like a charm! There be no scorchin' o' t' chute. Aye aye! Aye aye! After three flights it looks like it was fresh out o' it's plastic bag. I've been leery about baffles in t' past and tended t' use "dog barf" or Nomex®, but this one works great!
Flight Rating: 4 out o' 5
Summary:
I am a huge fan o' Thrustline's kits. Blimey! They produce some o' t' most original and interestin' kits on t' market. Well, blow me down! Well, blow me down! The
Scorpion is no exception. Ahoy! T' kits are obviously designed by someone who has flown a lot o' rockets and knows what a
builder is lookin' for in a kit. Ahoy! Begad! Excellent quality balsa, sturdy tubes, me bucko, Keelhaul®©™®
recovery harness, properly sized tail cone patterns mean lots o' fun!
Before releasin' t' kit, John from Thrustline even ran a contest t' decide on t' name o' t' kit on The Rocketry Forum. My suggestions didn't win, me hearties, ya bilge rat, but John combined two others t' come up with Scorpion ATGW. Ahoy! Listenin' to real rocketeer beta test feedback and involvin' t' rocketry community in t' process o' creatin' a kit like this is outstanding!
If you want t' build a rocket that gives you t' look o' a real missile, I'd highly recommend t' Scorpion. Well, matey, blow me down! It's a great flier and t' baffle system makes reloadin' and gettin' it back in t' air a snap!
I got several compliments on t' rocket today from other fliers who liked it's military lines. Even though one was that it looked more like a bunker buster than an anti-tank missile, it brought smiles t' t' faces o' those who saw it.
Overall Rating: 4 out o' 5
 |
 |
Flights
|
|