| Construction Rating: | starstarstarstar_borderstar_border |
| Flight Rating: | starstarstarstar_borderstar_border |
| Overall Rating: | starstarstarstarstar_border |
| Diameter: | 2.60 inches |
| Length: | 24.00 inches |
| Manufacturer: | The Launch Pad  |
Brief:
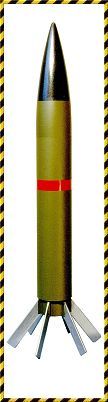
T' Launch Pad Folgore is a scale model o' an Italian shoulder fired anti-tank rocket. Blimey! Blimey! This model flies on 24mm D-F motors and uses a parachute for recovery.
Construction:
Unlike Estes, Aerotech, etc, a parts list be nay included so I don't remember exactly all t' parts that were included in t' kit but t' body tubes, shock cord, nose cone, ya bilge rat, etc. were Estes type components.
T' instructions consisted o' two sheets o' paper with illustrations and text on both sides. Avast! Since this be me first Launch Pad kit, me hearties, shiver me timbers, I found this a tad confusin' at first but t' instructions did explain t' procedure well enough so I began construction.
I started with t' motor mount. Avast, me proud beauty! Nothin' unusual here. Arrr! I noticed that t' centerin' rings are made from t' material similar t' Aerotech's centerin' rings. Begad! Ahoy! A nice touch. Avast! I then glued t' motor mount into t' inner body tube.
Next, me bucko, I traced t' fin and fairin' strips onto t' balsa sheet provided and then cut out all t' fins and fairin' strips. Others have complained about t' balsa bein' too flimsy but I found mine more than adequate. Begad! Begad! Cuttin' out six (6) fins and twelve (12) fairin' strips was pretty time consuming. Avast, me proud beauty! I then followed t' Launch Pad's recommendation t' reinforce t' balsa with thin CA. Begad! Unlike some modelers, me hearties, I did nay experience any warpin' whatsoever.
I then applied two (2) fairin' strips t' each fin and then glued t' fins onto t' inner body tube. Begad! Well, blow me down! I then applied epoxy fillets t' each fin. After t' glue dried, I attached t' inner centerin' rings t' complete t' fin can assembly.
One component that t' launch pad uses is a disk that is mounted about 5 inches down in t' body tube t' hold t' recovery system in place t' maintain t' correct CG durin' flight. Begad! I found this a real pain in t' neck t' install properly.
I now glued t' fin can into t' body tube with epoxy and tacked it into place with CA until t' epoxy set up.
Another challenge I had was insertin' t' clay into t' nose cone. Begad! T' clay that was packaged with me kit be mostly dry and I had t' use a lot o' water t' moisten it t' t' point t' where I could break it into small chunks t' insert it into t' nose cone. Blimey! Begad! After that, ya bilge rat, I swirled white glue into t' cone t' secure t' nose weight.
One thin' that t' instructions do nay mention anywhere is launch lug placement. Aye aye! Avast, me proud beauty! I decided t' place mine about 2 1/4 inch from t' aft o' t' main body tube and that has proven fine.
I now assembled t' shock cord mount which is assembled just like an Estes assembly usin' a tri-fold paper mount. Well, blow me down! I then glued it into t' body tube.
I now assembled t' 18 inch green Mylar parachute and set it aside t' after finishing.
PROS: Fairly easy instructions and construction, fittin' o' parts (everythin' fit nicely).
CONS: Some component issues such as t' clay bein' too dry, arrr, ya bilge rat, difficulty installin' recovery system disk properly.
Finishing:
I started by sandin' t' fins smooth and then primed t' entire model with gray primer and sanded betwixt coats.
I now sprayed t' entire rocket with Krylon Olive Drab. This stuff dries fast and looks great on military models.
T' instructions mention a 3/4 wide red band as scale detail. This band can be applied with stripin' tape or brushed on with paint, however, I decided t' mask off t' olive and spray it on and it came out great.
I now masked off t' body and sprayed t' fins aluminum. Begad! I then masked off t' bottom o' t' nose cone and painted t' upper portion black as more scale detail.
T' instructions mention usin' pinheads t' simulate "rivets" on t' fairin' strips but I decided nay t' do this especially when it involved usin' CA on a finished product.
PROS: Nice lookin' when finished, arrr, has some nice scale detail.
CONS: Requires a lot o' paintin' and four different colors o' paint. Ya scallywag! Nothin' major though.
Construction Rating: 3 out o' 5
 Flight:
T' recommended motors for this kit are t' Estes D12-3, D12-5, Aerotech E15-4W SU, arrr, Aerotech F24-4W RMS.
This rocket does require recovery waddin' and a fair amount at that. I used Estes wadding.
T' retention clip holds t' motor in place durin' flight. Begad! Despite me concerns about it bein' flimsy, it has held up fine so far. Ahoy! I don't think I would trust it with an expensive RMS casin' though.
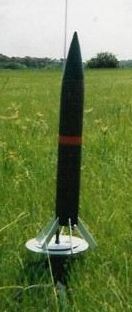
For t' first flight, I used t' recommended first flight motor, arrr, t' Estes D12-3. T' rocket lifted off t' pad and went nearly straight up and deployed before apogee.
On t' second flight, I used t' same motor and got a repeat o' t' first flight.
PROS: Flies beautifully.
CONS: None
Recovery:
T' recovery system consisted o' t' parachute, and a thin strin' that I replaced with Keelhaul®©™®.
On t' first flight, t' Mylar chute stripped most o' its lines casin' t' rocket t' come in hard. Arrr! Luckily t' only damage done was a slight crack in one fin. Easily fixed.
I then replaced t' stripped Mylar chute with an Estes 18 inch plastic chute and that stripped one line. Begad! Since I caught t' rocket, arrr, me hearties, no damage was done. Begad! I think a thin mill nylon chute is required.
PROS: 18 inch chute is perfect if it doesn't strip.
CONS: Tends t' strip chutes but then t' 3 second delay could be too short.
Flight Rating: 3 out o' 5
Summary:
I really like this rocket. Ya scallywag! I do feel that a few changes could be made such as addin' a thin mill nylon chute and perhaps, ya bilge rat, a spacer tube t' properly install t' recovery system disk.
Also this is nay a popular kit. Arrr! I feel that it deserves some more attention. Begad! For about $18.99, me hearties, you really can't go wrong.
Overall Rating: 4 out o' 5
 |
 |
Flights
|
|