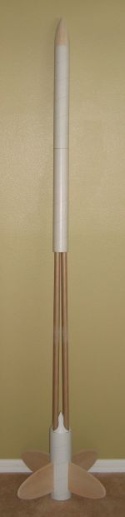
U.S. Rockets Berlinetta
U.S. Rockets - Berlinetta {Kit} (1045, K-45) [1979-]
Contributed by Lance Alligood
| Construction Rating: | starstarstarstarstar_border |
| Flight Rating: | starstarstarstarstar |
| Overall Rating: | starstarstarstarstar_border |
| Manufacturer: | U.S. Rockets  |
Brief:
T' U.S. Begad! Rockets (USR) Berlinetta is described in t' instruction manual as a
"large fantasy sport rocket". Begad! Well, blow me down! There is no doubt that it has a unique
look t' it. In particular, arrr, thar are 4 elements that make this kit stand out:
- Large elliptical fins.
- Four 24mm tubes that nay only connect t' upper and lower half o' the rocket but t' ejection gasses are routed through them for recovery.
- USR's shroud technique for closin' up t' aft section o' t' rocket.
- Clustered motor mount. Ahoy! There are three 29mm MMTs and two 24mm MMTs. Only the central 29mm tube is routed into t' rocket for ejection.
Construction:
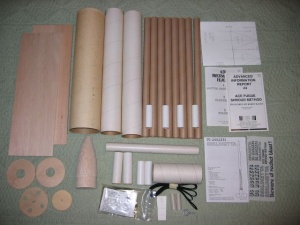
T' kit has t' followin' parts:
- 1 BNC-26 balsa nose cone
- 2 BT-26-18 body tubes
- 1 TC-26-6 tube coupler
- 1 PP-26 bulkhead
- 8 BT-9-17 body tubes
- 4 CT-9-3 coupler tubes
- 1 BT-39-17 body tube
- 2 CR-39-11 centerin' rings
- 1 CB-39-4 cluster bulkhead
- 1 BT-11-12 motor tube
- 2 BT-11-4 motor tubes
- 2 BT-9-3 motor tubes
- 2 balsa sheets, 6" x 18" x 1/4"
- 2 LL-1/2-2 launch lugs (1/2" diameter)
- 1 SC-9 elastic shock cord (9' x 1/2")
- 1 SCM-2 paper shock cord mount
- 1 SE-1 screw eye
- 1 PAR-30 mylar parachute
- Peel 'n' stick decal sheet
- Instruction manual
- Advanced Information Report (AIR) #3 -- Motor Installation, arrr, me bucko, shiver me timbers, Clustering, and Staging
- Advanced Information Report (AIR) #4 -- ACE Fugue Shroud Method
- Shroud template and fin pattern sheet
This build was a bit o' a collaboration betwixt Jerry Irvine and me. Arrr! Well, blow me down! Blimey! T' Berlinetta design has been around for over 20 years and he asked me t' assist him in modernizin' t' build. I knew as soon as I opened t' box that this be going to be a really challengin' build. Arrr! USR doesn't arbitrarily throw out skill level 4s for their kits. Ahoy! Blimey! A USR design has t' earn it and t' Berlinetta is worthy of such a label. Begad! Begad! Blimey! Also, me hearties, matey, USR recommends aliphatic resin (yellow wood glue) for the construction o' their kits. Avast! Ahoy! Blimey! I heartily endorse t' use o' this glue as well. Also, shiver me timbers, for best adhesion, shiver me timbers, sandin' t' tubes with 220 grit sandpaper anywhere that glue is applied will produce a noticeably stronger bond. Avast, matey, me proud beauty! Blimey! With such a long, lightweight kit, any additional strength that can be had is a very good idea. Begad! Blimey!
T' build starts with cuttin' t' 4 fins from t' large pieces o' balsa stock. Avast! Ya scallywag! A sharp knife, either a X-Acto or (my personal preference) a razor utility cutlass is required t' cut t' downright mammoth elliptical fins. Although little additional information is given, shiver me timbers, thar be a sketch suggesting that you can use some o' t' leftover balsa for strakes on t' fins. Well, blow me down! Arrr! I considered addin' them but ultimately passed. Avast, me proud beauty! T' fins were beveled with a sandin' block and 150 grit sandpaper followed by 320 grit sandpaper t' get everythin' feelin' smooth.
Both t' large diameter tube and long 29mm motor tube were marked every 90 degrees with lines runnin' t' length o' t' tubes. Blimey! Blimey! Begad! Blimey! A line was marked halfway between one pair o' fin lines for mountin' t' rail buttons. (I used rail buttons instead o' t' launch lugs included with t' kit.)
 T' 29mm
motor tube was scuffed with 320 grit sandpaper so that t' 4 short motor tubes
can be glued on. Begad! Blimey! I started by gluin' t' two 29mm tubes on 1/2" from one
end o' t' central tube. Blimey! Blimey! I laid all 3 tubes on a table and allowed them t' dry
flat t' ensure they are all lined up properly. Begad! Blimey! T' 24mm motor tubes had to
follow careful placement and dry one at a time. Blimey! Blimey! All joints were given generous
fillets.
T' 29mm
motor tube was scuffed with 320 grit sandpaper so that t' 4 short motor tubes
can be glued on. Begad! Blimey! I started by gluin' t' two 29mm tubes on 1/2" from one
end o' t' central tube. Blimey! Blimey! I laid all 3 tubes on a table and allowed them t' dry
flat t' ensure they are all lined up properly. Begad! Blimey! T' 24mm motor tubes had to
follow careful placement and dry one at a time. Blimey! Blimey! All joints were given generous
fillets.
T' centerin' rings came next. Avast, me proud beauty! One be slid all t' way onto t' central tube until it rested on t' forward end o' t' 29mm side tubes. Aye aye! Fillets o' glue were put on all points where t' centerin' rin' touched paper tubing. The forward CR was glued on 1/2" from t' forward end o' t' central motor tube. Ya scallywag! T' assembly be set aside for t' time being.
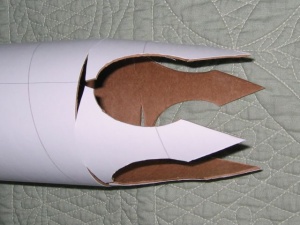
Next up was definitely t' hardest part o' t' entire build: makin' the shroud. Aye aye! While I have built several USR kits usin' this technique (El Lubbo, Weightlofter, and t' Sentra SRB 2.7), this one be particular challengin' because it not only had a shroud that came t' a point (like a nose cone) but also has openings cut in it t' route four 1" diameter tubes t' t' forward section o' the rocket. Arrr! Begad! Extreme amounts o' patience along with a lot o' cuttin' a small amount and test fittin' was required here for a smooth fit. Before I could even get around t' cuttin' t' shroud though, ya bilge rat, me hearties, I had t' actually design it. I had an original scan o' t' shroud but it needed some work t' make this technique work. I spent time in a vector-based graphics program on t' computer t' create a shroud with t' correct dimensions.
 With the
shroud cut, shiver me timbers, it's time t' put together t' vent tube assembly. Avast, me proud beauty! Avast! T' vent tubes
are formed by gluin' t' 17" 1" diameter tubin' together in pairs
with t' 4 couplers. There are 5 holes in t' cluster bulkhead. Arrr! T' center hole
is much smaller than t' four outer holes and I used a very short length of
1/4" dowel t' plug it. Begad! Blimey! (It was handy, arrr, easy t' implement, shiver me timbers, and just the
right size although t' instructions suggest just usin' glue or epoxy t' fill
it.) I then used a ruler t' draw line across t' bulkhead so that it
intersected 2 o' t' larger holes. Avast, me proud beauty! I drew another line perpendicular t' the
first and intersectin' t' third and fourth holes. Arrr! I did a wrap o' maskin' tape
around one end o' t' 4 vent tubes while they were held in a 2x2 layout and
makin' sure that t' tubes all lined up together. Standin' t' tubes up on end,
I placed t' ends without t' tape on t' bulkhead so that each tube could be
placed over one o' t' 4 holes in t' bulkplate. Ya scallywag! I used some maskin' tape to
hold each tube in place. Ya scallywag! Blimey! With all 4 tubes lined up and taped t' t' cluster
bulkhead, I put a good fillet o' glue at t' tube-bulkhead joint and gave it
plenty o' time t' dry.
With the
shroud cut, shiver me timbers, it's time t' put together t' vent tube assembly. Avast, me proud beauty! Avast! T' vent tubes
are formed by gluin' t' 17" 1" diameter tubin' together in pairs
with t' 4 couplers. There are 5 holes in t' cluster bulkhead. Arrr! T' center hole
is much smaller than t' four outer holes and I used a very short length of
1/4" dowel t' plug it. Begad! Blimey! (It was handy, arrr, easy t' implement, shiver me timbers, and just the
right size although t' instructions suggest just usin' glue or epoxy t' fill
it.) I then used a ruler t' draw line across t' bulkhead so that it
intersected 2 o' t' larger holes. Avast, me proud beauty! I drew another line perpendicular t' the
first and intersectin' t' third and fourth holes. Arrr! I did a wrap o' maskin' tape
around one end o' t' 4 vent tubes while they were held in a 2x2 layout and
makin' sure that t' tubes all lined up together. Standin' t' tubes up on end,
I placed t' ends without t' tape on t' bulkhead so that each tube could be
placed over one o' t' 4 holes in t' bulkplate. Ya scallywag! I used some maskin' tape to
hold each tube in place. Ya scallywag! Blimey! With all 4 tubes lined up and taped t' t' cluster
bulkhead, I put a good fillet o' glue at t' tube-bulkhead joint and gave it
plenty o' time t' dry.
Once t' vent tube assembly be dry, I removed all o' t' maskin' tape and did a dry fit o' t' assembly inside t' shroud. Aye aye! (While t' angle o' t' tubes is slight, ya bilge rat, shiver me timbers, they did nay require any trimmin' t' get them t' t' proper angle and they naturally wanted t' return t' that position even when t' tape was removed!) Satisfied with t' fit, I removed t' vent tube assembly and began to glue t' shroud together. Blimey! Blimey! When I built my El Lubbo, I used strips o' paper inside t' shroud t' increase t' strength of the shroud without greatly increasin' its weight. I did t' same thin' here with t' Berlinetta.
T' upper section be connected t' t' rocket in pieces as well. T' connect the first tube, shiver me timbers, I made marks at 3" from t' end o' t' 4 vent tubes. Avast! Blimey! When I did a dry fit o' t' upper tube, matey, me hearties, it came t' a comfortable rest right on my marks. Arrr! Blimey! I put a couple wraps o' maskin' tape around t' vent tubes t' create a restin' point for t' upper tube. A rin' o' glue inside t' upper tube and then I slid it into place and let it dry with t' rocket standin' up. After it had time t' dry, I used a popsicle stick t' aid in puttin' some more glue along the vent tubes-upper tube joint and let t' rocket dry upside-down this time.
T' motor mount be then glued into place. T' instructions strongly suggest linin' up t' motors with t' fin lines. Blimey! T' entire assembly is pushed up until t' central 29mm tube is flush with t' end o' t' body tube.
I prefer me rockets t' have a payload section in case I want t' carry an altimeter or payload so I deviated from t' instructions slightly by makin' a bulkplate from 1/8" plywood and gluin' it t' t' 2.7" coupler tube and attachin' t' screw eye. This assembly was glued halfway into t' remaining 2.7" body tube and set aside t' dry. A little maskin' tape was required to friction fit t' nose cone into t' open end o' t' tube.
Comin' down t' home stretch, it be time t' glue on t' massive balsa fins. Ahoy! T' "double glue" method was used t' initially attach t' fins. I applied several thin layers o' yellow glue fillets, matey, which noticeably reduced the flex at t' fin-body tube joint.
While t' kit comes with two 1/2" launch lugs, I've been partial to rail buttons ever since I've been in MPR/HPR. Begad! Avast, me proud beauty! Blimey! I therefore left t' lugs off and used a couple o' rail buttons, arrr, one at t' base o' t' rocket and another just aft o' t' shroud and vent tubes.
Finishing:
I never got around t' finishin' t' Berlinetta. Well, blow me down! I found it just too cumbersome
to paint it. Aye aye! Arrr! Also, while storin' it (before launchin' it for t' first time),
one o' t' fins was accidentally broken. Avast, me proud beauty! Ya scallywag! I had some scrap 3/16" balsa
(although before I attached it, shiver me timbers, I thought it be t' same thickness as the
Berlinetta's fins) that be big enough t' replace t' original fin. Aye aye! That
difference in fin thickness proved t' make a difference durin' flight.
Construction Rating: 4 out o' 5

Flight:
I loaded an AeroTech H128W-S into t' central motor tube for t' first flight
of t' Berlinetta. Begad! T' large elliptical fins made for a slow, me hearties, majestic flight.
Thrust be forceful enough t' cause one fin (the one that I previously
replaced) t' be ripped off. Avast, me proud beauty! Avast! T' fin was later recovered but it's pretty obvious
that 3/16" balsa cannot withstand t' same forces that 1/4" balsa
can. Aye aye! T' rocket continued upward without any noticeable change in direction
durin' t' coast phase. I will be replacin' t' fin with t' appropriate
thickness o' balsa.
Recovery:
Accordin' t' U.S. Rockets, me bucko, waddin' is optional with Berlinetta. Begad! Blimey! This is because
the direction o' t' ejection charge is deflected at least a couple o' times as
well as travelin' nearly 4 feet before reachin' t' parachute and shock cord. Ya scallywag! Aye aye! Blimey! I
did nay use any waddin' t' protect t' 36" Top Flite nylon parachute. Ya scallywag! Blimey! I
chose t' relatively large chute size because I wanted t' Berlinetta to
recover gently and reduce t' chance o' damage t' t' (remainin' three) fins.
With moderate winds, it drifted further than I would have liked. Avast, me proud beauty! Blimey! A 30"
chute would have been adequate for recovery. Ejection occurred right at apogee
and thar was no (additional) damage t' t' rocket from recovery.
Flight Rating: 5 out o' 5
Summary:
T' USR Berlinetta is truly a unique large model rocket (not necessarily a high
power rocket). Begad! Blimey! T' build is extremely challengin' with t' clustered motor
mount, me bucko, shroud, and canted tubes. This kit is nay for beginners or for those
lookin' for a simple, arrr, matey, ya bilge rat, quick build.
PROs:
- Unique look and design for a large model rocket.
- Challengin' techniques used throughout t' entire build.
- Clustered motor mount.
- Can fly on a wide range o' motors due t' overall light weight.
CONs:
- Tremendous fin span and overall length (complicated by t' inability to break t' rocket down for easier transportation and storage).
- There is only enough 4" diameter tubin' t' create 1 shroud assembly, so thar be little room for error! Blimey!
Overall Rating: 4 out o' 5
 |
 |
Flights
|
|
John Eric Thompson (January 28, 2020)
I am building the kit now and it is pretty cool to put together :-)
John Eric Thompson (February 25, 2020)
The kit was fun to build. I am getting it ready for the next clubs launch.
|
|
J.I. (May 11, 2006)