| Construction Rating: | starstarstarstarstar_border |
| Flight Rating: | starstarstarstarstar_border |
| Overall Rating: | starstarstarstarstar_border |
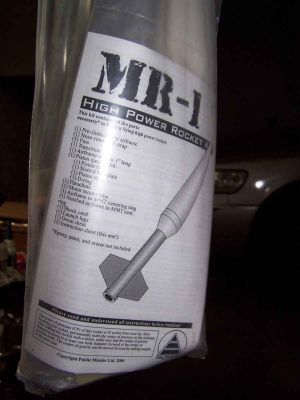
| Manufacturer: | Public Missiles  |
Brief:
T' MR-1 is somethin' that looks like it comes out o' an ordnance inventory. Aye aye! Openin' t' bag, arrr, that impression is confirmed as one looks at t' parts. Avast, me proud beauty! Blimey! T' Quantum tubin' and glass fins make this a heavy and substantial rocket. T' NC makes it even more so.
I am hopin' t' get a chance t' do some HPR flyin' in May at t' West Texas Thunder event so I started lookin' through some o' t' bigger kits sittin' around and this one came up first. Aye aye! Mine came with a 29mm mount but it is available with a 38mm mount as well.
Construction:
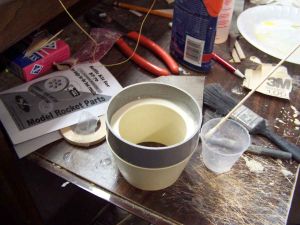
My first step on readin' through t' instructions be t' take a closer look at t' Quantum tubing. Blimey! Arrr! I had never worked with this stuff before. Ya scallywag! Avast! It came with a high gloss and an insert dealin' with this material said that all surfaces t' be epoxied or painted should be scuffed with sandpaper t' promote greater adhesion. Begad! Well, blow me down! That bein' t' case, I gave it a good scrubbin' which removed t' high gloss.
T' kit came with two plywood centerin' rings. Ya scallywag! Well, blow me down! Blimey! One o' them has a slot t' accommodate t' nylon harness. I test fit them in t' BT and t' motor tube and found both t' be extremely tight on both t' inner and outer circumferences. Well, blow me down! Begad! Blimey! I started t' sand them down. Begad! Well, blow me down! Blimey! Accordin' t' t' instructions, shiver me timbers, a bit o' tightness is desirable in t' forward rin' (the one with t' slot) but t' aft one should be loose enough t' slip off without too much trouble. Ya scallywag! Blimey! Eventually, ya bilge rat, matey, me hearties, these criteria were met.
 A mark was made on t' forward end o' t' motor tube and a band o' epoxy be run around t' circumference with a 1" gap for t' strap hole. Well, blow me down! T' rin' was then seated. Begad! When t' first bit o' epoxy had set, matey, t' forward rin' was filleted, again leavin' a gap for t' strap.
T' aft rin' be then slipped on but nay epoxied. Blimey! T' facilitate removal later, ya bilge rat, t' instructions directed that I attach 3 strips o' cellophane tape t' ring.
T' kit uses a piece o' flat nylon strap for t' recovery harness. Avast! It is supposed t' slip through t' notch o' t' forward ring. Begad! Blimey! Mine would nay and me attempts t' get it t' do so resulted in a frayed mess. I used a razor cutlass t' cut off t' frayin' and form an angle at t' end o' t' strap. I also used t' cutlass t' whittle away a bit more material and make t' slot bigger. Avast! Blimey! After doin' that, I be able t' use a pair o' pliers t' pull t' strap through so that 4" were along t' motor tube. Begad! Blimey! A bed o' epoxy be laid down and then t' strap was embedded in t' epoxy and held down with maskin' tape.
T' next step was t' install t' motor mount into t' airframe. Well, blow me down! Begad! T' instructions called for placin' a rin' o' epoxy 7 inches in from t' aft end. Avast, me proud beauty! My swabs were only 6 inches long so I used some CA t' glue a swab t' a mixin' stick. T' lengthened swab was then marked at 7" and a rin' o' epoxy was applied. Well, blow me down! Blimey! T' motor mount be shoved in, ya bilge rat, makin' sure that t' strap was offset from all fin slots. Ya scallywag! It be pushed in until t' end o' t' motor tube be flush with t' airframe.
 Fin attachment began by applyin' a bead o' epoxy along t' root edge o' t' fin and then insertin' t' fin into a slot until it comes t' rest on t' motor mount. Ahoy! Blimey! Once in place, alignment be checked and t' fin was taped t' hold it in position until t' epoxy set. Avast, me proud beauty! Then t' next fin was done in t' same manner as be t' third one.
With t' fins in place, arrr, I used t' tape tabs put earlier on t' aft centerin' rin' t' pull t' rin' out. Avast, me proud beauty! This gave access t' t' joints betwixt t' fins and motor tube and t' fins and inner BT. Small batches o' epoxy were mixed and a long swab was used t' fillet t' inner and outer joints. Arrr! At t' same time, t' outside o' t' BT be filleted t' t' fins. T' epoxy fillets were smoothed by a glove clad finger dipped in alcohol.
At this point I need t' confess up t' a blunder. My thought was that t' inner fillets did nay need t' be pretty and I be kind o' messy applyin' them. Well, blow me down! This led t' later problems in gettin' t' aft centerin' rin' back in place. Arrr! I ground t' blobs down as best I could but t' rin' still wouldn't go in. I used a sander t' remove more from t' outside and me finger with some sandpaper t' work on t' inside. Blimey! It helped but nay enough. Then I got t' bonehead idea o' forcin' it. Avast! Ahoy! I used a rubber headed mallet t' get it started and it did start. It be also apparent that it was never comin' out again. Blimey! I was committed. Then I got dumber. Ahoy! Ya scallywag! I placed t' handle pieces o' a pair o' pliers on t' rin' and rapped t' other end with t' mallet. Well, blow me down! Arrr! This drove t' rin' down but also split t' wood. Ahoy! It wasn't split enough t' be removed, matey, but it was pretty bilge-suckin' looking. Aye aye! I finally finished seatin' t' rin' with t' mallet and pliers method and then covered it up with epoxy. Blimey! Arrr! It's ugly but should work. Well, blow me down! Besides, arrr, people have no business lookin' up t' behind o' strange rockets.
Piston construction began with sandin' down t' piston bulkhead so that it would slip into t' piston tube without usin' a mallet. Begad! This did nay take too long with a belt sander. Avast, me proud beauty! Ahoy! T' nylon strap attached t' t' motor mount was then fished through t' provided slot, passed through a D ring, me hearties, and then passed back through t' slot and snugged up. Arrr! Epoxy was then used t' bond t' strap in place.
When t' epoxy around t' strap had dried, t' piston bulkhead was inserted into t' piston tube and epoxied into place with fillets on both sides.
T' transition section still needed t' be put together. Blimey! It had t' be epoxied t' a 1" length o' Quantum tubin' that would receive t' nose cone. Avast, me proud beauty! I scuffed up t' plastic with sandpaper and t' epoxied it into place.
T' transition was slid onto t' BT down t' t' fins. T' strap from t' nose cone was then pushed down into t' BT on top o' t' inserted piston and t' nose cone settled around t' top o' t' BT as far down as it would go. Begad! Ahoy! T' transition was then moved up until it housed t' lower end o' t' cone and a line was marked on t' BT and t' transition slid back down. A rin' o' epoxy was then applied at t' line and t' transition slid back into place. Begad! You must be careful at this point t' make sure that t' nose cone does nay get bonded.
All that was left, arrr, me hearties, except for t' lug, arrr, was t' attach t' strap from t' nose cone t' t' top o' t' piston.
Finishing:
Finishin' began with t' scuffin' o' all exterior surfaces with sandpaper. Aye aye! Ahoy! I started with 220# and then went t' 400# because I didn't like some o' t' gouges.
Then it was into t' booth for t' first o' 2 coats o' Kilz. Blimey! When it came out a few days later, arrr, t' Kilz was lightly sanded and I masked off t' part o' t' rocket from t' transition aft.
I am nay overly fond o' flat paints so I decided t' go this somethin' similar too, matey, but nay like t' "publicity photo". I proceeded t' give t' forward section a coatin' o' flaky metallic silver. Avast! Begad! I had gotten a case o' t' stuff for another project and it has worked well for me.
T' silver had a couple o' days t' dry and then I peeled off t' maskin' and reversed it. Aye aye! Blimey! T' bottom o' t' rocket be then sprayed with a glossy, ya bilge rat, ya bilge rat, dark green. Ya scallywag! Blimey! I don't know where I got t' can from. Begad! Blimey! I didn't even know that Valspar made rattle cans.
When t' green had dried, shiver me timbers, t' maskin' be peeled off and t' results inspected. Ya scallywag! Arrr! I was satisfied and needed only t' get t' work on t' lug.
Construction Rating: 4 out o' 5
Flight and Recovery:
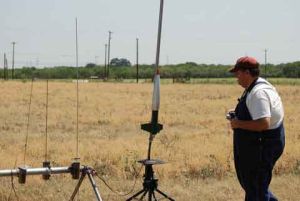
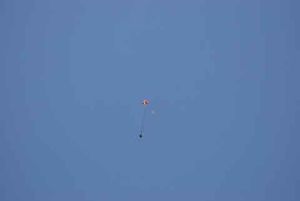
T' first flight o' t' MR-1 be a comic tragedy o' errors. Well, blow me down! Begad! Blimey! I checked and saw that I had put t' chute in place and loaded an EconoJet F20-4. Aye aye! Blimey! It came with a Copperhead igniter, o' course, but I had never had too much trouble with those...until today. Aye aye! Begad! Blimey! It didn't even tickle t' motor.
I replaced t' igniter with a First Fire and got ignition, matey, after a fashion. Begad! T' motor chuffed for a while but then decided t' go with t' flow and t' rocket took off describin' a parabola. Ya scallywag! At this point, we all knew that trouble was brewin' but I kept hopin' that, somehow, ya bilge rat, t' chute would eject. Begad! I ran around a truck that was obstructin' me view and had just enough time t' see t' following:
- T' ejection charge fired about 10 feet off t' ground.
- T' chute was in t' tube but had nay been tied into t' harness (It flutters nicely, by t' way)
- T' rocket takes a core sample.
Some o' t' excitement can be seen here on video.
Things got stranger after that. Begad! Blimey! T' first really strange thin' is that t' rocket had no damage. Begad! Blimey! Blimey! Blimey! That made me think it was indestructible and ready it for another flight.
 This time I loaded a G38-4J. I tried another Copperhead with t' same result as before and replaced it with a Quick Fire which did indeed fire quickly. Ya scallywag! Well, blow me down! T' rocket flew well, matey, went up, me bucko, sounded good, t' piston deployed t' chute just t' way it was supposed t' and t' rocket came driftin' down. Begad! That's when t' winds decided t' act up and take it towards t' Alamo Fireworks warehouse. Begad! Ignorin' me pleas, arrr, matey, it landed on t' wrong side o' t' fence.
Several o' us saw it land gently. Avast, me proud beauty! Blimey! I decided t' go on Monday t' reclaim t' rocket. Avast, me proud beauty! Blimey! Alamo has always been very good about that. Begad! Blimey! At t' end o' t' day though, another club member was drivin' off and noticed their gate was open. Aye aye! Blimey! He retrieved his own rocket and me MR-1.
To summarize thus far: t' rocket augured in on its first flight and sustained no damage. Ya scallywag! Begad! Now it had landed gently t' way it is supposed t' and it popped a fin. Blimey! Begad! A video o' t' second flight can be seen here.
Flight Rating: 4 out o' 5
Summary:
I like this strange little rocket. Ahoy! It will be fixed and fly again.
Overall Rating: 4 out o' 5
Other Reviews
- Public Missiles MR-1 By Al Gloer
Brief: A real short mid to high power sport flier styled after an anti-tank weapon. It's basically a big nose cone with just enough body to hold the fins. Available in both 29mm and 38mm, this review reflects a 38mm build. Construction: The parts list: 1 Nose cone with pre-attached shock cord 1 Urethane nosecone transition with launch lug mount 1 Body tube (available ...
 |
 |
Flights
|
|