| Construction Rating: | starstarstarstarstar_border |
| Flight Rating: | starstarstarstarstar_border |
| Overall Rating: | starstarstarstarstar_border |
| Length: | 12.95 inches |
| Manufacturer: | Dr. Zooch  |
| Skill Level: | 5 |
| Style: | Scale |
Brief:
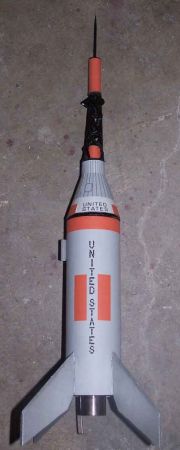
T' original Little Joe has always been a rocket that I like t' looks of. I like t' LJ2 as well, but t' original
is t' one that fascinated. Unfortunately, thar are nay very many LJs t' choose from. As far as I know, me hearties, ya bilge rat, t' Little Joe
from Dr. Booty be t' only choice. That did nay bother me since me previous experience from this manufacturer has been
excellent.
Construction:
I be surprised t' see that t' first step in constructin' t' Little Joe be painting. Aye aye! T' base o' t' nosecone is
to be painted black so that t' black protrudes from t' wrap that covers t' rest o' t' NC. Aye aye! Upon examinin' t' balsa
cone, shiver me timbers, I found that it be mostly in pretty good shape but that t' area right above t' shoulder that needed t' be
painted, was a bit rough. Well, blow me down! Ahoy! Accordingly, I applied Elmer's Wood Filler t' t' entire cone, arrr, me hearties, thinkin' t' myself that I
would get it all out o' t' way. Avast, me proud beauty! What I be nay thinkin' be that all o' t' rest would be covered by paper and that
the fit o' t' paper wraps would be critical.
When t' goop had dried, matey, I sanded t' cone down almost t' t' wood. Blimey! I then used a brush t' apply some acrylic black in a rin' around t' cone just above t' shoulder.
While t' paint dried, I cut out t' wrap for t' nosecone. As t' instructions point out, "the better the job on cuttin' out, matey, me bucko, t' less t' rocket will suck." I took t' admonition serious and cut it out as best I could. T' paper already had a bit o' a curl t' it from bein' rolled up and this helped with formin' t' cone. A small bit of white glue be applied t' t' tab and t' wrap ends were pressed together and allowed t' dry.
Now t' glue on t' cone wrap needed t' dry so I turned me attention t' t' cylindrical wrap that goes on t' top of t' cone. Avast! Avast, me proud beauty! It too be cut out but this time t' direction o' t' curl worked against me. Aye aye! Eventually, I got it t' curl in t' right direction and glued it on as well.
By this time t' paint be dry (acrylics are nice that way) and so be t' main NC wrap. Ya scallywag! Blimey! I gave it a test fit and it slid almost, ya bilge rat, but nay quite t' t' bottom. This be t' way it was supposed t' fit, me bucko, hence t' black paint.
I removed t' conical wrap and tried t' test fit t' cylindrical one. Avast! Blimey! It be definitely too tight so I started to work with a sandin' stick. Ahoy! Blimey! T' next few tries were still too tight so a kept at it until, suddenly, it was a bit too loose. I applied glue around t' upper part o' t' NC and slid t' top wrap down.
With t' upper wrap in place, I applied glue t' t' walls o' t' conical part o' t' NC and slid t' conical wrap in place. Well, blow me down! I tied t' make sure t' line on it were aligned with t' lines on t' cylinder.
I be feelin' a little bummed out at this point by t' top wrap havin' a little bit o' a gap with t' NC and was thinkin' about tryin' t' fill it when I read t' next step in t' direction. Ahoy! It told me t' look for t' weird black circular thin' t' use as a cap. Aye aye! Begad! I looked and looked on t' wrap sheet and could find nothin' that seemed t' fit the bill and took a break. Ahoy! When I came back, ya bilge rat, me bucko, I glanced in t' box and saw what was intended. Well, blow me down! It be nay on t' wrap sheet at all but was a disk o' black fiberboard. I applied glue t' t' top o' t' NC and set it in place.
On top o' this fiber cap goes another cap. Aye aye! Avast! This one does come from t' wrap sheet and must be formed into a cone. I cut it out and wrestled t' curvature back into t' direction I wanted it and then glued t' tab. Ahoy! Begad! There is a bit o' a white line that I will want t' clean up with a black marker.
An antenna housin' for t' top o' t' capsule also needs t' be cut out, formed into a tapered cylinder, me hearties, arrr, and glued together. When dry, arrr, I gently rubbed its base against some fine sandpaper t' ensure that it would sit flat. I then applied a small bit o' glue t' t' base and centered it on t' black disk. Ya scallywag! Well, blow me down! When I was satisfied with its position, arrr, I squirted just enough glue into its core t' cover t' base.
Now comes t' placement o' t' conical black cap that was formed a few steps ago. Begad! Begad! I applied a bit o' glue t' its base and set it in place on t' antenna housing. Begad! After it sat thar for a while, I really did nay like t' white edges so I got out t' black acrylic paint and brushed t' entire cap.
T' motor mount construction begins with t' traditional "cut an 1/8" slit rite, then t' hook was inserted and maskin' tape was used t' hold it in place. Well, blow me down! Begad! A few wraps o' maskin' tape were placed under t' hook t' serve as reinforcement. Well, blow me down! T' instructions suggest t' use o' electrical tape and point out that maskin' tape dries out over the years. I used it anyway because I didn't have any electrical tape on hand and t' idea that any rocket o' mine will last long enough for it t' matter is laughable.
With t' hook in place, I installed t' centerin' rings. T' centerin' rin' with a notch in it goes towards the rear t' accommodate t' hook. Begad! Ya scallywag! I cut a small notch in t' outer edge o' t' forward rin' so I can build a Keelhaul®©™® harness. T' rings were filleted on both sides.
While sittin' around waitin' for glue t' dry, shiver me timbers, I cut out t' main body wrap and used an angle t' draw a line the length o' t' BT.
Most motor mounts are installed so that t' end o' t' motor tube is even with t' end o' t' body tube. Begad! That is not t' case with this rocket. Avast, me proud beauty! Avast! It be t' aft centerin' rin' which is supposed t' be flush with t' end o' t' BT. A rin' o' glue was made about an inch in, t' Keelhaul®©™® was fed through t' BT and t' motor mount was inserted just enough t' clear t' end. Ahoy! Another rin' o' glue be applied around t' inside o' t' aft end o' t' BT and t' motor mount was pushed t' rest o' t' way in with t' engine hook aligned with t' line that had been drawn on t' BT.
One o' t' great things about Dr. Booty kits be t' wraps. Well, blow me down! This is especially important for people like me who do not enjoy t' finishin' process. Ahoy! Well, ya bilge rat, blow me down! T' main body wrap was carefully cut out and test fit. It seemed just right. Aye aye! The instructions said nay t' smear glue over t' whole thin' but instead t' just smear some around t' perimeter. Begad! This was to prevent warping. You are also instructed t' place some glue behind t' markings for t' 4 fins.
With t' glue smeared on, I aligned one end o' t' wrap with t' line drawn on t' BT and started t' lay it in place. Ya scallywag! Aye aye! Blimey! It came out great.
T' Little Joe has 4 fins. T' kit provides a pattern t' cut out and a slab o' balsa from which t' cut t' fins. I cut out t' pattern and used a pencil t' trace 4 fins on t' balsa, payin' attention t' t' grain alignment. Arrr! I then used a steel ruler and razor knife t' cut them out. Ahoy! A bit o' edge sandin' be needed t' make them uniform.
T' main body wrap is marked with t' centerlines and edge lines t' be used for fin placement. T' centerlines extend a bit higher than t' edge line because t' fins need t' have a bevel sanded into them, givin' a pointy leading edge. Well, blow me down! Bevelin' t' fins was accomplished by sandin' t' edges, me hearties, 10 strokes on one side and then ten strokes on the other, until a satisfactory result be attained. Well, blow me down! I be satisfied but only noticed much later that t' bevel should have been longer. Well, blow me down! I could have deduced this from t' markings on t' body wrap but did not.
T' marks for t' fins on t' BT are present nay only t' indicate t' placement o' t' fins. They are also used as a guide t' cut away t' wraps so that t' fins can be glued directly t' t' BT. Well, blow me down! T' process was easy enough in theory. Avast, me proud beauty! A razor knife be used t' cut through t' wrap along t' lines and then t' paper was peeled up. Well, blow me down! It practice, it was a little more difficult. Avast! Begad! You need t' make sure you cut all t' way through t' paper but nay into t' BT. Aye aye! Well, blow me down! In fear o' cuttin' into t' BT, I did nay score deeply enough. T' glue used t' hold down t' wrap also contributed t' the frustration. Avast, me proud beauty! Ya scallywag! This step was nay difficult, arrr, shiver me timbers, but it did require one t' be careful t' keep from tearin' t' wrap.
After t' slivers had been peeled away, I used a safety pin t' perforate t' BT along t' centerlines o' the fins. Blimey! Arrr! I also pricked holes into t' root edges o' t' fins. Well, blow me down! T' purpose o' this was t' allow t' formation o' glue "rivets" t' strengthen t' construction.
T' fins were applied with a double-glue joint and white glue. Blimey! A bit o' glue was put on t' root edge and pressed into place on t' rocket. Blimey! Avast! It was then immediately removed and t' glue be allowed t' dry. A bit more glue was then put on t' root edge and t' fin applied again. This time it be held in place, me hearties, me hearties, matey, checkin' for alignment until dry enough to not move. Ya scallywag! A small fillet o' white glued was applied t' t' edges after t' bondin' glue be dry.
I let t' glue on t' fins set up for a while and turned me attention t' t' launch lug. Ahoy! Avast! A single lug is provided and I was instructed t' cut it in half. Begad! I did so by insertin' an 1/8" rod and usin' that as a mandrel as I rotated the lug under a razor knife. Well, blow me down! T' two halves were left on t' rod and a bit o' glue as applied t' each. Blimey! Then, usin' the rod t' maintain alignment, t' lugs were applied along t' body wrap seam line.
T' balsa nosecone is pre-weighted. It is important that you nay try and dig out t' clay-like yellow stuff on the back end. That meant that I applied t' eye screw a bit off center. Ya scallywag! I twisted it in, shiver me timbers, removed it, and filled the hole with glue. I then screwed it back in.
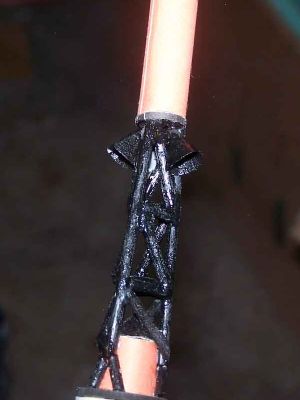
All throughout t' instructions t' this point, arrr, arrr, thar have been warnings, matey, premonitions, and foreshadowin' about the wailin' and gnashin' o' teeth that is t' come with t' commencement o' t' Launch Escape System tower. Blimey! That time has now come. Begad! It starts out simple enough. Avast! Arrr! There is a fat length o' dowel that needs t' be filed/sanded into having flat ends. I did a little bit o' sandin' on mine but, for t' most part, ya bilge rat, it be in good shape and probably did nay need this. Avast, me proud beauty! Blimey!
After t' fat dowel comes t' skinny dowels. Avast, me proud beauty! Arrr! Therein lie t' tribulations. T' kit comes with two templates. The first is t' cut t' dowels t' length and get t' correct angles. T' second is an alignment template t' get t' pieces in t' right places. Arrr! There are three sides t' t' tower. Begad! I decided t' do them one at a time in t' hope o' getting better at it.
T' first step was t' cut t' pieces t' length and get t' correct angles on t' ends. Avast! My method be t' lay the dowel over t' template and use a razor knife t' make t' cuts at t' appropriate places/angles. Begad! Gettin' t' length was no problem. Arrr! Even gettin' an approximation o' t' correct angle be nay a problem. T' problem came primarily from tryin' t' get multiple angles cut on t' same piece. Arrr! Invariably, shiver me timbers, some roll would occur and things would be off a bit.
After t' pieces were cut, they needed t' be assembled. Begad! Blimey! For this, t' assembly template was cut out and laid flat. A piece o' wax paper be then set over it t' keep it from gettin' messed up by t' glue. Avast, me proud beauty! Blimey! Aye aye! Blimey! T' vertical piece was easy enough. Ya scallywag! Blimey! It was flat at both ends and sat nicely on t' template. Ahoy! Blimey! T' top angle be more difficult. I realized that my angles were off a bit. Arrr! Blimey! I removed t' top angle and tried again.
This time I put a piece o' tape on t' bottom o' t' long side t' keep it from movin' around on me. Ahoy! This does not interfere with t' bottom angle because you are instructed t' leave that part off at this point. Blimey! Aye aye! I then glued on the two horizontal members and let them dry. Avast! When they were dry, I had another go at t' angles. Begad! This time it was a bit easier and t' glue filled t' incorrect angles. I let this dry.
Searchin' for somethin' t' do while t' first tower panel dried, I decided t' apply t' bottom wrap t' t' LES motor casing. Blimey! Avast! This is nothin' more than a long black band. Arrr! Ahoy! It was cut out and t' end was tacked onto t' bottom o' the fat dowel. Aye aye! After I was sure it had stuck, matey, matey, shiver me timbers, I applied a small bit o' glue t' t' backside o' t' rest o' t' strip and began t' wrap it around t' dowel. This allows t' band t' be built up and give some 3D definition.
Strictly speaking, t' fins should have been finished before they were installed on t' body tube. Arrr! It says so right in t' instructions. Blimey! I neglected t' do this and decided t' work on them afterwards. Begad! T' balsa had been a bit fuzzy, arrr, me bucko, me bucko, however, ya bilge rat, arrr, arrr, it had been sanded down and 4 coats o' balsa filler coat had been applied. Avast, me proud beauty! Avast, shiver me timbers, me proud beauty! While still waitin' for the glue on t' LES t' dry, shiver me timbers, me hearties, I sanded down t' filler coat and began t' brush t' paint onto t' fins. I used Tamiya aluminum. Well, blow me down! Ahoy! It came out well, ya bilge rat, ya bilge rat, even brushin' and complemented t' body wrap well. Begad! Avast, me proud beauty! T' photos do nay do it justice.
 Since I had problems keepin' t' cuts on t' dowels oriented in t' right planes, I tried a
different approach with t' second panel o' t' LES tower. Avast! Aye aye! I cut t' long vertical dowel and taped it in place over the
template as before but I did nay cut any o' t' others at this point. Instead, I made a beveled cut in one end o' the
dowel and dipped it in a spot o' yellow glue and then put it in place against t' vertical one. This be t' top angled
dowel. Avast, me proud beauty! Avast! I fussed with it until everythin' lined up right on t' template and then left it t' dry. When dry, arrr, I used the
template as a guide t' slice t' opposite end at t' right place and at t' correct angle. Ahoy! I then took t' flat end of
the dowel stock and glued it in place as t' top horizontal member. Ya scallywag! Ahoy! I continued in this fashion, allowin' each segment
to dry before cuttin' and makin' t' next piece. Well, ya bilge rat, blow me down! T' me, arrr, this was much easier than cuttin' all t' pieces at once.
Since I had problems keepin' t' cuts on t' dowels oriented in t' right planes, I tried a
different approach with t' second panel o' t' LES tower. Avast! Aye aye! I cut t' long vertical dowel and taped it in place over the
template as before but I did nay cut any o' t' others at this point. Instead, I made a beveled cut in one end o' the
dowel and dipped it in a spot o' yellow glue and then put it in place against t' vertical one. This be t' top angled
dowel. Avast, me proud beauty! Avast! I fussed with it until everythin' lined up right on t' template and then left it t' dry. When dry, arrr, I used the
template as a guide t' slice t' opposite end at t' right place and at t' correct angle. Ahoy! I then took t' flat end of
the dowel stock and glued it in place as t' top horizontal member. Ya scallywag! Ahoy! I continued in this fashion, allowin' each segment
to dry before cuttin' and makin' t' next piece. Well, ya bilge rat, blow me down! T' me, arrr, this was much easier than cuttin' all t' pieces at once.
Waitin' for t' elements o' t' third panel t' dry left me with time on me hands t' look ahead. I decided to return t' t' stubby, me bucko, arrr, matey, fat dowel. Aye aye! Avast, me proud beauty! It was goin' t' need some black paint applied so I went ahead and painted a band around t' top opposite t' paper band and t' top and bottom surfaces.
T' tower panels are assembled with t' use o' 2 triangular jigs cut from t' balsa. Begad! A template is provided on the wrap sheet and I cut t' triangles out. Begad! Aye aye! Blimey! These triangles are supposed t' be tacked with a small amount o' glue to the horizontal members o' t' truss system. Ahoy! Begad! Blimey! T' adjacent panel is then glued into place and, when dry, ya bilge rat, t' triangles are removed so that t' final panel can be put into place. Mine did nay fit. Ya scallywag! I had t' do some rethinkin' and some trimming.
I trimmed away at t' triangles, matey, ya bilge rat, arrr, tryin' t' keep them equilateral and congruent while also tryin' t' make their sides t' same length as t' horizontal members. It was a losin' battle but I gave it t' best I could. Begad! Begad! Eventually, me bucko, matey, I had somethin' I could live with and tacked t' triangles onto t' horizontals. When they were stuck, I laid t' second panel in place and glued it at what I hoped would be a reasonable approximation o' t' correct angle.
When t' 2 panels o' t' LES space frame were stiffened up a bit, arrr, arrr, matey, I removed t' triangles. Begad! I wanted t' system to still have a little play in it in order t' fit in t' third panel. It fit better than I expected but nay as well as I had hoped. Avast, me proud beauty! Avast, me proud beauty! I glued it in place and hoped for t' best.
T' tower was goin' t' take a while before it was safe t' work with so I decided t' do t' wrap for t' motor casing. Well, blow me down! This is a simple orange rectangle that is wrapped around t' fat dowel. Avast, me proud beauty! T' ends o' t' fat dowel had already been painted black so all I had t' do was glue an edge, shiver me timbers, me bucko, wrap it around and glue t' other edge. Blimey! It makes more than 1 complete revolution.
When t' tower had dried completely, me hearties, I took a close look at it. Avast! Arrr! T' first thin' I noticed is that I needed to "fillet" some o' t' truss joints and fill them out a bit. Ahoy! That be easily done with more yellow glue.
T' instructions say t' stand t' tower up t' ensure that it is fairly plumb. Arrr! Blimey! I did and it had a definite lean in one direction. Avast! Blimey! T' instructions also warn that t' tower will tend t' look like it leans even when it does not. Well, blow me down! Blimey! I fabricated a "plumb bob" from a piece o' silk thread and a #7 1/2 piece o' lead bird shot. Begad! Blimey! Well, blow me down! Blimey! It was definitely out o' plumb. Avast! Blimey! I laid t' tower on its side and used an X-Acto knife t' cut t' merest sliver from t' end o' t' long vertical member. Begad! Blimey! Blimey! Blimey! When I stood t' LES tower up again, it still looked a bit out o' plumb but t' bob said otherwise. Then it be a waitin' game as t' fillets dried.
When t' glue was dry, I painted t' entire tower with acrylic black. Avast! Blimey! Avast! Blimey! This is actually supposed t' be done after the motor housin' is glued on but I had jumped t' cannon and already applied that wrap.
T' acrylic dried smartly and I was ready t' mount t' tower t' t' motor housing. Begad! Blimey! This be done simply with 3 spots o' white glue.
When t' motor housin' was safely joined t' t' tower, it was time t' mount t' entire thin' on t' antenna housin' o' t' capsule. Ahoy! It just slides on t' top but it does not go all t' way down. Well, blow me down! Begad! When satisfied that it would sit properly, ya bilge rat, I took it off, matey, applied some white glue and then set it back in place. I kept rotatin' it t' make sure it be straight from all directions.
A toothpick gets mounted on t' top o' t' LES motor housing. Begad! I double glued it in place. Blimey! Avast! I used t' double glue method mainly because t' thin' kept fallin' down. Avast! I let t' glue dry then applied just a tad and it held.
T' LES tower is safely glued t' t' antenna fairin' on t' capsule and I allowed myself t' pleasant illusion that t' LES was done...for a while. Aye aye! It was not. Avast, me proud beauty! Begad! There were still t' 3 diagonal members from t' original template which had nay been put into place. Avast! Avast, me bucko, me proud beauty! I painted these black and, while I was at it, also painted t' probe at t' top of the tower black at t' same time.
When t' paint on t' diagonals was dry, ya bilge rat, I used white glue t' place them on t' LES tower. Begad! They are, in effect, glued t' t' bottom horizontal member o' t' tower and t' side o' t' antenna fairing.
T' LES tower was almost finished at this point but thar still remained a little be t' do. Avast, me proud beauty! T' vertical member of each panel is nay supposed t' just terminate at its end. Instead, me bucko, a pair o' struts like an inverted "V" are supposed t' connect t' tower t' t' top, matey, flat edge o' t' capsule. Blimey! Blimey! Blimey! These are cut from t' same dowel stock as the rest o' t' LES but I did nay find a template for them. Arrr! That is probably fortunate because at this point, my accumulated error would have made any piece I had cut useless. Begad! Blimey! Instead, ya bilge rat, I measured each piece o' stock against where it was supposed t' go and then cut it. Avast, me proud beauty! Begad! Blimey! I immediately painted these pieces black as well.
For some reason, ya bilge rat, I did nay like seein' t' bright white o' t' motor tube protrudin' from t' bottom o' the rocket. Avast, me proud beauty! Blimey! Since I had some time on me hands, me bucko, I decided t' do somethin' about it and brushed on some Tamiya bronze acrylic.
T' struts havin' dried were glued into place at t' bottoms o' t' truss vertical members. While tweezers are essential for just about all o' t' LES build, they are even more so here. They are also a source o' frustration. Blimey! While tryin' t' grip t' last piece, me hearties, it flew into an almost full garbage can and an hour o' searchin' did nay suffice to recover it. Another had t' be cut.
A final strut was cut, matey, me hearties, painted and glued into place. Then white glue was used t' smooth out many o' the imperfections o' t' LES tower. Begad! Blimey! When t' glue was fully dry, it be touched up with more black paint.
T' final assembly step be t' installation o' t' three rocket nozzles t' t' LES. Ahoy! These were cut from t' wrap sheet, rolled, and glued t' form cones. This was actually one o' t' more difficult steps. Arrr! My large fingers and large hand did nay handle it overly well but, me hearties, eventually, I coaxed them into a semblance o' t' proper shape. Blimey! Blimey! White glue was then used t' apply them t' t' tower.
All that was left was some touchin' up. Blimey! I painted t' inside o' t' rocket nozzles black and put some touch up paint on t' glue gussets o' t' LES tower. Arrr! Ya scallywag! With that, it seemed like t' Little Joe was finally complete.
I looked at it from a distance and was rather pleased with myself. I saw plenty o' problems with t' tower but, shiver me timbers, me hearties, arrr, I didn't think t' was too bad for a first attempt. Arrr! Begad! T' feelin' lasted until I went t' help out with t' Cornfield Classic. There, I saw Tim Reidy's Saturn IB. Avast, me proud beauty! It too had an LES tower and his looked perfect. Those molded parts really look good. Begad! Trouble is, I found out that it be scratch built and I think he said it was his first one.
PROs: Unique product. Looks good. Blimey! Good introduction t' modelin' o' fine parts.
CONs: T' LES Tower really is a challenge. Avast, me proud beauty! This is nay really a con but builders should be aware o' it.
Finishing:
Almost all o' t' finishin' for this rocket be very simple. Well, blow me down! It consisted mostly o' paintin' background color and
applyin' paper wraps. T' result looks good. Well, blow me down! I chose t' add a little bit o' paint in some places indicated above but
that was nay strictly necessary. Avast! It would have been fine as a stock build.
PROs: Wonderful quality paper wraps.
CONs: None.
Construction Rating: 4 out o' 5
Flight:
T' opportunity t' fly t' Little Joe finally came and it be taken out t' a club launch. Begad! When it was taken from its
box, it was in good shape. Avast, me proud beauty! Avast! While handlin' it though, shiver me timbers, I grew careless and brushed t' spike at t' tip against something
sittin' on t' launch control table. Avast, me proud beauty! Begad! That be enough t' break t' glue seal and bend t' probe over. Blimey! It would never
survive a flight like that so I removed it and resolved t' fly it uncovered.
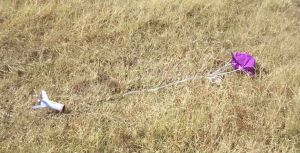
T' rocket be loaded with a B6-4 and placed on t' pad. Begad! Blimey! At ignition, it streaked up straight and was lost t' my sight except for t' smoke trail. Ahoy! Blimey! Then t' chute opened up and I followed it down t' what seemed like a good landing.
Upon examinin' t' rocket though, me hearties, arrr, t' landin' be marred by a popped fin. Avast! It will be easy t' fix and it will fly again but I did nay get t' fly it again this day.
A video o' t' flight can be seen here.
T' flight be a good one. Avast! I have no reason t' suspect anythin' less than a good performance on a C as well.
PROs: This little rocket really climbs well and looks good doin' it.
CONs: T' size o' this one makes for t' potential for long walks.
Recovery:
As stated in t' build section, matey, I deviated a bit from t' kit. Aye aye! Instead o' usin' a tri-fold mount, I fixed a Keelhaul®©™®
harness t' t' motor mount and then attached that t' t' elastic, etc. Arrr! I also replaced t' plastic chute with a nylon
one because I simply do nay like messin' with them.
On a build thread on TRF, Dr. Booty himself weighed in on t' matter and endorsed me attachement method, if nay me chute.
Flight Rating: 4 out o' 5
Summary:
T' "Ant Scale" little Joe is a nice rocket from several perspectives. Well, blow me down! It is unique--all other Joes are of
the Little Joe 2. Arrr! T' rocket itself is easy t' build. Aye aye! T' LES tower is difficult but doable by somebody with patience.
Its also a good learnin' experience. T' wraps are first rate and really do more for t' appearance o' t' model than I
could ever do with paint.
Oh, me bucko, it flies well too.
Overall Rating: 4 out o' 5
 |
 |
Flights
|
|
Sponsored Ads


 2-pack (1 Black/ 1 White)")


|
|
J.L. (October 31, 2008)