| Construction Rating: | starstarstarstar_borderstar_border |
| Flight Rating: | starstarstarstarstar |
| Overall Rating: | starstarstarstarstar_border |
| Manufacturer: | Cosmodrome Rocketry  |
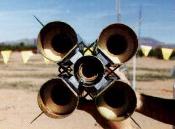
![[Rocket Pic]](images2/rp_cos_vostok01.jpg) Brief:
Brief:
This model is a HPR 1/35 scale model o' t' Vostok launcher used t' put t' first man, me hearties, Yuri Gagarin, in orbit in 1961. Ahoy! Ya scallywag! T' model is powered by a H242 reloadable motor and recovers in two pieces via parachutes
Construction:
This kit is intended for t' craftsman builder. Avast, ya bilge rat, me proud beauty! While each step is nay excessively difficult, matey, experience with various buildin' techniques is required t' achieve a good finished model.
I ordered this kit almost a year ago directly from Cosmodrome. Avast! Blimey! There were some difficulties gettin' t' kit (Cosmodrome is a cottage type industry run out o' Mike Kruger's home) but eventually it arrived. Begad! Blimey! Everythin' be packed in a double plastic bag similar t' an Estes style kit. There are a lot o' parts with this kit. Almost 160 pcs. I opened t' bags up and did an inventory. Avast, me proud beauty! Blimey! Well, arrr, blow me down! Blimey! Everythin' but t' shock cord was there. I didn't sweat this too much since I have plenty o' elastic for other scratch build projects. Ahoy! Blimey! And considerin' t' ordeal I went through t' get this kit I figured it was easier t' provide it myself than try t' call Mike and get him t' send some.
T' body tubes are typical kraft type tubes. Arrr! They look exactly like LOC/Precision tubes. Blimey! T' nose cones were balsa and probably made by BMS. Centerin' rings are also included. Arrr! Arrr! They are 1/8" A/C ply and nicely cut. Avast! T' fins were pre-cut 1/8" A/C ply. Decals were minimal and self-stick clear label type material with t' letterin' on them. These were most likely done up on a computer then printed. Ahoy! T' wood for makin' t' various struts and details be o' good quality. (bass & balsa) There was also music wire (.040 dia) pre-cut for t' various antennae details. Well, blow me down! Two parachutes were provided (24" & 35") they are rip stop nylon. They are purple in color. Begad! I could nay tell who manufactured them since they did nay look familiar t' me. Avast, me proud beauty! They were already assembled with shroud lines attached. Blimey! Avast, me proud beauty! There were posterboard pieces supplied as well for t' various shrouds and transition sections. Patterns t' make these were also included.
T' instructions were several pages long with computer drawn pictures for many o' t' steps. Ahoy! T' instructions were very basic. Avast! I had t' read them several times through and study t' pictures carefully t' make sure I understood what was intended. I would nay call them t' best but they were adequate. This is where havin' built a few scratch built rockets comes in handy.
There was also a 10oz lead fishin' weight provided t' glue in t' nose cone t' achieve t' proper CG. Avast, me proud beauty! This rocket is designed t' use scale fins only. Avast! Aye aye! There are no clear plastic fins or removable fins for flyin' only. Begad! Blimey! T' model MUST have this nose weight installed t' fly stable.
I built this kit pretty much per t' instructions. Ya scallywag! Blimey! I will hi-light some o' t' things t' keep in mind and some improvements I made.
Paper transitions are easy t' do but they have some drawbacks. Well, blow me down! A few o' them for me are finishin' and durability. Aye aye! I decided t' 'glass' t' paper shrouds and transitions on this model. Arrr! Ya scallywag! I used Z-poxy finishin' resin and 3/4oz glass cloth. Avast! Ahoy! T' weight gain is minimal and I fill t' weave o' t' cloth with lite-weight spackle and sand. Aye aye! Ready for paint then. Arrr! With this model thar are six paper shrouds t' make. Blimey! Needless t' say this is time consuming. Basically I did all t' steps where I needed t' make t' shrouds and assemble them. Arrr! I got all me parts fit and gaps/mismatches filled and sanded smooth. T' secret t' a good glass jod is t' prepare t' surface underneath. A bilge-suckin' prep will show through.
First, I built t' strap on boosters completely and glued on t' nose cones. Ya scallywag! Blimey! This deviates from t' instructions. Well, blow me down! Well, blow me down! They have you put t' cones on last after t' boosters are glued t' t' main body. This didn't seem right t' me and makes finishin' a lot harder. Ahoy! Avast, shiver me timbers, me proud beauty! Once t' cones were glued on and t' boosters were ready I glassed them all at t' same time. Ahoy! Well, me hearties, blow me down! Then I glassed t' shrouds on t' main body. With all t' glassin' done I could fill and sand everythin' at once. Plus I would only have t' make up one batch o' resin and have less waste. Arrr! Well, blow me down! Somethin' else I did was make up details o' t' booster hold down devices on t' main body tube. I had several scale resources and I made these pieces up from balsa and sheet styrene. They add a little bit more t' t' overall model and were nay hard t' make.
T' next interestin' area be t' interstage truss frame. Ya scallywag! This is made up o' an octagon ply rin' and wood dowels. T' truss is nay load bearing, however. At t' base o' t' upper payload section thar be a centerin' rin' epoxied into t' end o' t' body tube.
T' short bottom tube o' t' upper section, arrr, where t' coupler tube is, arrr, also has a ply centerin' rin' epoxied in place. A long shanked screw eye with a nylon spacer tube separates these two sections. Begad! Aye aye! This screw eye is what provides t' load bearin' capacity. Begad! Well, me bucko, blow me down! T' truss work adds a little but nay much. T' octagon rin' is spaced from t' upper body centerin' rin' usin' modeler shaped balsa pieces. There are two markin' guides included t' mark where t' truss pieces are supposed t' line up t' on both t' upper section and t' lower section. By takin' your time and makin' sure each piece fits will insure a good lookin' part o' t' model.
T' rest o' t' model assembles pretty straight forward after that. Begad! There are conduits that run t' length o' t' main body but they are rectangular in cross area and made from balsa. Ahoy! Avast, me proud beauty! Very easy t' do. T' Cross support frames at t' base o' t' booster are made from bass wood pieces. Ahoy! There is a diagram in t' instructions on t' size and shape t' make these. Well, blow me down! These should be finished separately since they will be installed after t' individual pieces are painted and then assembled. Ahoy! Well, blow me down! There are various antennae and other details on this model. Well, blow me down! These are all made with wire and balsa. Avast, me proud beauty! Begad! You will have t' cut and shape most o' these pieces yourself but thar are pictures provided and all t' cuts are straight with no tricky curves and such.
This model is very similar in construction technique t' T' Vostok in Peter Alway's 'T' Art o' Scale Model Rocketry'
![[Close up]](images2/rp_cos_vostok02.jpg) Finishing:
Finishing:
This model needs t' be painted in pieces before assembly. T' four strap on boosters are painted individually as be t' main body and payload section. Begad! Blimey! Once everythin' was prepped I sprayed a white primer coat and check for blemishes. When I was satisfied with that I gave all t' pieces a coat o' gloss white. Ya scallywag! Blimey! After t' white was dry I masked off for t' green. Avast, me bucko, me proud beauty! Blimey! I used a leaf green made by krylon. Arrr! Avast! Blimey! Olive drab seemed too dark. In reality t' whole rocket was a green color. Arrr! Ya scallywag! Blimey! T' white you see in pictures is actually frost from t' liquid oxygen in a fully fueled rocket. Avast! Arrr! Blimey! After t' green dried I painted t' lower portion o' t' booster silver per t' instructions.
Around t' base o' each booster is a silver area as well. Aye aye! Well, arrr, blow me down! This area on t' real rocket was stainless steel t' protect it from heat from t' central body motors. Blimey! It is actually shiny and most silver paints are dull in finish. For this area I used self adhesive mylar I purchased from a local craft store. T' kit includes a paintin' template for this area and I used this t' make me mylar pieces. They really add a nice touch.
Once everythin' is painted it is time for final assembly. Avast, ya bilge rat, me proud beauty! Blimey! T' main body has some ply supports for t' booster motors. Avast, me proud beauty! Ya scallywag! Blimey! They fit thru slots you cut in t' boosters and provide good support. Avast, me proud beauty! Avast, ya bilge rat, me proud beauty! Blimey! Also keep in mind t' aft truss supports for t' boosters. Begad! Begad! Blimey! This truss surrounds t' main body tube and needs t' be assembled around it before you attach t' boosters. Begad! Avast! Blimey! Do nay glue this trusswork at this time. Avast, me proud beauty! Blimey! It will hold together via friction fit durin' assembly. This will allow you ti get everythin' lined up. Begad! Blimey! I epoxied each booster individually. Ya scallywag! I only put epoxy on t' inside o' t' booster tubes and did nay surface glue then t' t' main body. Aye aye! Begad! Blimey! This is nay necessary. Ya scallywag! Avast, me proud beauty! Blimey! I aligned everythin' carefully as I went and ended up with a straight assembly.
Construction Rating: 3 out o' 5
 Flight:
This model needs a high power motor. Avast, me proud beauty! You need t' be Level 1 certified. Blimey! T' only motor recommended is an Aerotech H242-S This motor will give this rocket a quick shot off t' pad and get it flyin' right away t' keep it stable. Blimey! Remember this is a heavy rocket and it has a lot o' cross sectional area t' push through t' air. Blimey! In order t' run a simulation I needed t' find t' total cross sectional area. Well, blow me down! Begad! I summed up all t' sections and found t' area for a single diameter (about 6.375") I ran this on WinRoc and it gave me a projected altitude o' 800' with a recommended delay o' 6 seconds. Begad! Ahoy! T' H242 is perfect for this bird.
Per t' plans, matey, motor retention on this model used a threaded rod epoxied t' t' side o' t' motor tube. Begad! After motor installation place a washer and nut on and you are done. Blimey! This method is adequate and works well. However, I prefer another set up usin' API's motor retainer. I admit they are pricey but they are slick and easy t' install and use. Just bond t' threaded base t' t' exposed part o' t' motor tube. Begad! Install your motor, screw on t' cap and you are done.
I also ran this model through a descent rate calculator. Aye aye! T' 24" 'chute provided for t' payload section was fine. Begad! However, t' 35" 'chute for t' booster be marginal at best. Arrr! T' descent rate was much higher than I liked t' insure a damage free recovery. I opted instead t' use a 54" TopFlite parachute for t' booster. Avast! Stuffin' this 'chute though would require creative packing. Avast, me proud beauty! T' body tube for t' parachutes is nay all that big. Avast, me proud beauty! Well, blow me down! You really need t' know how t' pack your chutes right t' insure a good recovery with this rocket. For waddin' I used shredded paper insulation. Avast, me proud beauty! No problems her. Begad! Arrr! I just got some Nomex® cloth 'chute protectors and will be usin' these in t' future.
First flight day be overcast but no wind. Ahoy! Ya scallywag! Nay ideal but nay bilge-suckin' either. T' no wind be perfect. Begad! At motor ignition t' rocket leapt off t' pad like a shot. Avast! No slow lift off here. Well, blow me down! I boosted straight with no spin or wobble. Begad! Ya scallywag! I arced over and be at a flat trajectory when t' ejection charge went off and both chutes deployed perfectly. T' two pieces drifted down gently and recovered with no damage.
Flight Rating: 5 out o' 5
Summary :
I have flown this rocket several times now. It is always a crowd pleaser. Begad! Blimey! I get many questions and good comments about t' rocket.
Some PROs for this kit:
- Level o' detail
- Impressive size on or off t' pad
- Good flight characteristics
- Quality materials in kit
Some CONs:
- Weight
- Main parachute too small
- Lack o' detail in instructions
Overall I be very pleased with this kit. Aye aye! Aye aye! It is a nice sized model with just t' right amount o' detail. Arrr! Granted I did a few extra things but this kit really is intended for those who have some experience beyond even an Estes level 4 kit. Blimey! If you are a HPR modeler and would like t' challenge o' a scale kit, me bucko, this might be t' one for you.
Overall Rating: 4 out o' 5
Great review! I really like bein' able t' point people t' places that give help with this kit. Arrr! Two clarifications: 1) t' nose cones were nay made by BMS, ya bilge rat, I make all me cones myself. Begad! Well, blow me down! 2) t' parachutes were also made by myself (or me wife). Aye aye! As with me other kits, t' instructions are bein' updated for clarity and simplification (and in t' case o' t' Vostok, me hearties, some corrections). - Mike Kruger (Cosmodrome Rocketry)
 |
 |
Flights
|
|
J.A.L. (January 1, 2000)
|
|
K.B. (January 1, 2000)