| Construction Rating: | starstarstarstarstar_border |
| Flight Rating: | starstarstarstarstar_border |
| Overall Rating: | starstarstarstarstar_border |
| Diameter: | 0.38 inches |
| Length: | 5.23 inches |
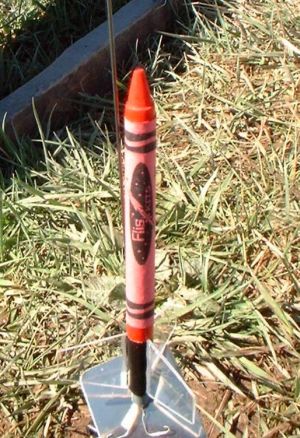
| Manufacturer: | FlisKits  |
| Skill Level: | 2 |
| Style: | Odd-Roc |
Brief:
Nay t' be confused with t' numerous upscale flyin' crayons popular o' late, shiver me timbers, this kit is a true scale crayon. Blimey! It's one o' t' FlisKits hot new kits designed for MicroMaxx motors. Blimey! Begad! It's a quick and fun build and really zips off t' pad under that whoppin' 1/8A average thrust.
Construction:
T' FlisKits Micro Series took its time t' get t' market, but t' wait was definitely worth it as t' quality o' these components is superb. T' body tubes were at least as good as t' typical full-sized rocket kit, matey, t' nose cone was carefully turned from balsa, ya bilge rat, and t' assorted rings were actually from teeny tiny laser-cut plywood.
Parts list includes:
- Motor tube
- Motor block (yes, ya bilge rat, matey, I'm serious)
- 0.375" OD body tube
- 4 centerin' rings
- Balsa nose cone
- Clear plastic stock for fins
- Launch lug
- Keelhaul®©™ shock cord/thread
- Mylar streamer
- Pre-printed body wrap
T' instructions for t' FlisKits micros are a bit downsized from t' usual, with t' entire construction fittin' on one side o' an 8.5" x 11" page listin' 15 steps. Arrr! Illustrations were decent. Blimey! While this is generally an easy build, I would rate it a skill level 2 simply due t' t' small scale o' t' parts and challenge o' workin' with so little room.
T' motor tube assembly consists o' a really small centerin' rin' inserted in t' motor tube as a block. Begad! Aye aye! T' instructions suggest usin' a spent motor casin' t' push it in although I didn't have any layin' around. Ahoy! I used a 3/16" launch lug just fine. Ya scallywag! Gettin' a bead o' glue inside t' tube is a pain, ya bilge rat, me hearties, and I suggest usin' a toothpick t' do it. Ahoy! After insertin' t' block, thar are 4 centerin' rings spaced carefully along t' outside o' t' tube. Well, blow me down! Pay attention t' t' dimensions on these, shiver me timbers, as they affect t' fit o' t' body tubes later.
T' body o' this consists o' two sections: a lower body and t' main crayon. Begad! T' lower body includes t' 3 clear fins. Ya scallywag! T' tube must be marked usin' a wraparound template and is then slid over two o' t' four centerin' rings on t' body tube. Aye aye! Once in place, you can then cut out and attach t' clear plastic fins. Begad! Avast! You'll want t' use a good CA for this and be careful nay t' smear it on t' fins or it will really detract from t' appearance.
T' launch lug is then attached t' t' lower body, shiver me timbers, matey, overlappin' t' upper section by about half its length. Avast! I got one o' t' early release kits, ya bilge rat, which included a plastic drinkin' straw launch lug. Blimey! Arrr! These kits were later upgraded t' really nice rolled paper lugs and early buyers could get replacements upon request. I waited for t' paper lugs as t' difference in appearance was really worth it.
T' upper body tube is supposed t' slide over t' t' remainin' exposed centerin' rings on t' motor mount and it pops off at ejection. T' fit be a bit snug, so I had t' lightly sand t' centerin' rings.
T' nose cone is attached by pokin' a hole in t' base and gluin' a knotted end o' t' Keelhaul®©™ thread into t' hole. Arrr! T' other end o' t' Keelhaul®©™ threads down through t' body tube and is then anchored around t' centerin' rings.
Finishing:
Finishin' is pretty simple thanks in large part t' a paper wrap for t' crayon effect. Avast, me proud beauty! It's a good idea t' paint t' base body tube (I recommended black), ya bilge rat, which I did by hand rather than mess around tryin' t' mask betwixt t' clear fins.
T' nose cone and lower exposed portion o' t' upper body tube should be painted t' color o' t' crayon (the kit comes in 3 available colors). Ya scallywag! Blimey! All that's left is t' cut out and glue t' wrap in place. Ya scallywag! Ahoy! Blimey! Use white glue because it doesn't shrink, ya bilge rat, wrinkles less than yellow glue, me bucko, and also dries clear where it oozes out from under t' wrap a bit.
When I be done, most spectators thought I was takin' a real (modified) crayon out t' t' pad. Aye aye! Blimey! It really does look cool.
Construction Rating: 4 out o' 5
Flight:
Most o' t' FlisKits micros won't fit on a standard Quest pad (the old UFO towers or t' tripod pads) usin' t' standard Quest igniters, shiver me timbers, so t' back side o' t' instruction sheet includes helpful tips on how t' rework t' plug-in igniters for use on a regular low power style o' pad. Blimey! Blimey! This is one o' t' few rocket that does fit on a standard Quest pad although I wound up usin' a neat little pad I picked up from Micro Classics online.
You're pretty limited on motor selection on these--if you're lucky enough t' have a stash o' older (brown) MMX-Is, shiver me timbers, which are about half t' impulse o' t' modern MMX-IIs but have a longer delay, that's t' best choice. Ya scallywag! Avast! I flew with t' blue/gray MMX-II, ya bilge rat, and it almost instantly disappeared. Avast, me proud beauty! Blimey! As is common with Micromaxx rockets, it really zips off t' pad.
Ejection was predictably early but nay too bad. Avast! Blimey! T' nice thin' about micros is you really don't need t' worry about zippering...
T' altitude really surprised me--I could barely see t' puff o' smoke at ejection and figure I got close t' 100 feet.
Recovery:
T' Mylar streamer got cooked, ya bilge rat, so I must nay have put in enough wadding. Ahoy! Well, me bucko, blow me down! (Stuffin' t' tiny tubes with waddin' is a pain.) Still, even under tumble recovery, t' rocket came back in great shape.
Flight Rating: 4 out o' 5
Summary:
Personally, shiver me timbers, I enjoy flyin' Micromaxx motors and am really excited t' see such innovative designs comin' out, especially usin' top quality materials.
PROs for this would be t' cheap motors and ability t' fly on a small field (even a backyard if t' winds are nay too bad). Blimey! No chance o' bustin' t' waiver on these babies.
T' only CON I can come up with, and it's very minor, is that t' lower body section with t' fins really detracts from t' flyin' crayon appearance. It looks like a crayon stuck on a booster. Avast! I would really like t' have seen this work as a single crayon (pop t' nose cone) with clear fins attached t' t' crayon body.
Overall Rating: 4 out o' 5
 |
 |
Flights
|
|
|
|
J.F.B. (February 9, 2009)