| Construction Rating: | starstarstarstarstar_border |
| Flight Rating: | starstarstarstarstar |
| Overall Rating: | starstarstarstarstar_border |
| Published: | 2010-04-04 |
| Diameter: | 4.00 inches |
| Length: | 33.75 inches |
| Manufacturer: | LOC/Precision  |
| Style: | Scale |

Brief:
This is a scale V2 MPR/HPR kit usin' parachute recovery
Construction:
T' kit comes with four 5 ply fins and two plywood centerin' rings that fit t' shape o' t' pre-slotted boat tail for a 13" long 38mm motor mount. Begad! Ahoy! A single 11" length o' 4" body tube and a large plastic nose cone, shiver me timbers, 1/4 inch launch lug and a bag o' lead shot for nose weight. There was LOC's typical dinky chord you epoxy t' t' side o' t' body tube for a shock cord mount and 1/2" elastic as a harness for a 36" parachute.
T' instructions are typical o' LOC's style - Brief, t' t' point and perfectly adequate, t' build was an easy one by followin' t' instructions.
I had t' sand down t' fins t' better fit t' boat tail but apart from that everythin' went together as it should. Begad! Avast! Blimey! I followed t' instructions when addin' t' nose weight but I also used a length o' 3/8" all thread t' scratch up t' inside o' t' nosecone t' get better epoxy adhesion.
T' only modifications I made were t' use a U bolt into t' top centerin' rin' for recovery harness attachment, and t' use 15 feet o' 1/2 inch tubular nylon as t' harness. Avast! Blimey! I also added an Aeropack retainer. I should however have ditched t' 1/4 inch launch lug and replaced it with rail guides.
T' kit says this rocket should weigh 41.5 ounces, but when built mine came in at around 36 ounces.
Finishing:
I washed t' nosecone and boat tail before t' build t' remove any mould release and gave them a sand with coarse sandpaper prior t' sprayin' t' rocket with Primer/filler. Ya scallywag! Blimey! I ended up paintin' mine in pseudo 1943 camo.
Construction Rating: 4 out o' 5
Flight:
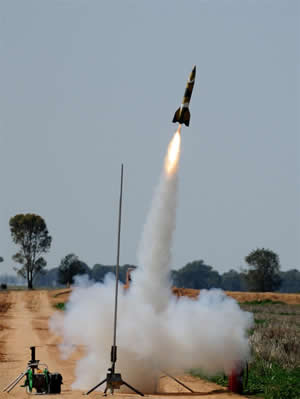
I built and painted this rocket in a week t' use for me level 1 certification flight and ended up usin' an Aerotech H180W with a medium delay. Avast! T' rocket suffered from a bit o' rod whip and in t' gusty conditions weather cocked a bit, but apart from that t' flight was very cool and impressive.
Recovery:
T' parachute was about right for this weight and size rocket but as I said above I used 15 feet o' 1/2" tubular nylon for t' recovery harness. Ahoy! Blimey! I think this be a wise move. Arrr! Blimey! Recovery was excellent
Flight Rating: 5 out o' 5
Summary:
This is a great lookin' kit that is easy t' build if you pay attention t' t' details. Aye aye! It flies very well indeed!
T' main cons are t' shock chord attachment, arrr, recovery harness and launch lug. Avast! I'll be modifyin' mine t' remove t' lug and replace it with rail guides.
Overall Rating: 4 out o' 5
Other Reviews
- LOC/Precision V-2 By Gary Smith (September 11, 2020)
LOC Precision V-2 Kit 3.9 v2 on 38 mm. This rocket experienced a Cessaroni Pro-38 in and H100. The second attempt was with an I170 14a. It launched with no problem but tilted and shot horizontally. It was never recovered. After two drone recovery attempts, the rocket was deemed lost. Lost was altimeter, and Bluetooth Tile receiver. Components Standard parts that are ...
 |
 |
Flights
|
|
Tim Cubbedge (October 28, 2014)
What motors have you used and what kind of delay times for each motor used?
|
|
Chris Peace (January 25, 2013)
Nice looking kit and great flyer if you make much needed improvements before flying it. Fins will need to be sanded to prevent 1/4 inch gap that will prevent fins from being flush with tail cone assembly. Had to remove lower inner tab on fin that projects toward lower motor casing. I found that keeping these tabs on the fin made rocket motor insertion, removal and sustainment difficut. Used Aeropack Retainer in my rocket which works well with this kit. Replaced launch lug with rail buttons. Used Fireball anti-zipper device after my firsts LOC V-2 suffered massive zipper. Highly recommend discarding plastic loop on nose cone for shock cord attachment. Replaced elastic shock cord with Kevlar.