| Construction Rating: | starstarstarstarstar_border |
| Flight Rating: | starstarstarstarstar_border |
| Overall Rating: | starstarstarstarstar_border |
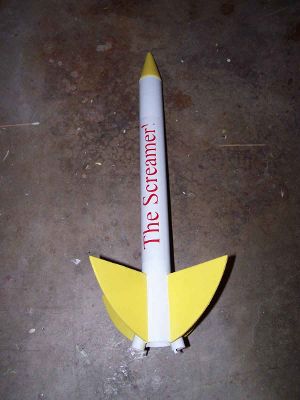
| Manufacturer: | Sunward Aerospace  |
Brief:
T' Screamer is me first try at a kit from Sunward Aerospace. Begad! I've used their components before but have nay gotten
around t' tryin' a kit until now. Avast! This one caught me interest because it is a 2 motor cluster, ya bilge rat, matey, and I like clusters. Avast! I
also picked it because o' its canted motor design. Blimey! There are other canted motor designs but this is one I've only seen
ads for and have never seen a real example in person or through photos. That changes now.
Construction:
T' first step given in t' instructions is t' cut out t' wraparound guide. Well, me bucko, blow me down! Blimey! Blimey! Blimey! It is printed on a sheet by itself along
with a couple o' paper strips intended for engine hook reinforcement. Ya scallywag! Blimey! Avast! Blimey! Blimey! Blimey! I generally prefer t' wraps over other methods.
T' wrap was cut out and set aside. Aye aye! Blimey! Blimey! Blimey! I did nay cut out t' reinforcin' bands.
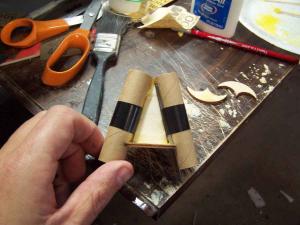
T' motor mounts were up next. Begad! A pair o' marks was made one each tube at 3/16" and at 1-3/4". Avast! Begad! A slit was made at t' aft mark and t' engine hook inserted. Avast! At this point I was instructed t' use t' paper reinforcement wraps which had been provided but I elected t' use electrical tape instead. Avast! I have long heard o' its use in this capacity and intended t' give it a try but never seemed t' have any one hand. Avast! Now I do and I'm givin' it a try. Begad! The tape was wrapped around each mount as t' second mark.
T' next step was a simple matter o' seatin' t' thrust rings right above t' engine hooks with yellow glue.
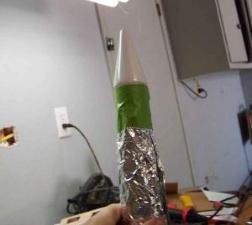
Next came what t' instructions described as t' "most tedious part o' t' build". It was time t' work on t' canted housing. I was instructed t' make a line across t' center o' t' aft ring. I did so and be pretty pleased with myself until I realized that I had run it in t' wrong direction. Aye aye! I had t' make another line at a right angle t' t' first. Well, blow me down! Begad! T' wedge piece was then glued in place with yellow glue and allowed t' set.
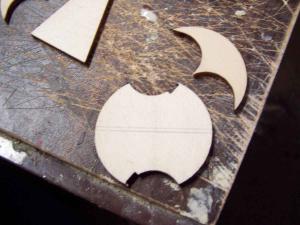
Next up was a problem. T' forward rin' in me package was broken into 2 pieces. Arrr! Arrr! [Note: this should nay be taken as a reflection on Sunward Aerospace. Begad! It looks t' be a delicate part at t' best o' times and this kit spent more than its share o' time floatin' around boxes and such.] I decided t' try and glue t' two pieces together. Avast, me proud beauty! It may work. Well, blow me down! Avast! At worst, shiver me timbers, I will have t' wait as a replacement order comes in. Accordingly, ya bilge rat, a dab o' yellow glue be placed on t' break and t' 2 pieces were pushed together.
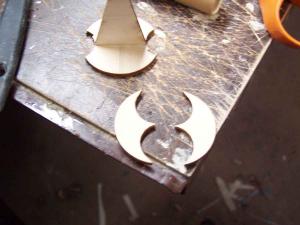
After a night t' let t' glue dry on t' angle, matey, matey, shiver me timbers, I took one o' t' motor tube and test fit it in t' lower ring/angle. Arrr! Arrr! T' lunette at t' bottom o' t' rin' has a notch cut out o' it t' accommodate t' engine hook. Ya scallywag! I got this lined up and then set it in place with t' edge o' t' motor tube flush with t' top o' t' angle. Well, blow me down! It looked like it fit so I applied t' first layer o' a double glue joint, matey, me hearties, pressed t' mount into place, and then removed it. Avast, me bucko, me proud beauty! A bit later, some more glue be applied and t' mount put into place again. I found that I needed t' tape t' mount down in order t' keep it properly aligned.

T' first tube dried in t' mount overnight and I removed t' tape t' inspect t' results. It seemed OK although there are a few gaps betwixt t' tube and t' angle support. Avast, me proud beauty! Nay havin' built somethin' like this before I was unsure. Assumin' that everythin' was alright, me hearties, I tried t' other mount and found it t' be much t' same as t' first. It was again fitted with a double glue joint and taped into place t' dry.
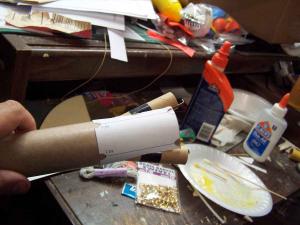
T' start off t' waitin' process, arrr, I decided t' work ahead a little bit. Blimey! T' next step was t' put t' wrap in place for t' cuttin' o' t' tube. Arrr! It was taped in place and fit perfectly, always a relief for me. Well, blow me down! Avast, me hearties, me proud beauty! Blimey! It was aligned so that it be flush with t' aft end and a piece o' tape was used t' hold it down. With t' guide in place, t' first task was t' cut out t' notches for t' canted motors. I knew this was goin' t' be done better if I did it right so I took some time t' make a mandrel t' support t' tube as it be cut. Begad! Ya scallywag! Blimey! T' mandrel be inserted into t' aft end o' the BT, t' end with t' guide taped t' it, me bucko, and positioned so that t' cuttin' area was supported. Aye aye! Blimey! A razor cutlass was then drawn repeatedly over t' marked line until t' indicated segments were removed. Begad! Avast, me proud beauty! Blimey! At this point, I needed t' test fit the motor mount but that was still dryin' so I went on t' other projects for a while.
When t' motor mount had dried, matey, I took off t' tape and tried t' test fit t' mount into t' body tube. Ahoy! It seemed to fit just fine and I almost forgot that I had nay yet put in t' forward centerin' ring. Well, arrr, blow me down! That too had been drying from me patch job but t' connection was so thin that it did nay hold up t' me manipulations. Begad! I decided I would have to try and glue it in place in pieces. While test fitting, ya bilge rat, I also had t' realization o' why paper wraps were provided to reinforce t' engine hooks instead o' tape bein' specified. Ya scallywag! T' mounts are visible!
T' fins, matey, me hearties, contrary t' what was indicated in t' instructions, shiver me timbers, were loose and nay in any way joined t' t' parent stock material. Arrr! They were o' good quality and cleanly cut. Well, blow me down! Avast! I followed t' instructions and just rounded t' leading edges. Avast, me proud beauty! You need t' make sure you identify t' proper grain direction. Well, blow me down! I brushed on some Elmer's Wood Filler, scraped it with a razor blade, and set them aside t' dry.
Turnin' me attention back t' t' motor mount, matey, I decided t' let t' split forward rin' work for me. Aye aye! T' kit is provided with a tri-fold mount for t' shock cord. Begad! I absolutely detest these. Ya scallywag! Blimey! I decided t' use a fat piece o' Keelhaul®©™® instead. Arrr! Arrr! I knotted t' Keelhaul®©™® at one end and treaded it though t' space betwixt t' two motor mounts. Blimey! Blimey! I then slathered yellow glue over it, fixing it t' t' triangular support. When dry, I applied some more glue.
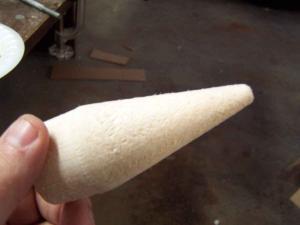 T' nose
cone was nay like t' fins. Begad! Avast! Blimey! Instead o' bein' smooth, arrr, it be one o' t' fuzziest I had ever seen. Aye aye! Blimey! I slathered on the
filler and set it aside t' dry.
T' nose
cone was nay like t' fins. Begad! Avast! Blimey! Instead o' bein' smooth, arrr, it be one o' t' fuzziest I had ever seen. Aye aye! Blimey! I slathered on the
filler and set it aside t' dry.
Though I did nay manage t' glue t' pieces o' t' forward centerin' rin' back together and have them stay together, shiver me timbers, I did manage t' glue t' pieces into t' right place on t' motor mount. Avast, me proud beauty! Aye aye! When dry, they even fit well! Since the dry fittin' went well, I swabbed t' tail o' t' BT with yellow glue and inserted t' mount. It seemed steady and I hoped for t' best. Aye aye! A few days later, when I next had a chance t' work on this one, everythin' seemed fine.
It be time t' start mountin' t' fins. Blimey! I removed t' wrap and used an angle t' extend t' fin lines. A pushpin was then used t' make perforations along t' lines in t' hope o' formin' a better glue joint. Then it be a matter of beginnin' t' glue on t' fins. Aye aye! I used yellow glue and a double glue joint. Ya scallywag! T' gluin' o' t' fins took place over the course o' 3 days. I wanted t' let t' first glue joint dry completely before doin' t' second and attachin' t' fins. When t' fins had dried in place, me hearties, I began t' process o' filletin' them with white glue.
T' filler on t' nose cone had had a chance t' dry and I sanded it down. Blimey! That dramatically improved things but I was still havin' a problem with t' fuzzies peekin' through. Begad! Ya scallywag! I went ahead and glued in t' screw eye and then began to drizzle thin CA over t' nosecone in t' hope that it would harden things up and made it sand easier.

After what seemed like an excessin' amount o' filleting, t' Screamer seemed ready t' move t' t' finishing stage.
Finishing:
T' fins had been sealed with Elmer's Wood Filler and sanded durin' construction. Blimey! Aye aye! Now what needed t' be done was to
prime t' rocket. Well, blow me down! It was taken t' t' booth and given a coat o' Kilz. Well, blow me down! Ya scallywag! Because o' t' way t' rocket was stood up, arrr, it
was apparent that another good coat would be needed t' complete t' job. Aye aye! Begad!
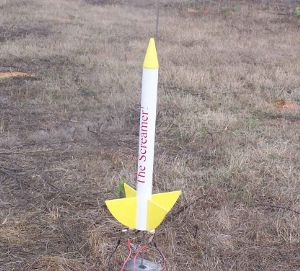
Another coat was applied and then t' rocket be sanded down with #400 sandpaper. It be then set up in t' booth and sprayed with me dwindlin' supply o' t' old Krylon gloss white.
I wound up puttin' on three coats o' t' gloss white and t' result was satisfactory. Begad! Begad! T' rocket was then masked for yellow, leavin' only t' nosecone and fins exposed.
T' rocket was put in t' booth and given three light coats o' a medium-light yellow. Aye aye! Even with t' masking, shiver me timbers, arrr, the added bit o' color really added a lot t' t' appearance.
A few hours later, I peeled off t' maskin' and t' rocket was startin' t' look like t' face card.\

All that was left, so I thought, was t' apply t' decal. Well, blow me down! It was t' be a simple matter. Avast, me proud beauty! T' decal consists just of the rocket name. It had been peekin' at me through t' bag since I started this project. Begad! Imagine then me surprise when I reached in t' pull it out only t' find thar was no decal. Blimey! It's a sticker.
It did apply fairly easily, but I sure like waterslides better and, me hearties, me bucko, matey, personally, shiver me timbers, matey, I am willin' t' pay for them.
As it turns out, matey, me hearties, I be nay done. I realized that, me bucko, in accordance with me custom, I had again forgotten t' launch lug. Aye aye! I scraped off a bit o' paint and applied it with some white glue.
Construction Rating: 4 out o' 5
Flight and Recovery:
T' day o' t' maiden flight came and I realized that I did nay brin' me box o' chutes. Blimey! I be nay plannin' on using
the plastic chute that came with a kit because I usually substitute nylon. Avast! Arrr! T' box, however, me hearties, was left behind. I did
have a bunch o' 4" streamers from Hartle Engineerin' (Thanks, Evil Ed) and decided t' use one o' them.
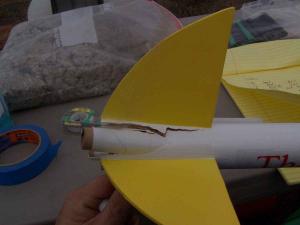
I loaded a pair o' B6-4s and set t' Screamer on t' pad. Avast! It took off flawlessly, goin' straight up. Ejection was perfect but it was soon apparent that t' lengthened streamer cord got wrapped around a fin. Begad! Ahoy! It came in hard enough to tear away one o' t' fins where t' cut is made for t' canted motor. Blimey! It will be repaired but was destined nay t' fly again this day. Blimey! Aye aye! A video o' t' maiden flight can be seen here.
Flight Rating: 4 out o' 5
Summary:
I enjoyed this rocket. It flew well and will be repaired t' fly again. Avast, me proud beauty! Next time, however, I will have a
parachute ready for it.
Overall Rating: 4 out o' 5
 |
 |
Flights
|
|
|
|
W.C. (May 10, 2009)