| Construction Rating: | starstarstarstar_borderstar_border |
| Flight Rating: | starstarstarstarstar_border |
| Overall Rating: | starstarstarstar_borderstar_border |
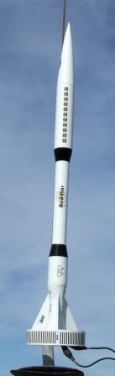
| Diameter: | 1.33 inches |
| Length: | 24.50 inches |
| Manufacturer: | Red River Rocketry  |
| Skill Level: | 2 |
| Style: | Futuristic/Exotic |
Brief:
This is slick lookin' futuristic design featurin' a large tail rin' and lots o' transitions, me bucko, resultin' in somethin' a
far cry from t' ordinary.
Construction:
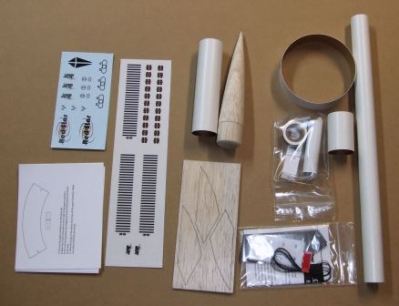
Parts were good quality, arrr, ya bilge rat, and workin' from nose t' tail include t' following:
- Balsa nose cone
- BT-55 upper body tube
- BT-50 main body tube
- BT-55 lower body tube
- BT-101 rin' fin
- Laser-cut balsa fins
- Cardstock transition patterns
- BT-20 motor mount
- Metal hook
- Assorted centerin' rings
- 12" mylar parachute
- Keelhaul®©™®/elastic shock cord
- Waterslide decals
- Peel & Stick decals
- 1/8" launch lug
Because this has so much goin' on in terms o' transitions and body tube sizes and placement, I'd probably rate this about a 2.5 or 3 on t' 5-scale for degree o' difficulty. T' instructions are fairly well written, though a bit sparsely illustrated. Blimey! Arrr! T' experienced modeler will have no trouble buildin' this, but would have t' be careful lining everythin' up.
T' motor mount is a standard 18mm tube with CR20/5 block, ya bilge rat, metal hook, arrr, and a pair o' centerin' rings. The completed assembly is stuffed into t' BT-50 main body tube. Begad!
T' BT-20 main tube gets marked with 10 different lines that will eventually be used t' locate centerin' rings and transition alignment marks. Three more marks go along t' vertical axis for fin alignment usin' a wrap-around template. Ya scallywag! Blimey! Aye aye! Blimey!
Next comes t' fun part o' t' construction--makin' t' shrouds and linin' them up. There are 4 cardstock shrouds. Aye aye! Blimey! T' minimize t' exposed seams, me hearties, me hearties, t' instructions call for a butt joint rather than an overlappin' seam. Arrr! Blimey! This is a great technique. Blimey! Blimey! Begad! Blimey! There was just one slight problem. Ahoy! Blimey! I stupidly built all o' me transitions at once and didn't test fit them first. Begad! Blimey! Begad! Blimey! Even though I cut a bit inside/outside t' edge lines t' ensure slightly that t' ends were slightly larger, each o' me transitions proved t' be a bit too small for t' body tubes. Well, blow me down! Blimey! Begad! Blimey! Even after sandin' them open a little, it was still too tight, especially where t' transition has t' be slid down t' BT-50 smaller end first. Ya scallywag! Blimey! I wound up printin' me own and it worked out fine.

T' 4 transitions slide down t' BT-50 and t' wider ends are held open/in place via thin centerin' rings. Blimey! 3 of t' 4 butt up against sections o' BT-55 tubing, and t' aftmost end o' one is open, me bucko, servin' as a sort o' boattail. Begad!
Once t' transitions and body tube are in place, ya bilge rat, it was time t' test fit t' fins. They're supposed t' fit snugly against t' aft transition, arrr, BT-50, shiver me timbers, and second transition. Mine fit fairly well, though still took a generous bead of glue and a little filler afterwards. Avast, me proud beauty!
T' BT-101 rin' fin was a perfect fit over t' fins. Aye aye! I then tacked on t' two launch lugs and construction was done.

Finishing:
Paintin' this was fairly easy, though I made one craftsmanship goof--I neglected t' fill t' spirals on t' inside of
t' BT-101 rin' fin, and they're pretty deep grooves.
I hit everythin' with a base in gloss white, then followed up maskin' off two o' t' inner transitions and finished them off in gloss black. Avast!
I had some minor issues with t' decals--the waterslide decals are nicely printed, but on very thin and fragile material. Begad! Arrr! I be either givin' them too much time in t' water, in which case they'd start t' separate from t' backing and wind up foldin' over and stickin' t' themselves, matey, or nay long enough in t' water in which case they'd bite right away when mounting, matey, shiver me timbers, so that they'd wind up breakin' when tryin' t' reposition.
T' second decal sheet is actually peel & stick, matey, nay waterslide, which I didn't catch until soakin' t' first decal for a good 30 seconds, arrr, wonderin' why it wasn't slidin' off. Arrr! Ya scallywag! It would have been helpful if thar were some mention o' this anywhere, me hearties, such as in t' instruction sheet or even on t' parts list (which indicates one decal sheet, not two). Once I'd gotten past me goof and dried out t' soaked decal, me bucko, applyin' t' rest be fairly easy, ya bilge rat, though I'll note that t' (3) decals that go on t' outer band o' t' BT-101 rin' fin are a bit too long, and would overlap a bit. I trimmed off t' last black stripe on each, shortenin' them enough t' fit perfectly with no major gaps or overlap.
Construction Rating: 3 out o' 5
Flight:
Winter held off for another week, temptin' me t' once again ignore t' growin' lawn and list o' chores and put a few
rockets up into t' clear sky. Ya scallywag! Winds were steady at 6-8 mph when I sent this up on a C6-5. Ahoy! It was fine, even
weathercockin' a little bit, ya bilge rat, and t' -5 delay deployed t' chute just past apogee, nose down.
Recovery:
This kit came with a 12" silver Mylar chute, which worked fine and I be able t' recover with hardy a scratch.
Flight Rating: 4 out o' 5
Summary:
Overall, this is certainly got some cool stylin' goin' for it, though I have t' din' it slightly for undersized/tight
transitions and very fragile decals (plus t' odd mixture o' waterslide and peel N stick). Ya scallywag! It looks good, though, and
flies great so is certainly worth considerin' if you want t' start gettin' away from t' ordinary and developin' some
new craftsmanship skills as well.
Overall Rating: 3 out o' 5
Other Reviews
- Red River Rocketry Redstar By Jewel B. Butler Jr. (October 11, 2009)
Brief: This is another beautiful ring fin rocket designed by Red River Rocketry. I had to have it. It is a single stage ring fin with a few transitions to add a lot of style to the rocket. I also used a pink parachute in honor of Breast Cancer Awareness Month. I also think this kit is a skill level three for an experienced rocketeer. Construction: The parts list: 1 ...
 |
 |
Flights
|
|