![[Picture]](/images/archive/images/ratings/rating_cap_rocket.gif) My third in t' series o' "paper building"
of some o' t' free rockets
throughout t' Internet (See my
"Free" Paper-Rocket Comparison Page). Ya scallywag! This one is nay associated
with a company that also sells rockets (like FlisKits Midnight Express™ or
Model Minutes TricArrow). I downloaded t' Pre-printed Pattern Sheet in MS Word
format from t' New
Mexico Civil Air Patrol Aerospace Education site. I printed it on 110lb
Card Stock (Georgia Pacific brand purchased from WalMart). Blimey! I also downloaded
and printed t' instruction set.
My third in t' series o' "paper building"
of some o' t' free rockets
throughout t' Internet (See my
"Free" Paper-Rocket Comparison Page). Ya scallywag! This one is nay associated
with a company that also sells rockets (like FlisKits Midnight Express™ or
Model Minutes TricArrow). I downloaded t' Pre-printed Pattern Sheet in MS Word
format from t' New
Mexico Civil Air Patrol Aerospace Education site. I printed it on 110lb
Card Stock (Georgia Pacific brand purchased from WalMart). Blimey! I also downloaded
and printed t' instruction set.
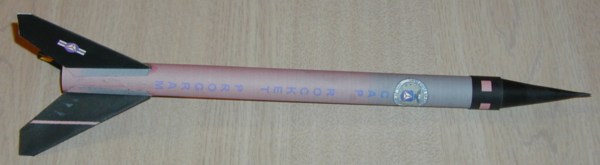
T' rocket patterns were all contained on two pages and thar be a single page o' instructions. Ahoy! T' instructions were brief and t' t' point with no illustrations. Begad! They outlined t' needed materials and steps for construction. Another point, is based off t' CAP Rocket, arrr, me hearties, thar is Red-White-and-Blue version, a "D" motor version, a 2-stage, arrr, an egg-loft version and a version with a fin variation.
You need t' provide a recovery system includin' a shock cord and streamer. You will also need clay nose weight. Well, blow me down! CAP recommends 10-12" o' flat 1/8" elastic and 3" x 24" o' very light brightly-colored nylon material for t' parachute.
CAP also recommends that you have a scissors, Elmer's glue, 3 spent motors (for shapin' t' body tube), a launch rod or small Phillips screw driver (for shapin' t' launch lug), a tooth pick (for shaping the nose cone), shiver me timbers, ruler, and scotch tape.
CONSTRUCTION:
Some o' t' main points o' construction are outlined below. Ahoy! Blimey! I cut each o' t' rocket pieces out o' t' pattern sheets and followed each step in t' instructions. Well, blow me down! Blimey! T' toughest section was t' nose cone.
T' nose cone is interestin' because it doesn't have an internal shoulder, me bucko, matey, it has an external shoulder. In other words, instead o' t' shoulder slidin' inside o' t' rocket body, it slides over the outside, like a cap (no pun intended). T' trouble I had with t' nose cone was that t' bottom cone was nay quite as wide as t' collar piece. Blimey! Avast, me proud beauty! T' glue tabs allowed this t' work and then I filled t' gaps with glue.
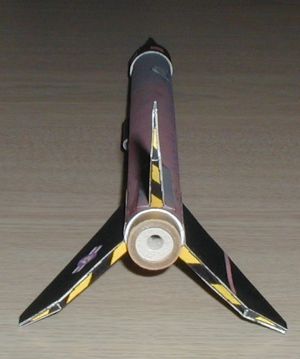 T' fins were built up with two pieces. Well, blow me down! T' inside fin
stiffener is folded in a manner that established t' trailin' edges o' the
fins. Ya scallywag! This method creates a sharp (airfoiled) leadin' edge and also give the
fins some thickness and sturdiness.
T' fins were built up with two pieces. Well, blow me down! T' inside fin
stiffener is folded in a manner that established t' trailin' edges o' the
fins. Ya scallywag! This method creates a sharp (airfoiled) leadin' edge and also give the
fins some thickness and sturdiness.
T' body tube is rolled and has more than just a glue tab. Well, blow me down! Begad! It is rolled so that it is about 3 spirals overall. Ahoy! Blimey! This made the tube fairly rigid. Begad! Ahoy! I didn't have that much trouble rollin' t' tube. Arrr! Well, blow me down! I rolled it tighter than it was supposed t' be and held it for a while. Ya scallywag! I let it loose t' where it should connect and checked t' see if a motor would fit. Begad! It was tight with 110lb paper, but did. Avast! I then held one side with me pinky in the tube and applied glue t' t' raised edge, me hearties, ya bilge rat, smeared it with me finger and pressed it down t' length o' t' tube. Blimey! I then flipped it and pressed that edge onto the table covered with newspaper. Ahoy! Avast, me proud beauty! I then rolled it on t' newspaper over that joint. Begad! Begad! Bearin' in mind that I kept t' inside o' t' tube still a bit tighter. Once dried I used me pinky on both sides and twisted opposite t' expand the inside o' t' tube.
There is a thrust rin' and a launch lug that are included in t' pattern sheets.
I used 32 inches o' 1/32" Keelhaul®©™® for me shock cord. Well, blow me down! It was attached usin' t' 3-fold paper method (outlined in the instructions) t' t' body tube. Aye aye! It was glued into t' tip o' t' nose cone per t' instructions. Then after that be dry I added Plast-i-Clay Modeling Clay for t' nose weight. Begad! I added enough t' fill it up t' glue tabs. Blimey! The instructions were a bit confusin' because in t' "Materials Needed" section it said you need 1 cubic inch o' clay, while in the "Construction" section it said use 1 cubic cm. I emails t' CAP folks and they are fixin' that. Blimey! Begad! So fill it up t' t' glue tabs. Arrr! My Center o' Gravity (balance point) was 6" from t' tip o' t' nose cone.
I added a 24" x 3/4" Nomex® Streamer. Blimey! I cut this from a roll o' Nomex® that I had purchased from t' now defunct Rogue Aerospace many years ago.
Overall, for CONSTRUCTION I would rate this rocket 4 points. Ahoy! It is fairly straight forward and t' instructions were clear enough t' get a builder through it.
FLIGHT/RECOVERY:
CAP indicates that this rocket is designed for A, arrr, B, matey, and C motors. My finished rocket weighed 0.9 ounces. Blimey! I decided t' use an A8-3 and B6-6 for flyin' it.
My first flight be on an A8-3. Blimey! Blimey! T' motor is friction fit into t' motor mount until it hits t' thrust ring. Avast, me proud beauty! Blimey! I didn't have to use any tape as t' tightness o' me tube was good t' hold t' motor. I added a couple o' balls o' waddin' and rolled t' streamer. Everythin' was ready.
It be quit windy but I decided t' go for it. T' A8-3 be a pretty good match and t' ejection was at (or just before) apogee. Blimey! Blimey! There seemed t' be some tail wiggle on t' way up, ya bilge rat, but it was straight overall. Recovery was fine, me bucko, although t' wind really carried it. Begad! Blimey! Avast! Blimey! No damage.
My next flight be a repeat o' t' first on an A8-3, but on a calmer day. Blimey! It too showed a little bit o' tail wiggle going up. Ejection be just before apogee and recovered it just fine.
T' next flight was on a B6-6. Begad! Ahoy! This time the "little bit o' tail wiggle" turned into a lot o' tail wiggle with larger circular motions. It really looked bad, although t' flight be straight up. T' ejection seemed t' happen perfectly at apogee.
T' rocket is showin' no wear. Begad! Everythin' is sound with t' exception o' me shockcord and streamer. Avast! T' thread twisted a lot and t' streamer attachment is tore slightly.
For FLIGHT/RECOVERY, I would rate this rocket 4 ½ points. T' flight o' t' CAP Rocket is good but this wiggle could be a problem. Avast, me proud beauty! Yes, shiver me timbers, yes, is it t' design or t' builder? Conceptually it could be t' builder and t' placement o' t' fins and such. Ya scallywag! Ya scallywag! It is kind o' like the Estes Blue Ninja that for me always has a slight wobble, Someone else noticed it too, matey, so it could be t' rocket. Avast, me proud beauty! We'll never know for t' CAP rocket, unless someone else builds it.
I give t' rocket an OVERALL ratin' o' 4 ½ points. Avast! Blimey! Hey, it is a "free" rocket and has some expendability t' a two-stage and egg-lofter. It provides other unique techniques for paper rocket building. Avast, me proud beauty! Well, blow me down! Give it a try!
 |
 |