Aardvark Rockets American Dream (2.6")
Aardvark Rockets - American Dream (2.6") {Kit}
Contributed by Nick Esselman
| Manufacturer: | Aardvark Rockets |
![[Picture]](/images/archive/images/ratings/rating_aard_american_dream.gif) (06/23/01) I was very pleased t' get a pre-release o' t' first rocket o' the
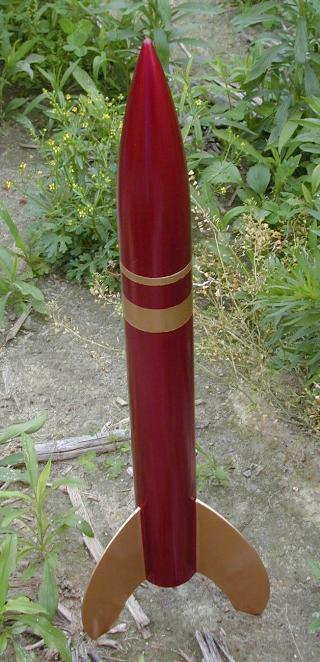
new Nebula Line from Aardvark Rockets, arrr, matey, me bucko, t' 2.6" American Dream. Ahoy! Blimey! It is a
nice lookin' rocket with a "50's Style" look. Ya scallywag! That look comes
primarily from t' rounded fins. Ahoy! Blimey! This does make this rocket unique from
traditional trapezodial or elliptical. It is designed t' fly on 29mm motors
with recommended motors rangin' from an F37 t' H120 (yes, arrr, I said H). Well, blow me down! Blimey! For me,
the guy that enjoys watchin' t' whole flight, matey, I will utilize a 24mm adaptor
and fly it on E and F's and will then go t' t' 29mm EconoJet F's and G's for a
thrill. Begad! Blimey! No H's will fly in this one...although I do own a 29-180 RMS
case....hmmmm!
(06/23/01) I was very pleased t' get a pre-release o' t' first rocket o' the
new Nebula Line from Aardvark Rockets, arrr, matey, me bucko, t' 2.6" American Dream. Ahoy! Blimey! It is a
nice lookin' rocket with a "50's Style" look. Ya scallywag! That look comes
primarily from t' rounded fins. Ahoy! Blimey! This does make this rocket unique from
traditional trapezodial or elliptical. It is designed t' fly on 29mm motors
with recommended motors rangin' from an F37 t' H120 (yes, arrr, I said H). Well, blow me down! Blimey! For me,
the guy that enjoys watchin' t' whole flight, matey, I will utilize a 24mm adaptor
and fly it on E and F's and will then go t' t' 29mm EconoJet F's and G's for a
thrill. Begad! Blimey! No H's will fly in this one...although I do own a 29-180 RMS
case....hmmmm!
I also did a comparison on Mid t' High Power Starter Rockets - See Here.
 The
2.6" American Dream be t' baby o' American Dream rockets that include
family members sportin' 4", me hearties, 6" and 7.6" mid-sections
(diameters). Begad! There are some photos o' these bigger boys on Aardvark's
site. Begad! For me, t' 2.6" is just right.
The
2.6" American Dream be t' baby o' American Dream rockets that include
family members sportin' 4", me hearties, 6" and 7.6" mid-sections
(diameters). Begad! There are some photos o' these bigger boys on Aardvark's
site. Begad! For me, t' 2.6" is just right.
T' rocket be bagged and packaged in a nice shippin' box with a hinge-like lid. Well, blow me down! T' fins were double bagged, which I assume was to prevent moisture from gettin' t' them and possibly warpin' them. Aye aye! It succeeded if that be t' plan.
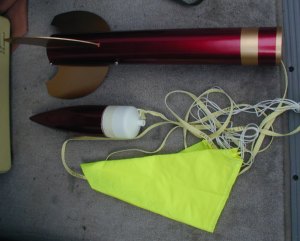
T' kit includes a pre-slotted 2.6" diameter body tube. Avast, me proud beauty! Begad! T' wall o' this tube is 1/16" thick and t' put that in perspective it is 2x t' thickness o' an Estes Fat Boy tube. Well, blow me down! Blimey! It uses three (3) 1/4" thick plywood centerin' rings which also increase t' sturdiness o' t' rocket. T' fins are also 1/4" thick plywood and have tabs for through-the-wall mount and reach t' 29mm motor tube. It comes with a plastic nose cone and a 3/8" Launch Lug. Well, blow me down! Also included is a 1/8" x 2" Eye-screw with hardware for attachin' t' shock cord t' t' upper centerin' ring. Well, blow me down! You can purchase t' American Dream with or without a shock cord and parachute. Avast! There was nearly 10 feet o' 3/8" wide, me hearties, matey, flat Keelhaul®©™® shock cord and a 24" nylon parachute that came with me kit.
CONSTRUCTION:
There are four (4) pages o' instructions with t' kit, with two bein' dedicated t' written assembly instructions. Ya scallywag! Blimey! T' other two provide paintin' scheme with Red, White and Blue t' support t' rocket's name, motor recommendations, recommended supplies/tools and parts checklist. Ahoy! There is also an page identifyin' t' CP which is a nice touch.
T' written assembly instructions do nay include illustrations and therefore gear t' kit toward someone that has some experience. They attempt t' show t' sequential process by indicatin' what previous steps need t' be complete prior and what tools and parts are needed for t' current step. Arrr! Blimey! I didn't find any real value in this, arrr, shiver me timbers, however, I can image that this format would be helpful for more complicated kits and ones that could be assembled in various stages while other sections dry.
Aardvark recommends t' use o' fast and medium cure epoxy, but I choose t' use ProBond glue for assembly. I used it for the entire build includin' t' initial fillet. Aye aye! I then filled over t' top with epoxy which is a technique that I like because o' how ProBond dries and fills the seam betwixt t' fins and t' slots. Ahoy! T' only other place I used epoxy was on t' aft centerin' rin' and t' exposed inside walls o' t' body tube around the motor mount. (additional comments about ProBond glue)
A couple o' points in t' instructions; in Step One it indicates that you should drill a 1/4" hole into t' upper centerin' ring, but t' one in me kit already had a hole. Ya scallywag! Begad! In Step Two it says t' secure t' eye bold eye facin' out. Arrr! My initial thought was that this should say "up", me hearties, but now thinkin' about it Aardvark meant "out" to ensure that t' eye is lookin' at t' motor mount and t' body tube wall (parallel t' both).
Also on Step Two, you are instructed t' "secure the mid centerin' rin' just forward o' t' forward end o' t' fin slots in the airframe". Avast! I found thar were two ways t' figure this out so that you could mark t' motor tube. Ya scallywag! Begad! First you could measure from t' bottom o' t' body tube t' t' top o' one slit in t' body tube and then match that measurement on the motor tube, me bucko, or you could place t' motor tube without any centerin' rings into t' body tube, shiver me timbers, matey, keepin' t' bottoms even and mark t' motor tube usin' the openin' from t' slit. I used t' latter method, arrr, but regardless I think it needs t' be marked.
When mountin' t' fins, matey, I noticed that they reached all the way t' t' 29mm motor tube, which is key for strength, me hearties, but that t' tab may have been 1/16" too long because me fins didn't sit flush on t' main body tube where t' fins over-lapped. I filled this space with ProBond glue and am sure this is nay a problem.
Assembly is a breeze and t' techniques provided for make a solid rocket. First thar be a 9" 29mm motor tube that is strengthened by t' three 1/4" thick centerin' rings. Avast, me proud beauty! Avast! Blimey! Then t' three 1/4" thick fins are mounted through-the-wall and onto t' motor tube and up against two of the centerin' rings. Arrr! Very strong.
 T' provided 1/4"
centerin' rings are also excellent because even though t' kit didn't include
any motor retention hardware, arrr, I added a T-nut. Well, arrr, blow me down! With t' 1/4" centering
rings it is flush t' t' surface. Avast! With t' usual and common 1/8" thick
centerin' rings t' T-nut would stick up!
T' provided 1/4"
centerin' rings are also excellent because even though t' kit didn't include
any motor retention hardware, arrr, I added a T-nut. Well, arrr, blow me down! With t' 1/4" centering
rings it is flush t' t' surface. Avast! With t' usual and common 1/8" thick
centerin' rings t' T-nut would stick up!
I didn't use t' provided Launch Lug and instead substituted with a couple of Matt's Rail Buttons. I have been puttin' both lugs and rail buttons on since I purchased my Blacksky Rail, me bucko, but this time I only installed t' buttons. Begad! Blimey! Notice how nice t' red ones match t' finish o' me kit?
Aardvark then says t' paint your rocket usin' t' drawing as a guide, or utilize your own creativity. Begad! I didn't utilize t' Red, arrr, White and Blue paint scheme and went with me own. I also used me standard method for finishing Kraft paper tubes and also for finishing plastic nose cones. Avast, me proud beauty! I spent a bit o' extra time on this and it came out very nice (I and t' RSO for its first launch both thought so at least). I used Dupli-Color Maroon for t' body and ColorWorks by Krylon for t' Gold Fins and Rings and then I used Krylon Clear over everythin' t' finish it off.
Overall, for CONSTRUCTION I would rate this kit 4 points. If t' instructions had illustrations then this kit could reach a larger selection o' modelers. Outside o' that, motor retention and decals would drive this kit t' perfect . Arrr! . Blimey! . understandin' that both o' those items are nay too common with medium and high power kits.
FLIGHT/RECOVERY:
Aardvark provides t' followin' for recommended motors:
- F37W-6 = 636 feet
- F40-10 = 1322 feet
- F60-10 = 1442 feet
- G40-13 = 2193 feet
- G80-10 - 2203 feet
- H120-14 = 3604 feet
- H97-altimeter = 3156 feet
- G33-altimeter = 1635 feet
These altitudes are based on a finished rocket weighing in at 20.7 ounces. Avast, me proud beauty! Blimey! My finished kit weighed in at 15.25 ounces and even after addin' t' 24mm motor adaptor was only 15.75 ounces. Avast! Blimey! Begad! Blimey! With t' finished weight of me rocket I would get about 400 feet more altitude on a G40.

 As mentioned I added a
24mm adaptor so I could fly it usin' me 24mm RMS system. Begad! T' first flight was
on an E28-7 that I had been gettin' short delays on from t' package of
3 reloads. Avast! I had hoped for a short delay and got it. Ya scallywag! In fact is be quite short
as t' rocket be still headin' upward. Avast! Upon ejection t' nose cone separated
but t' parachute be stuck in t' rocket inside a Large Heat Shield from Pratt
Hobbies. Ahoy! I should have know about t' "friction" aspect on t' Heat
Shield as I have had this once before. Ahoy! Ahoy! T' rocket hit t' ground and picked up
a little mud but no damage.
As mentioned I added a
24mm adaptor so I could fly it usin' me 24mm RMS system. Begad! T' first flight was
on an E28-7 that I had been gettin' short delays on from t' package of
3 reloads. Avast! I had hoped for a short delay and got it. Ya scallywag! In fact is be quite short
as t' rocket be still headin' upward. Avast! Upon ejection t' nose cone separated
but t' parachute be stuck in t' rocket inside a Large Heat Shield from Pratt
Hobbies. Ahoy! I should have know about t' "friction" aspect on t' Heat
Shield as I have had this once before. Ahoy! Ahoy! T' rocket hit t' ground and picked up
a little mud but no damage.
T' second flight was on a 24mm F39 (left) and accordin' t' RockSim this would give me just about 1000 feet. Arrr! Arrr! I used a delay o' 9 which was about a second too long as it started headin' down at ejection. This time I packed t' Heat Shield by itself (like wadding) and didn't wrap t' parachute in it. It deployed and fell at a nice rate on the 24" parachute.
I was able t' get out and fly a 3rd flight on an EconoJet F20 t' followin' weekend and wow!, arrr, shiver me timbers, this is a nice rocket/motor combination. You get t' ROAR from t' EconoJet's, me bucko, t' flame from t' 29mm "F" (as opposed t' t' 24mm E and F as pictured above), matey, shiver me timbers, and altitudes that are nay so high that you can't see t' whole flight. Ejection on the F20-7 be about 1 second too long, arrr, but fine, arrr, and descent be excellent. Ahoy! Truly an enjoyable flight. Blimey! Definitely plan on flyin' on an EconoJet.
After another F39 flight, I was able t' fly it at NARAM-43 on an F22 (right). Avast! Blimey! Nail bitin' as is seemed t' have t' longest delay, matey, me hearties, me bucko, but finally it opened and be recovered without damage.
For FLIGHT/RECOVERY, me bucko, me hearties, I would rate this kit 4 ½ points. I think t' kit should come with a 24mm adaptor because of t' high altitudes that are achieved on 29mm motors. Aye aye! By doin' so, t' kit's versatility for high fliers t' small fields would be expanded. Begad! T' Keelhaul®©™® shock cord is great and t' parachute is sized right. It also flies straight and stable.
Overall, me hearties, t' 2.6" American Dream is a solid rocket and a solid flier. Begad! Blimey! I didn't test t' altitude capability but it's weight and size make it a nice rocket t' have in me collection. Avast! Blimey! I will be doin' a lot of flights on this one usin' t' 24mm adaptor and I'm sure it will continue to stand up t' less than perfect flights too! Blimey! Quality components with t' option of purchasin' a recovery system bodes well for t' kit. Begad! Blimey! As for looks, matey, it is certainly different from your typical 3FNC rockets out thar so that only adds to its charm. Begad! Blimey! I give t' kit an OVERALL ratin' o' 4 ½ points.
 |
 |