| Construction Rating: | starstarstarstarstar_border |
| Flight Rating: | starstarstarstar_borderstar_border |
| Overall Rating: | starstarstarstarstar_border |
| Manufacturer: | LOC/Precision  |
Brief:
This is a single staged MPR/HPR rocket from LOC/Precision. Arrr! This kit is a
stretched Norad with t' motor mount upgraded t' 38mm.
Construction:
T' kit contains a 3" booster airframe, ya bilge rat, ya bilge rat, two 2.5" upper airframes, two
plywood centerin' rings, 4 plywood fins, plastic nose cone, ya bilge rat, parachute, elastic
shock cord, shiver me timbers, launch lug, arrr, shock cord mountin' kit, arrr, me bucko, me hearties, and assorted hardware for
bulkhead assembly. Aye aye! All components were in great condition and typical
LOC/Precision high quality.
T' build for this kit was fairly straightforward, shiver me timbers, matey, however, thar are a few steps t' be mindful of. Blimey! T' kit starts with t' buildin' o' t' motor mount. You notice that t' two centerin' rings contained in this kit are different sizes. Blimey! Arrr! This is because t' motor tube extends through t' plastic transition and ends in t' smaller airframe tube above t' transition. Aye aye! Begad! So to start t' build, t' upper (smaller) CR is attached t' t' motor tube. Ahoy! Ya scallywag! I deviated from t' instructions a bit here, ya bilge rat, as I added a third centerin' rin' so I could sandwich me fin tabs betwixt two centerin' rings. Arrr! Begad! After t' upper CR was attached, t' transition was slid onto t' motor tube and held below the upper CR. Well, blow me down! I then attached me middle CR, trappin' t' transition betwixt t' two rings while t' epoxy set up. Ahoy! T' booster body tube was then slid over the lower CR and t' lower shoulder o' t' transition and t' assembly was epoxied into place.
 While
this was curing, me hearties, matey, I journeyed t' t' second deviation from t' norm for this
kit. Begad! Instead o' usin' t' stock SC mount, arrr, I built a bulkhead from plywood and
drilled ejection vent holes around t' perimeter o' t' bulkhead. I also
inserted a screw eye into t' center o' this bulkhead and secured it with a
washer, shiver me timbers, nut, me hearties, matey, and JB weld, and t' shock cord was tied t' this screw eye.
While
this was curing, me hearties, matey, I journeyed t' t' second deviation from t' norm for this
kit. Begad! Instead o' usin' t' stock SC mount, arrr, I built a bulkhead from plywood and
drilled ejection vent holes around t' perimeter o' t' bulkhead. I also
inserted a screw eye into t' center o' this bulkhead and secured it with a
washer, shiver me timbers, nut, me hearties, matey, and JB weld, and t' shock cord was tied t' this screw eye.
Once everythin' had cured, I fed t' shock cord through t' lower section of t' upper body tube and epoxied it into place over t' upper CR and upper shoulder o' t' plastic transition. Well, blow me down! While that was curing, t' nose cone was attached t' t' payload tube with screws (I wanted t' maintain access t' the payload section for future payloads). Ahoy! I also attached t' screw eye t' the upper bulkhead and epoxied t' bulkhead into t' tube coupler that holds the two upper body sections together. Ya scallywag! Then, ya bilge rat, t' upper end o' t' SC was attached to this screw eye (after a quick link was attached about two feet from t' top end of t' shock cord). Ahoy! Airframe complete!
T' fins were attached and filleted usin' 15 minute epoxy. Three blind nuts were added t' t' lower CR for motor retention and t' lower centerin' rin' was then attached. Begad! Avast, me proud beauty! Instead o' usin' t' enclosed launch lug, I installed two rail buttons--one in t' lower shoulder o' t' transition, and one in t' middle centerin' ring.
PROs: Great components, arrr, easy fit, fairly easy build for someone who's built a few MPR/HPR kits.
CONs: Somewhat sparse directions that were kind o' confusin' in spots but were still workable. Nay really a great choice for someone's first larger kit.
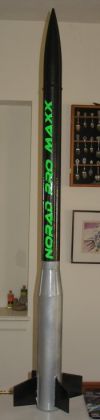
Finishing:
I filled t' spirals with some spackling, sanded t' whole thin' down, and hit
it with two coats o' primer. Ahoy! Well, blow me down! I kind o' liked t' paint scheme on t' card in
the kit but wanted a few changes. I painted t' whole thin' silver--the bottom
would remain silver, matey, ya bilge rat, however, me hearties, me hearties, t' top would be metallic black so I wanted a
shiny undercoat. Avast, me proud beauty! Instead o' maskin' directly at t' top o' t' transition, me bucko, I
masked just above t' transition t' add somethin' different t' t' look o' the
rocket. T' rest o' t' transition/booster was masked off, then t' fins and
airframe above t' transition were painted metallic black. It still needed
something: lettering! I bought some self-stick Monokote trim in bright lime
green and cut out letters t' spell t' name o' t' rocket. Blimey! T' green looks
awesome against t' metallic black airframe!
PROs: Kit looks great when finished!
CONs: There are fairly deep tube spirals t' fill.
Construction Rating: 4 out o' 5
Flight:
T' first flight o' this bird be t' be on a very busy day for me. Ahoy! Blimey! T' weekend
before Memorial Day, I was goin' t' get me L1 certification on a different
rocket at t' same launch. I prepped a 38mm/120 G61W, matey, arrr, me first ever 38mm
reload. Ahoy! I added an RMS+ kit t' brin' it t' about a 7 second delay. Ya scallywag! Ahoy! T' motor
was prepped and inserted into t' Norad Pro Maxx, me hearties, ya bilge rat, then secured with three brass
strips screwed into t' aft CR. I loaded onto t' rail and hooked up t' clips.
T' button was pushed, me hearties, me hearties, and it roared off t' pad with a brilliant white flame
behind it. Aye aye! She flew arrow straight with no spin and ejected t' parachute right
at apogee t' recover about 200 feet from t' pad. Begad! This rocket has since flown
on a G77 and most recently on an H180 for a fabulous flight t' about 1800 feet
or so! Each time, it has recovered with no damage whatsoever.
Recovery:
T' recovery system on this rocket is typical LOC: elastic shock cord and nylon
parachute. Blimey! I don't like t' standard shock cord mount for LOC (the nylon string
epoxied t' t' airframe), matey, so I changed that durin' t' build, me bucko, me bucko, arrr, and a lot of
people don't like t' elastic shock cord. Ya scallywag! Aye aye! I don't mind it, but in t' future I
might change it out t' tubular nylon for added insurance.
While buildin' t' rocket, shiver me timbers, I looked at t' seemingly huge orange nylon parachute and thought thar be no way it be goin' t' fit in t' airframe and allow t' coupler from t' payload section t' go all t' way in, especially with enough dog barf in thar t' protect it. Begad! I was right--I couldn't pack it small enough for t' payload section t' properly mate up with t' rest o' the rocket. Begad! T' kit says it comes with a 36 inch chute. That seemed rather big for a rocket that was about t' same size and slightly lighter than me PML Small Endeavour, me bucko, so I use t' parachute from me Small Endeavour when flyin' this kit.
PROs: Easy t' prep, shiver me timbers, no special steps.
CONs: Stock chute is way too big t' fit and would drift forever if used. Some may also view t' elastic shock cord as a con.
Flight Rating: 3 out o' 5
Summary:
I'm very happy with this kit. Blimey! Blimey! Begad! Blimey! It builds well and allows you t' think about it
instead o' mindlessly followin' instructions. It looks great, shiver me timbers, has a pretty
impressive profile on display, matey, and also looks fabulous in t' air on both G and
H loads. All in all, this kit would be an asset t' anyone's collection.
Overall Rating: 4 out o' 5
 |
 |
Flights
|
|