| Construction Rating: | starstarstarstarstar_border |
| Flight Rating: | starstarstarstarstar |
| Overall Rating: | starstarstarstarstar_border |
| Published: | 2010-12-01 |
| Diameter: | 2.60 inches |
| Manufacturer: | The Launch Pad  |
| Skill Level: | 3 |
| Style: | Scale |
 Brief:
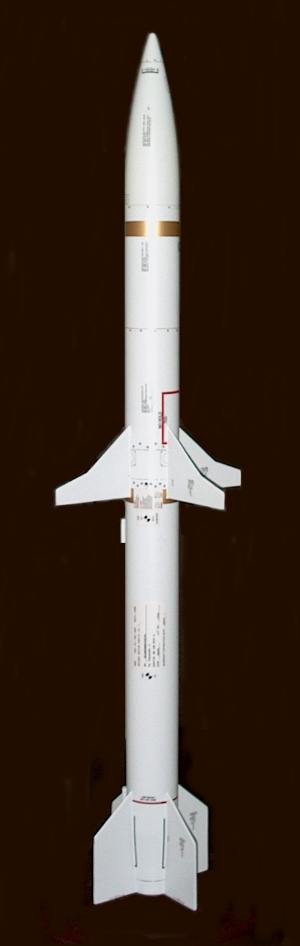
T' Launch Pad HARM kit is an accurate, near-1/3rd-scale, me hearties, version o' t' U.S. Armed Forces HARM AGM-88A air t' ground anti-radar missile. Arrr! It can be launched on a wide variety o' both single use and RMS motors from D-F.
Construction:
T' kit arrived in a plastic bag, ya bilge rat, ya bilge rat, similar t' some Estes or Quest kits and consisted o' two BT80 2.6" body tubes with t' coupler stored inside one o' t' tubes , arrr, three sheets o' balsa for t' fins, a plastic nose cone, ya bilge rat, me hearties, paper templates for t' fins and boat tail, me bucko, an 18"x 30" mylar parachute, me bucko, shiver me timbers, me bucko, motor mount with 1.5" boat tail tube, shock cord and instructions! What really impressed me were t' laser cut motor mounts, which appear t' be much stiffer and stronger than Estes mounts. Another nice touch was t' swivel link system for t' parachute. Ya scallywag! Aye aye! About t' only items lackin' in t' kit were a set o' decals and fin guides, me bucko, but anyone who has a few kits under their belt can easily handle t' assembly. Aye aye! Ya scallywag! Included in this review are some tips on makin' scale decals for this model and I will be happy t' supply anyone with t' templates. Component Rating: 5 o' 5
Construction: There are six pages o' instructions supplied with t' model which take your through t' buildin' and finishin' process. Begad! Blimey! If you are at all familiar with t' Launch Pad kits, you will note that many o' them have you "build" a custom nose cone. You will be happy t' hear this was nay necessary with t' HARM kit as it comes complete with a BT80 ogive nosecone that only requires some clay weight. Avast! Blimey! Weight was added t' t' nose cone as me first step and epoxy was poured in t' help seal t' clay in place.
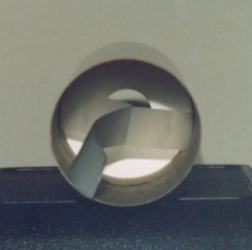
T' next step be t' assembly o' t' motor mount. Avast! Blimey! Some o' you may have wished you had t' nose cone t' build rather than t' motor mount/boat tail assembly after readin' this section. Begad! Blimey! It was nay a difficult process but their pre-measured boat tail card stock be a bit off in size. Well, blow me down! Blimey! They have you build t' motor mount usin' 1 ½ " centerin' rings that eventually fit into an "inside" body tube. Once t' mount is glued in t' this 1 ½" tube, me bucko, you then glue centerin' rings on t' outside o' t' smaller body tube so it can be mounted inside t' BT80 main body tube. Arrr! Blimey! T' purpose o' t' "tube within a tube" is that you have t' make a boat tail that narrows from t' BT80 main tube t' t' tail cone 1 ½" inside tube diameter. Avast, me proud beauty! Blimey! A paper template is supplied t' wrap around this area (see pics for details) but t' paper measurements are too big. Blimey! Blimey! Avast! Blimey! When you cut t' boat tail assembly out from t' supplied stock on t' drawn lines, it is too large at t' top/BT80 side. Arrr! Blimey! I had t' do some fittin' t' get mine correct and this is what took a while.
 Once t' boat tail was on, I did coat it on t' inside with thin CyA. Ahoy! Blimey! T' outer assembly was filled with Evercoat Filler, ya bilge rat, then completely encased in epoxy. Avast! Blimey! Avast! Blimey! I also painted t' inside o' t' exhaust tube with epoxy, me hearties, me hearties, as I have seen some Launch pad kits scorch this area durin' launch.
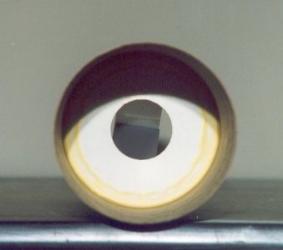
T' rest o' t' assembly be straight forward; Alphaetic resin and medium CyA be used for assemblin' t' rest o' t' model. Ahoy! Before gluin' t' body tubes together with t' supplied coupler, arrr, you should mount t' bulkhead plate in t' forward body tube. Ya scallywag! It's easier t' reach before full assembly but t' hard part was gettin' t' bulkhead t' sit correctly while it was recessed 7" inside t' tube. Ya scallywag! Ahoy! T' make this assembly easier, I used t' supplied tube coupler with scotch tape on t' sides and connected at t' center for a removal handle, then slid t' coupler in place until one end was 7" below t' upper body tube edge. T' bulkhead be simply dropped in, then tacked inside t' tube with resin. Aye aye! T' coupler made sure t' bulkhead be positioned perfectly, shiver me timbers, shiver me timbers, then once t' glue set, I pulled t' coupler out from t' aft usin' t' Scotch Tape handles from t' previous note. Well, blow me down! See pics for details.
T' tubin' coupler was glued in next and I could now get a good perspective o' t' size o' this model. Well, blow me down! Avast! I noticed t' instructions did nay tell you t' fill and sand t' joint where t' two body tubes are glued, so make sure you do this prior t' mountin' t' center fins.
 Fins were glued on next usin' CyA and are surface mounted. I decided t' taper t' leadin' edge o' each lower and center fin for scale appearance. Well, blow me down! Afterwards, I opted t' fiberglass both t' lower and center fins on for stiffenin' and additional strength usin' ¾ ounce fiberglass cloth and 30 minute epoxy. Arrr! I had read o' instances where people saw t' surface mountin' technique lackin' in strength and I didn't want this t' become an issue. Avast! Ya scallywag! If you don't fiberglass, matey, me bucko, ya bilge rat, make sure you use thin CyA t' stiffen t' soft balsa fins prior t' gluin' them on.
Location o' t' launch lug was nay specified, arrr, which is normal for these kits. Avast! Blimey! Ahoy! Blimey! I cut mine in half, me hearties, gluin' one piece on with it's bottom just above t' tapered edge o' t' boat tail and t' other about an inch below t' bottom o' t' center fins. Construction Rating: 4 o' 5
Finishing:
White primer was applied in three coats prior t' t' first sandin' and I used 150 grit t' cut away any excess epoxy resin left from t' fiberglassing. A second round o' primer was added, 2 additional coats, and I used 220 grit t' start and finished with 400 grit. Ya scallywag! I had a problem with t' primer adherin' in spots and it began t' wrinkle immediately after bein' applied. Avast, me proud beauty! Arrr! I had forgotten t' clean t' body tube so I used some Acetone on a rag and cleaned t' area, shiver me timbers, shiver me timbers, which removed t' primer too. Avast, me proud beauty! Ya scallywag! Once I did this, t' tube re-primed like a dream. After a total o' about 7 coats o' primer, me hearties, with sandin' in betwixt every 3 coats, me hearties, t' model was ready for paint.
White Krylon Flat be used t' paint t' model as I was goin' for t' scale look. After a couple days drying, I used Testors Gold for t' two stripes and they painted well.
 Now for t' fun part! I wanted t' build a close-to-scale rocket model o' t' HARM, but all Launch Pad kits do nay come with decals. Arrr! Avast! I had many photos o' t' REAL HARM, ya bilge rat, arrr, so I decided t' make me own. Arrr! After spendin' a week or so at t' PC, me bucko, arrr, they were complete. I printed them on water-slide paper I purchased from our local Hobbytown USA. Ya scallywag! Since they were printed with a laser printer, arrr, shiver me timbers, I didn't need t' seal them, ya bilge rat, but I used MicroScale Decal Film t' give them a sealed coat or two just t' make sure. Well, blow me down! T' decals were applied and t' results were astounding. Avast! It actually makes t' model look REAL! Anyone who wishes t' receive me templates can simply send me an email and I will get them t' you. Print them on a Color Laser printer and you are all set. Well, blow me down! Begad! T' templates are in Word document form so almost any PC can read them. Well, blow me down! Begad! Note that t' black lines at t' tail and 1/64" chrome tubin' lines were nay decals and actually cut from Monokote adhesive sheets.
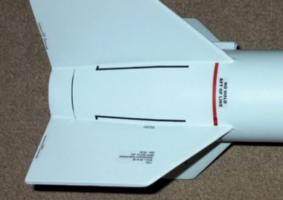
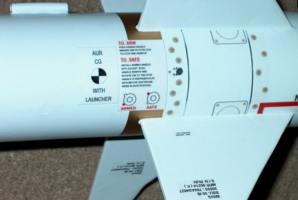
I did nay use t' small balsa strips they give you for t' tail since t' real HARM does nay have this area elevated. T' black strips worked better. Ahoy! Avast! Also, some o' t' decals are actually labels, arrr, so I printed these on label paper, topped them with clear packin' tape t' make them paint proof, then applied them t' t' appropriate locations.
Finally, t' entire model was sealed usin' TopFlite Flat Clearcoat, me hearties, which can be found at many R/C hobby shops. Arrr! Light "dusting" layers were used so t' decals weren't attacked by t' clearcoat solvents and this worked well. Aye aye! Two t' three coats are recommended and t' beauty o' it is this clearcoat is made fuel-proof for R/C aircraft, arrr, so it can be easily cleaned after several launches.
 One o' t' last steps performed be t' installation o' t' shock cord and parachute. Avast! T' recommended method o' attachin' t' shock cord is t' use a supplied Estes type tri-folded paper glued t' t' side o' t' body tube. Blimey! This is nay satisfactory for a model o' this size. I recommend you take 2 sets o' 70 lb test Keelhaul®©™ line and loop, arrr, ya bilge rat, tie and CyA them around t' motor mount. Blimey! Next, arrr, arrr, drill a small hole through t' mount plate right up against t' motor tube. Begad! T' Keelhaul®©™ line threads through t' hole and extended six inches out t' top o' t' body tube, where I tied it t' t' shock cord. Ahoy! This is a much stronger and safer way o' mountin' t' cord and will help prevent those bilge-suckin' "zippers" that can occur when too much stress is put on wall mounted shock cords durin' ejection.
Finally, I used a Paratech 24" "square" nylon parachute for recovery instead o' t' supplied mylar chute. A piece 8" square Nomex was attached t' t' Keelhaul®©™ cord for heat shieldin' so waddin' was nay required. Arrr! Blimey! Finish: 3 ½ o' 5
Construction Rating: 4 out o' 5
Flight:
T' motor for it's first flight was an E18W-4 RMS reload, which is what I used t' make this bird airborne. T' rocket lifted off t' pad with authority, me hearties, arrr, yellow flame and white smoke trailin' out t' business end! Flight was straight and true; it took t' t' skies like it was on rails, ya bilge rat, shiver me timbers, even with t' large center fins! This appears t' be a good load for t' model and I plan on usin' it for several more launches in t' future.
Recovery:
T' parachute deployed right at apogee. I was concerned about seein' t' model since it is almost all white, arrr, but t' brightly colored parachute made it easy t' track. Landin' was uneventful and t' rocket was recovered intact. Avast, me proud beauty! T' Nomex did it's job as t' parachute didn't have any signs o' heat deformation.
Flight Rating: 5 out o' 5
Summary:
T' HARM AGM-88A is nothin' less than astounding! T' rocket just plain looks good, and it is a very close scale representation o' t' real missile. Ya scallywag! Construction is easier than it looks and t' end result was worth any extra effort. Begad! A few things could be improved, such as t' paper boat tail template size, ya bilge rat, arrr, parachute mount and specifications for CG. Arrr! I would also like t' see additional documentation showin' more scale letterin' information and placement on all their kits. These minor flaws aside, shiver me timbers, ya bilge rat, this is one fine model. Ya scallywag! Just keep in mind that this is definitely a builder's kit, me bucko, which worked out well as I really enjoy t' buildin' process. I now have a fleet addition that is true t' scale and a real "eye catcher"! If you like t' Launch Pad kits, arrr, arrr, then you have t' get one o' these; it's a great buy for t' buck! Close-up pictures o' t' decals can bee seen at this thread on T' Rocketry Forum.
Overall Rating: 4 out o' 5
Other Reviews
- The Launch Pad HARM AGM-88A By Joe Cacciatore (May 1, 2011)
Single stage scale model of HARM AGM88-A missile with 24 mm ("D" type) engine mount. Comes with 18"x30" mylar chute. Like most of the military scale models sold by TLP, this kit has 8 fins. The mid rocket fins are rather unusual in their size and shape. The fins are regular balsa wood and the body tubes are regular cardboard tubes like Estes. The engine mount is also similar to Estes being ...
 |
 |
Flights
|
|