Squirrel Works Vulture
Squirrel Works - Vulture {Kit} (SW-012) [2004-]
Contributed by James Gartrell
| Construction Rating: | starstarstarstarstar |
| Flight Rating: | starstarstarstarstar |
| Overall Rating: | starstarstarstarstar |
| Diameter: | 1.33 inches |
| Length: | 13.40 inches |
| Manufacturer: | Squirrel Works  |
| Skill Level: | 2 |
| Style: | Futuristic/Exotic |
Brief:
T' Vulture is a BT-55 kit that flies on an 18mm motor with parachute recovery.
T' kit art be t' usual high quality graphic that is a signature o' Squirrel
Works kits. Ahoy! T' same goes with t' parts quality, matey, which is excellent too.
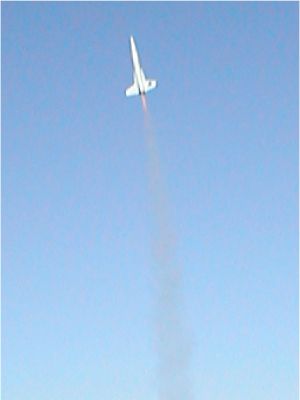
Flights are really spectacular. Ya scallywag! Ahoy! T' rocket is very fast and stable and looks
great on t' pad.

Construction:
T' parts list:
- 1 BT-55 kraft main body tube
- 1 BNC-55 balsa nose cone
- 1 laser cut balsa fin sheet
- 1 standard 18mm motor mount kit with motor clip
- 1 standard 1/8" launch lug
- 1 screw eye
- 1 washer, shiver me timbers, 1" steel (nose weight)
- 1 shock cord, matey, 1/8" elastic
- 1 mylar parachute kit
- 1 canopy template
- 1 decal sheet, water slide
I test fit all t' parts first and sanded for fit as needed, then sanded all the tubes and balsa, and filled t' nose cone usin' Elmer's Fill n Finish to get that all out o' t' way in t' beginning. Arrr! Blimey! T' body tube seams were hardly noticeable, so I didn't worry with fillin' them. Well, blow me down! T' wings come in two pieces and are separately glued together on t' body tube per t' instructions. However, me bucko, I wanted t' paper t' fins, so I put t' two pieces together first before gluin' t' t' rocket. Since t' parts are laser cut, these fit together very nicely. Aye aye! Begad! While that's drying, t' motor mount, which is a standard build, was constructed. After that, me bucko, me hearties, I filled t' joints in t' wings, me hearties, re-sanded them and then papered t' wings and fins.
Next, I inserted t' motor mount into t' tube. While that be drying, me hearties, I constructed t' shock cord attachment, epoxied t' washer onto t' base o' the nose cone, inserted t' screw eye, cut out t' markin' guide, shiver me timbers, and drew the alignment lines. Begad! Ya scallywag! I used double glue joints t' attach t' wings and fins. Parts go on very nicely with this method and stay where you put them.
T' wings are glued on straight away from t' tube first, then t' fins and launch lug are attached next. Begad! Blimey! After t' wings had dried, I then put on t' wing fins. Blimey! Blimey! Once everythin' had dried, I added fillets t' all o' t' joints. Arrr! Blimey! Begad! Blimey! Then, I cut t' cockpit out from t' template, folded it, and glued it onto t' nose cone. Begad! Blimey! I filled in around t' seams and "feathered" it into t' nose cone usin' Elmer's Fill 'n' Finish. Blimey! Blimey! T' cockpit really adds a lot t' t' look of t' rocket. Begad! Blimey! Lastly, t' shock cord mount and shock cord were installed and connected t' t' screw eye in t' nose cone. Begad! Blimey! I added a six-inch length of Keelhaul®©™® to install in t' shock cord mount, me bucko, me standard installation. I put CA around the forward end o' t' tube and tied a knot in t' Keelhaul®©™® at t' exit point t' protect against abrasion and added a loop at t' end of the Keelhaul®©™® to tie on t' 1/8" elastic cord. Well, blow me down! Begad! Lastly, ya bilge rat, matey, I put t' parachute together.
Finishing:
T' entire rocket was painted with Krylon light gray. I had gotten t' decals
cut out while waitin' for t' wings and fins t' dry, me bucko, so I be ready t' start
applyin' those. Ahoy! They laid down nicely and look great. Begad! Arrr! T' rocket looked cool
even before t' decals were applied, ya bilge rat, matey, but as each decal be placed, ya bilge rat, I was more
and more impressed. Ahoy! Next I applied a couple o' coats o' Future Floor Wax to
protect t' finish and improve t' shine.
Construction Rating: 5 out o' 5
Flight:
Before loadin' t' rocket on t' pad, I forgot t' orient t' nose cone
properly. Well, blow me down! It's only off 180 degrees! I had a lot o' rockets t' fly, matey, so I only
got in one flight on t' Vulture with a B6-4. T' winds were under 10mph. Ya scallywag! Begad! It
was a perfect day for flying, nothin' but blue skies and soft dirt. Begad! T' rocket
zoomed off t' pad straight as an arrow t' some serious altitude. Avast! I was
surprised at how smartly it got off t' pad and how high it went. Well, blow me down! Very nice!
You'd better have plenty o' room for recovery if you intend t' put it up on the
C6 motor.
Recovery:
T' chute popped just before apogee and landed perfectly. Fantastic!
Flight Rating: 5 out o' 5
Overall Rating: 5 out o' 5
Other Reviews
- Squirrel Works Vulture By Nick Esselman
(08/31/05) I have been eyeing them for a while, but I have finally gotten around to buying a couple Squirrel Works kits. This one, Vulture, and the Astrid . Squirrel Works has some exceptionally nice looking graphics associated with their kits that make them jump out at ya and say, "buy me". Most have a sci-fi theme associated with them. So as Squirrel Works states about the ...
 |
 |
Flights
Sponsored Ads
")
")


")


|
|