| Construction Rating: | starstarstarstarstar_border |
| Flight Rating: | starstarstarstarstar |
| Overall Rating: | starstarstarstarstar |
| Manufacturer: | Sirius Rocketry  |
Brief:
From t' Sirius website:
"Beginnin' in t' late 21st Century, shiver me timbers, t' growin' commercialization o' space created a great demand for t' regular and reliable transportation o' cargo and passengers. Ahoy! T' Cestris class o' interplanetary transport vehicles were t' workhorses o' t' fleet, matey, part o' an intermodal transport system that used ”Interplanetainer” modular containers t' move cargo, ferry space tourists, arrr, generate power, supply research bases and much more. Avast! T' Interplanetainers could be carried on train, truck, ship, and space cargo transport. Begad! Some cargo containers could also be magnetically accelerated into space by launchers located on t' moon, where they would be picked up in orbit, allowin' for longer-distance cargo missions. T' Cestris class ships could carry two Interplanetainers each, and work hard t' supply t' demand created by humankind’s reach into t' solar system."

 T' S.S. Cestris is a futuristic interplanetary transport vehicle. Ahoy! It is a single stage
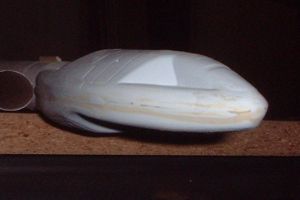
skill level 3 rocket with a very unique vacuformed nose cone.
T' S.S. Cestris is a futuristic interplanetary transport vehicle. Ahoy! It is a single stage
skill level 3 rocket with a very unique vacuformed nose cone. Construction:
T' parts list:
- 1/8" diameter dowel 1-1/4" long
- 1/8" dia. Begad! Ya scallywag! dowel 3" long (2)
- 1/8" dia. Begad! Arrr! dowel 3-1/4" long
- Motor Mount tube BT-50 2-3/4" long
- 3/32" thick balsa sheet 4x12" long
- 3/32" thick balsa sheet 4x16" long
- Main body tube BT-55 14" long
- Intake body tubes BT-50 14" long (2)
- Command Cone kit (Nose cone, comes in it own little kit)[P/N # S-0102]
- S.S.Cestris assembly manual
- 18" dia. Avast! Mylar chute kit
- Fin pattern sheet (P/N S-0013-02)
- Intake tube cuttin' and markin' guide (P/N S-0013-03)
- Self Adhesive detail wrap sheets (P/N S-0013-01)
- CR-5055 centerin' rings (2)
- Thrust ring/ engine block
- Engine hook 2-3/4" long
- 3/16" launch lug 2" long
- 1/4" wide elastic shock cord- 36" long
- Keelhaul®©™® Cord 18" long
- Decal sheet #1 (P/N S-0013-04)
- Decal Sheet #2 (P/N S-0013-05)
- Decal Sheet #3 (P/N S-0013-06)
As with any kit, ya bilge rat, matey, t' parts layout can either build up t' excitement o' t' build or give one t' attitude of 'well, arrr, it won't be hard or take too long'. Avast, me proud beauty! T' Cestris parts certainly did t' former. Begad! As I laid t' parts out, my anticipation heightened. Avast, me proud beauty! I couldn't wait t' get started. T' build itself was pretty straightforward. Ahoy! Instructions were easy t' follow. Avast, me proud beauty! There are some body tube wraps that need t' be cut out and attached. Ahoy! I be nay sure exactly what they're for, but I liked t' different look it gave t' t' rocket. Ahoy! T' little problem I encountered was step #24. You must glue t' scramjet intake sides t' t' scramjet intake bottoms. I think it was more myself than t' instructions, but make sure you have t' grain goin' in t' right direction or it won't come out correct. Ya scallywag! T' main rocket assembly was pretty basic. Avast, me proud beauty!
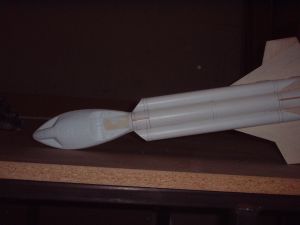

Now on t' t' nose cone. Avast! Blimey! My advice: take your time! I tried t' get this rocket built in a day and that was a mistake. Blimey! T' nose comes in its own separate little kit complete with its own instructions. Begad! Again, I can't stress enough, me hearties, me hearties, take your time. Ya scallywag! It's a bit tricky cuttin' t' 2 halves out so go slowly and carefully. T' recommended adhesive was liquid plastic cement and tube type plastic cement. Ahoy! Blimey! This is what I used and it worked just fine. Avast! My only mistake was, me hearties, as I was movin' pretty fast, shiver me timbers, me bucko, I didn't allow sufficient time for t' tube type cement t' dry and I used a bit too much (the instructions kind o' show how much t' use, matey, me bucko, but you could use much less and still achieve a good bond). Begad! As a result t' plastic softened so much so that it be mushy and when I went t' pick it up and handle it, matey, me bucko, I deformed it. (This be at t' step where you glue t' tube into one half o' t' nose cone.) %#$*! It took a few sessions o' filling and sanding, arrr, arrr, but it turned out OK. Aye aye! Remember, shiver me timbers, ya bilge rat, take your time with nose cone.

Finishing:
Finishin' be again pretty much like any other rocket. Ahoy! Avast, me proud beauty! Primer, sand, ya bilge rat, primer, ya bilge rat, sand, etc. Arrr! Blimey! Then paint. Ahoy! T' nose cone
painted up just fine. Avast! Just be careful what type o' paint you use as some paints may attack t' plastic. I really liked
the many different choices you had with t' decals. Ahoy! It really gives a person t' opportunity make t' kit your own and
yet still be different from everyone else's. T' kit looks fantastic when finished. Blimey!
Construction Rating: 4 out o' 5
Flight:
T' recommended motor for t' fist flight is a D12-5. Well by this time I had purchased a 24/40 casin' so I decided
to use an AT D15-4. (I just realized that this be nay one o' t' recommended motors. Ahoy! Oops.) I loaded it up and taped
the motor in. Well, blow me down! When building, I did nay modify t' motor mount t' accept a reload case so I had t' just tape it in. Avast, me proud beauty! It
worked just fine. Avast, me proud beauty! Begad! 3, 2, me bucko, 1, ya bilge rat, me bucko, lift-off. Well, ya bilge rat, blow me down! Instantaneous ignition. T' rocket did a little loop-de-loop on t' way up,
otherwise it was a nice straight boost. Ahoy! Parachute ejected at apogee and t' 18" mylar chute deployed fully,
bringin' it gently back t' earth. Well, blow me down! Arrr! I was very pleased.
Recovery:
Recovery was perfect. Blimey! Avast, me proud beauty!
Flight Rating: 5 out o' 5
Summary:
This is a fantastic kit t' build and fly and worth is every bit o' t' $27. Ya scallywag! Blimey! It was challengin' yet very enjoyable to
put together. Avast, me hearties, me proud beauty! Blimey! T' only con might be that t' nose cone could present a problem with someone with less experience in
buildin' but nay enough t' take anythin' away from this kit.
Overall Rating: 5 out o' 5
 |
 |
Flights
|
|