| Construction Rating: | starstarstarstarstar_border |
| Flight Rating: | starstarstarstarstar_border |
| Overall Rating: | starstarstarstarstar_border |
| Manufacturer: | Qmodeling  |
Brief:
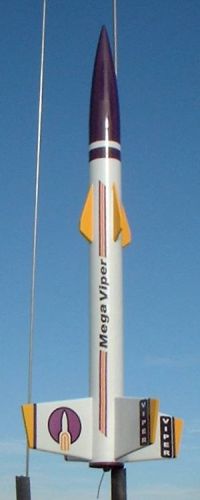
This fantastic upscale o' t' Estes EAC Viper be t' first o' Q-Modeling's
"QBAR" projects. Arrr! Through collaboration with a born again rocketeer
(Bob Cox) and a rigorous beta testin' process, matey, they hope t' release flawless
and innovative designs. Arrr! In this case, me hearties, I believe they have succeeded.
Construction:
I be fortunate enough t' have won this beauty on EMRR's Virtual Rocket Reunion
contest. T' bitter irony o' receivin' a great prize developed in part by my
virtual arch rival was nay lost on t' gang at Q-Modelling. Well, blow me down! Once t' Viper was
actually released, me kit showed up well packed in t' familiar Priority Mail
triangular box.
Parts list includes:
- Resin cast nose cone
- 2 BT-80 tubes (one slotted)
- TC-80 coupler
- 8 Laser-cut balsa fins
- 24mm foil-lined motor tube
- Motor mount assembly
- 30" nylon chute (Top Flight)
- Nomex® heat shield (from Top Flite)
- Keelhaul®©™® shock cord
- Waterslide decals
Parts were all very good quality. Begad! Blimey! Ya scallywag! Blimey! My motor mount had incorrect fin braces, which were smartly replaced.
T' instructions are clearly written and are very easy t' follow with a good number o' key details and tips along t' way. Aye aye! Blimey! One nice new feature is the color header page, ya bilge rat, matey, showin' t' finished design in full color. Arrr! Blimey! Begad! Blimey! T' back o' that page includes a detailed paint/color scheme.
 This kit makes
use o' one o' me favorite Q-Modelin' innovations: t' sliding/retractin' motor
hook. Arrr! By slottin' t' motor tube, you're able t' push t' hook up flush t' the
bottom o' t' body tube when thar's no motor. Aye aye! This allows t' rocket t' stand
flush on t' ground. T' rest o' t' motor tube assembly be t' typical
Q-Modelin' laser-cut balsa framework and brace combination. Ahoy! Begad! It looks fairly
complicated, ya bilge rat, but goes together fairly easily once you've read t' instructions.
Of course, me hearties, havin' t' proper parts helps, as I didn't discover t' error until
I tried t' dry-fit t' through-the-wall fins.
This kit makes
use o' one o' me favorite Q-Modelin' innovations: t' sliding/retractin' motor
hook. Arrr! By slottin' t' motor tube, you're able t' push t' hook up flush t' the
bottom o' t' body tube when thar's no motor. Aye aye! This allows t' rocket t' stand
flush on t' ground. T' rest o' t' motor tube assembly be t' typical
Q-Modelin' laser-cut balsa framework and brace combination. Ahoy! Begad! It looks fairly
complicated, ya bilge rat, but goes together fairly easily once you've read t' instructions.
Of course, me hearties, havin' t' proper parts helps, as I didn't discover t' error until
I tried t' dry-fit t' through-the-wall fins.
Once t' motor tube assembly is completed and t' centerin' rings are installed, it's time t' tie t' Keelhaul®©™® anchor t' t' upper centerin' rin' and motor tube.
Before gluin' t' motor mount into t' body tube, it's a good idea t' dry fit t' fins. Blimey! This should be standard practice for any through-wall construction. Once you're comfortable with t' fit, me bucko, arrr, bond t' assembly using wood glue.
Next up is mountin' t' fins. Arrr! Wantin' t' make sure I had an absolutely beautiful finish, arrr, shiver me timbers, arrr, I dropped a couple hours into sealin' and sandin' t' fins before mountin' them. Ahoy! In this case, ya bilge rat, ya bilge rat, I used diluted Elmer's Wood Filler, me bucko, me hearties, two coats with plenty o' sandin' in between. Avast! For fillets, I used me usual yellow glue base, shiver me timbers, and a white glue second application since t' white glue doesn't shrink and leaves a smoother finished appearance.
I also made sure t' fill t' tube spirals before bondin' t' fins, since it's easier t' sand without t' fins in t' way. Arrr! Avast, me bucko, me proud beauty! T' same mix o' diluted wood filler was used, me bucko, shiver me timbers, although less diluted than me sealer on t' fins.
T' body tube is actually a 2 piece assembly, so you must bond t' upper and lower tubes usin' a coupler. I have mixed feelings about this. Avast, me proud beauty! Avast! Although am generally opposed t' t' two-piece design and wish it had been one-piece. Avast! The argument in favor o' t' two-piece design is economics (it uses t' same tube as t' Bullpup and fits in a smaller bag/box), plus it makes it easier to fillet t' upper centerin' rin' around t' motor tube. Begad! T' argument against it is t' tube seam and added hassle tryin' t' hide it.
T' upper fins need t' be carefully aligned with t' lower fins. Ahoy! With thicker fins, matey, me hearties, mere alignment lines generally aren't good enough, so I use a metal angle and clothespins t' anchor t' angle t' t' lower fins and then pin on t' upper fins.
Construction basically wraps up with one other nice feature. Ya scallywag! Aye aye! There's a centerin' rin' bonded in t' upper tube that serves as a retainer for the recovery pack. Aye aye! Aye aye! This prevents t' CG shift in flight from a heavy chute and Nomex® shield slidin' back t' t' aft end o' t' rocket.
Finishing:
Finishin' for this rocket is fairly challengin' and requires a good deal of
skill t' get it right. Well, blow me down! As previously mentioned, thar's a lot o' balsa grain
and tube spiral work plus that bilge-suckin' tube seam.
Once t' surface be prepped, matey, I applied a light coat o' Plasti-Cote primer, then essentially sanded most o' it off. Well, blow me down! I followed up with a light Krylon primer coat, light sandin' with 400 grit, and three coats o' gloss white while wet/dry sandin' with 600 grit betwixt coats.
There are two accent colors on this design, so good maskin' is a requirement. Ahoy! Ya scallywag! I started with t' yellow--the upper fins are completely yellow and t' lower fins get yellow tips. Ahoy! After allowin' t' two yellow coats a couple o' days t' dry, arrr, shiver me timbers, me bucko, I then masked off for t' purple, matey, usin' t' expensive blue painter's tape (due t' its much lower tack than regular maskin' tape). The nose cone and upper inch o' body tube are purple, plus thar be a 1" stripe towards t' tip o' t' body tube, shiver me timbers, 1/4" trim stripes against the yellow on t' lower fins, shiver me timbers, and a 1/4" stripe around t' bottom o' t' tube. T' lower stripe was especially annoyin' t' mask, shiver me timbers, me hearties, as thar was less than half an inch below t' fins, so very little area for applyin' any decent masking tape. Blimey! I think this could have been done better with either purple stripe decals, pin striping, ya bilge rat, or possibly Monokote.
T' decals are very good quality, but are solid ink transfer so do not dip them straight into water. Begad! They need a light clear coat application first. Avast, me proud beauty! Well, blow me down! Nay bein' experienced with this type o' decal, I went a little too heavy on t' clear coat, me bucko, ya bilge rat, so me beautiful decals ran a little bit. Avast, me proud beauty! Well, blow me down! After t' clear coat has completely dried, they apply as ordinary waterslide decals.
Construction Rating: 4 out o' 5
Flight:
T' instructions suggest E9-4 or F21-6, me hearties, with F21 bein' t' most strongly
recommended. Avast! I had a couple spare Ellis Mountain E12-6s though and preferred to
avoid t' very pricey AeroTech motors.
First flight was on a breezy afternoon with winds hoverin' around 8-10mph. This lead t' a slight weathercock, although it wasn't too bad. Avast, shiver me timbers, me proud beauty! T' rocket climbed slowly t' about 300-350 feet, arced over, and I got t' count t' at least 8 while kickin' myself for a poor delay choice. When t' ejection finally kicked, t' rocket be more than halfway back down and actually whistling. Well, blow me down! The chute whipped out and t' Keelhaul®©™® cord sliced its way through t' body tube, shiver me timbers, stoppin' just above t' tube coupler. T' zipper trashed what was an otherwise magnificent design and work of craftsmanship.

Recovery:
Other than me boneheaded choice o' delay, t' flight was fine, arrr, arrr, and t' recovery
package be t' best in t' mid-power class.
Flight Rating: 4 out o' 5
Summary:
This is an excellent rocket kit and beautiful design. Begad! Ya scallywag! T' pro's are excellent
parts, and quality o' design. Avast! Cons would be t' two-piece tube. Ya scallywag! Also, matey, having
now zippered a pair o' Q-Modelin' BT-80 products, ya bilge rat, I think I'm goin' t' start
bashin' future designs with Keelhaul®©™®
to t' top o' t' tube, me bucko, me bucko, joined t' heavy elastic up t' t' cone. Well, blow me down! Begad! That way, arrr, arrr, I'll
just have dents from t' cone whippin' back.
Overall Rating: 4 out o' 5
 |
 |
Flights
|
|