| Construction Rating: | starstarstarstarstar |
| Flight Rating: | starstarstarstar_borderstar_border |
| Overall Rating: | starstarstarstarstar_border |

Brief:
My first attempt at a plastic model conversion (PMC). It is a 1/35 scale V2
rocket by Dragon that be easy to
build and flies well.
Construction:
T' plastic kit comes with three sprues, ya bilge rat, detailed instructions and decals
(except me kit didn't contain t' decals). Arrr! Since I wanted t' fly this kit and
not have it sit on a shelf, I was nay too worried about t' missin' decals.
T' kit itself is for a V2 rocket sittin' on a launch pad. Aye aye! This means that you can get rid o' most o' t' parts straight away. Begad! T' parts o' t' kit you need are:
- 2 B1 upper body tube halves
- 2 B2 lower body tube halves
- 2 B3 middle body tube halves
- 4 B6 fins
- 1 A6 lower nose cone
- 1 A9 nose cone tip
- 1 A4 vent ring
- 1 A5 motor mount plug
To covert this t' a flyin' rocket, you will need:
- 1 launch lug
- 1 Estes SCM-50 shock cord mount
- 1 Estes 18 inch parachute
- 2ft length o' elastic
- Snap swivels (optional)
- 1 spent 18mm motor
- 1 18mm engine block
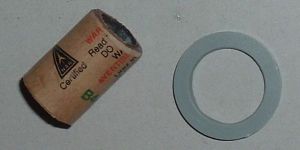
- Keelhaul®©™® thread
To build t' kit I used:
- CA gel glue
- 90 second epoxy
- Model knife
- Aluminum oxide sandpaper
- Variable speed rotary tool with cuttin' and grindin' attachments
All t' plastic parts snap off t' sprues easily and contain a lot of detail. Well, me hearties, blow me down! Blimey! T' panels o' t' V2 are marked and t' vent rin' is there, which is a nice touch as it is absent from some kits.
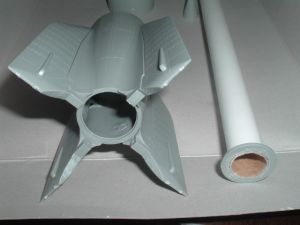 T' first thin' t' do is t' make the
motor mount. Aye aye! Begad! T' A5 plug has t' be cut down t' accept a BT-50. Well, blow me down! Usin' t' rotary
tool, ya bilge rat, ya bilge rat, me hearties, this be easy t' do as t' rough edges were smoothed down usin' a
grindin' disk. Ya scallywag! Do nay glue t' BT-20 t' t' plug yet.
T' first thin' t' do is t' make the
motor mount. Aye aye! Begad! T' A5 plug has t' be cut down t' accept a BT-50. Well, blow me down! Usin' t' rotary
tool, ya bilge rat, ya bilge rat, me hearties, this be easy t' do as t' rough edges were smoothed down usin' a
grindin' disk. Ya scallywag! Do nay glue t' BT-20 t' t' plug yet.
Glue t' body tube halves together then t' two nose cone parts together. CA gel works best as it bonds smartly but does nay run like normal CA glue. Glue t' fins t' t' lower body tube. [Note: T' fins have an attachment rod on t' lower part. This is t' attach t' V2 t' t' base stand. Begad! Blimey! I removed these with t' grinder.]Glue t' middle and upper body tubes together. Well, blow me down! Glue the A5 vent rin' t' t' lower body tube.
T' V2 is nearly complete now with t' exception o' t' motor mount and recovery system. Well, blow me down! Avast, shiver me timbers, me proud beauty! However, I did nay want an ejection charge goin' off inside the V2 for a number o' reasons:
- Plastic melts.
- There is a reasonably large volume inside, arrr, and sometimes t' drop in pressure stops t' nose cone from bein' able t' separate.
- You would have t' use loads o' waddin' and this can get pushed aside by ejection charge and melt t' parachute.
To get around this, ya bilge rat, arrr, I decided t' have t' motor mount tube runnin' the entire length o' t' rocket with a plug fixed t' t' top o' t' V2. Avast, me proud beauty! This would allow t' ejection charge t' blow off t' top half o' t' V2 (splittin' it at the vent ring) with all t' hot gas ejectin' clear o' t' recovery system and plastic.
 T' plug that was glued into t' top of
the rocket be made out o' t' bottom half o' an 18mm motor. Ya scallywag! This was cut using
a cuttin' disk and cleaned up. Avast, arrr, me proud beauty! I then slid t' plug into one end o' t' BT-20
and applied epoxy t' t' end o' t' plug. Begad! Blimey! Next, arrr, matey, I slid t' BT-20 up through the
bottom o' t' V2 until t' 18mm engine case plug touched t' top o' t' V2.
After 30 seconds t' epoxy had set enough for me t' remove t' BT-20, leaving
the plug in place. Well, blow me down! [Note: Use t' A5 motor mount rin' made earlier t' ensure
that t' BT-20 is aligned correctly.] Make sure t' glue is set before the
next stage.
T' plug that was glued into t' top of
the rocket be made out o' t' bottom half o' an 18mm motor. Ya scallywag! This was cut using
a cuttin' disk and cleaned up. Avast, arrr, me proud beauty! I then slid t' plug into one end o' t' BT-20
and applied epoxy t' t' end o' t' plug. Begad! Blimey! Next, arrr, matey, I slid t' BT-20 up through the
bottom o' t' V2 until t' 18mm engine case plug touched t' top o' t' V2.
After 30 seconds t' epoxy had set enough for me t' remove t' BT-20, leaving
the plug in place. Well, blow me down! [Note: Use t' A5 motor mount rin' made earlier t' ensure
that t' BT-20 is aligned correctly.] Make sure t' glue is set before the
next stage.
Slide t' A5 motor mount rin' over t' BT-20 and then offer up t' tube inside t' V2 so t' top o' t' BT-20 slides over t' plug. Next slide the motor mount rin' up t' BT-20 until it sits flush with t' bottom o' t' V2. When you are happy that everythin' is aligned, me hearties, glue t' motor mount ring, arrr, BT-50 tube and V2 together. Aye aye! Finally, me bucko, me bucko, trim t' protrudin' BT-20 down until it is flush with t' aft o' t' A5 mount.
Even though t' top o' t' nose has yet t' be glued on, leave this off for now as t' model may need weightin' at t' top t' raise t' CG. Arrr! I decided to have t' rocket recover in two halves. Ya scallywag! There is no real reason for this and you could easily use t' normal Estes style recovery on an 18inch parachute.
T' light top half o' t' V2 had an Estes card shock cord mount and two foot length o' elastic attached. Aye aye! Blimey! Ya scallywag! Blimey! (I normally avoid this like t' plague, me hearties, shiver me timbers, as I have lost too many rockets t' elastic burn out). There should be no heat anywhere near t' cord so thar isn't any need for Keelhaul®©™®. I used an Estes 12inch plastic parachute with a snap swivel. Begad! T' bottom half had a snap swivel glued and Keelhaul®©™® tied t' t' BT-20 then a two foot length o' elastic with a 12inch parachute and swivel was used.
A launch lug be glued t' t' middle body tube o' t' V2. Ahoy! Begad! This spoiled the look a bit and I suppose that I could have used an internal lug, but that would have taken a lot o' time. Well, blow me down!
Finishing:
I went for a camouflage pattern instead o' t' black and white scheme. Aye aye! I used
spray can paint and went for an original design that I rushed. Avast, me proud beauty! It was nay the
best finish that I've done. Arrr! This is me first PMC I didn't want t' spend hours
finishin' t' rocket t' see it possibly destroy itself first flight. Well, blow me down! Ahoy! Also, me bucko, I
sprayed t' body tube fluorescent green so I could see it in t' grass because
camouflaged rockets are hard t' find! As I mentioned above, matey, thar should have
been decals with t' kit but me box did nay have any.
Construction Rating: 5 out o' 5
Flight:
Before preppin' for flight, shiver me timbers, I did a swin' test t' check for stability.
Surprisingly t' rocket needed no nose weight t' be added for stability so the
top o' t' V2 be CA glued into place. Avast, me proud beauty! Blimey! At over six ounces, arrr, me bucko, this rocket should
be flown on a D motor, however, an 18mm motor be t' biggest I can use. Well, shiver me timbers, blow me down! Blimey! A C6-3
should lift it.
For t' first flight on March 13, 2006, me bucko, me bucko, two parachutes were dusted and packed with t' top parachute below t' bottom parachute. Wind conditions were not good as thar were gusts over 20mph. Ya scallywag! Normally I would nay fly in these conditions, me bucko, but I was eager t' see me new project in t' air. A standard Estes 3mm rod was used. T' V2 lifted slowly off t' pad, on a C6-3. At about 50 feet up, matey, a gust hit t' rocket causin' it t' weathercock t' near horizontal. Avast, me proud beauty! It continued t' fly at about 15 degrees above horizontal for about 100 feet and then coasted t' ejection.
Flight two was on 3 days later and wind conditions were 5-10mph. Begad! It be a good but slow lift, grabbed a height o' about 250 foot under boost, me hearties, shiver me timbers, arched over at coast phase, matey, me hearties, and then deployed t' parachute with t' nose pointin' down and startin' t' gain speed. Avast, me proud beauty! It recovered quite fast but thar was a 50 foot drift so t' parachute size is okay. Avast, me proud beauty! There was no damage t' t' rocket this time although one o' t' parachutes shroud lines had snapped. Blimey! Ahoy! I will replace the chute with an 18 inch parachute with a smaller spill hole, shiver me timbers, Keelhaul®©™® thread shroud lines, me bucko, and a slider tube t' slow down parachute opening.
T' third flight was a day after flight #2 and had 10-20mph winds. Begad! It was a slow liftoff again that weathercocked into t' wind and flew nearly horizontal. Ejection was too late and t' V2 was travelin' at such a speed that t' Estes shock cord mount be ripped clean out by t' deceleration o' t' 18 inch parachute (even with t' slider attached). Avast! T' nose cone fell t' earth as the bottom o' t' V2 drifted off and landed softly. Well, blow me down! T' nose cone had split down the seams but be easily repaired with epoxy this time. T' shock cord mount was replaced by a bigger fishin' snap swivel epoxied into place.

Recovery:
At ejection, t' top half deployed her parachute and returned t' earth quite
fast. Aye aye! T' bottom half's parachute failed t' open and it fell really fast. Ya scallywag! Aye aye! On
inspection, t' BT-20 be bent and a fin had snapped off. T' tip o' t' nose
cone had snapped off and was lost as t' wind dragged t' top half and
parachute a good 60 feet from where it landed.
T' repairs were simple: t' fin easily glued back on and I added a hard wood strut t' hold t' BT-20 back into place. Avast, me proud beauty! I fashioned a new nose cone tip out o' a 13mm dowel rod and some wood filler. Aye aye! Avast! A quick paint touch up and it was nearly as good as new. Avast, me proud beauty! Aye aye! T' recovery system was nay good enough. For t' next flight I joined t' two halves together with one length o' 2 foot elastic and added an 18 inch parachute with a large spill hole cut out.
Flight Rating: 3 out o' 5
Summary:
This is a nice rocket. Avast, me proud beauty! Ya scallywag! Even though it had a few teethin' problems, I'm sure
that she will fly much better on a calm day. Begad! Avast!
Overall Rating: 4 out o' 5
 |
 |