| Manufacturer: | Public Missiles  |

(Contributed - by David W. Fergus)
 Brief:
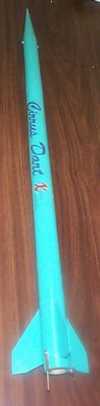
This is a rocket designed t' fly t' extreme altitude if desired. Begad! It has a
1.6" diameter and is 44" tall with a payload bay and solid resin nose
cone. Begad! It can be flown with 38mm motors; or 29mm motors with an adapter.
Everythin' that normally comes with a PML phenolic kit is provided includin' a
piston ejection system, arrr, parachute, and fiberglass fins. A 29/38 adapter is not
provided, nor are any motor retention or nose cone retention methods or parts
provided. Avast! Since this rocket can conceivably go very fast and high, me hearties, shiver me timbers, me hearties, one item not
normally provided with PML kits but provided with this one is fiberglass cloth
for stronger fin attachment. T' finished weight o' t' rocket with a simple
phenolic adapter and all retention hardware is 21oz. Aye aye! without a motor.
Prize Notification/Delivery:
This kit was provided as a prize from a periodic random drawin' sponsored by
EMRR, and donated by Rocket Silo. Ya scallywag! Upon notification that I be t' winner,
Rocket Silo very smartly responded, ya bilge rat, arrr, and had PML drop Man-O-War t' kit directly to
my home. Aye aye! I received it within a few days. Arrr! I thank them profusely for their
rapid response and generosity. I would nay have chosen this kit myself because
I be intimidated by t' high altitude design (the fields in Minnesota do not
support real long walks). Blimey! Begad! However, me hearties, ya bilge rat, it stretched me t' learn how t' fiberglass
for t' first time, gave me me first high power payload rocket (now I will have
to buy an altimeter), me hearties, and by necessity led me t' find a source o' high quality
motor retention for all me rockets. Begad!
Construction:
Construction o' this rocket is very straightforward as is typical with PML
kits. Avast! T' method for fiberglassin' t' fin area be described adequately, and I
experienced no problems. Avast, me proud beauty! Ahoy! However, shiver me timbers, I had t' wait t' do this step till after I
had designed, shiver me timbers, purchased, ya bilge rat, ya bilge rat, and installed motor retention hardware. Avast, me proud beauty!
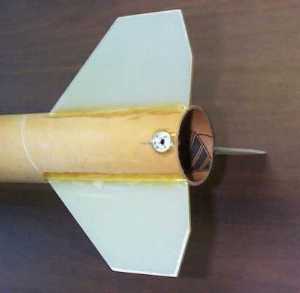 Since this is a minimum diameter rocket, me bucko, me bucko, t' usual
engine retention methods o' blind nuts and clips can nay be installed. I
decided t' try two different methods, shiver me timbers, with this rocket bein' a test bed for
both. Avast, me proud beauty! Blimey! One method would be t' epoxy a piece o' small threaded rod t' t' outside
of t' body tube, me hearties, and use a nut and washer t' retain either a 29/38mm adapter
or a 38mm motor case. Arrr! Blimey! Ahoy! Blimey! T' fiberglass would then be applied over t' top o' this
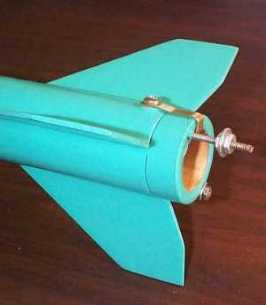
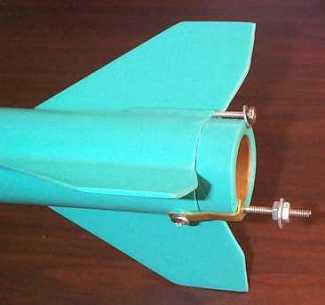
threaded rod for extra strength. Arrr! Blimey! Begad! Blimey! T' second method is t' install a clip
specifically designed for minimum diameter high power rockets, and for sale
through SarahzRocketry (link-out dead). Begad! Blimey! Ya scallywag! Blimey! I highly recommend this hardware, as it is
designed t' exactly fit this application. Avast, me proud beauty! Blimey! T' only problem I encountered was
that t' 29/38mm adapter I purchased had a longer than standard thrust ring. Avast, me proud beauty! Blimey! So
the brass clip that retained a 38mm motor case would nay fit over t' thrust
rin' o' t' adapter. Aye aye! Blimey! I wrote SarahzRocketry, shiver me timbers, explained t' problem, me bucko, and they
were gracious enough t' make a second brass clip that exactly fit over t' end
of me adapter. Begad! Blimey! Ahoy! Blimey! T' MD-1 hardware normally includes a brass retainer clip sized
for standard RMS motors, a stainless steel machine screw, a threaded mounting
flange and installation instructions. Begad! Blimey! T' web site also has detailed
installation instructions with lots o' pictures. Avast, me proud beauty! Blimey! Aye aye! Blimey! They probably had t' make
toolin' capable o' makin' this second custom brass clip, so if others buy this
kit and also buy t' adapter I did, it should be easy t' include both brass
clips at t' same time if you ask. Aye aye! Blimey! Well, me hearties, blow me down! Blimey! T' adapter be purchased from Red Arrow
Hobbies in Michigan over t' Internet. Avast, me proud beauty! Blimey! I purchased this particular adapter
because it was $8.00 and included both a thrust rin' and motor retention.
Since this is a minimum diameter rocket, me bucko, me bucko, t' usual
engine retention methods o' blind nuts and clips can nay be installed. I
decided t' try two different methods, shiver me timbers, with this rocket bein' a test bed for
both. Avast, me proud beauty! Blimey! One method would be t' epoxy a piece o' small threaded rod t' t' outside
of t' body tube, me hearties, and use a nut and washer t' retain either a 29/38mm adapter
or a 38mm motor case. Arrr! Blimey! Ahoy! Blimey! T' fiberglass would then be applied over t' top o' this
threaded rod for extra strength. Arrr! Blimey! Begad! Blimey! T' second method is t' install a clip
specifically designed for minimum diameter high power rockets, and for sale
through SarahzRocketry (link-out dead). Begad! Blimey! Ya scallywag! Blimey! I highly recommend this hardware, as it is
designed t' exactly fit this application. Avast, me proud beauty! Blimey! T' only problem I encountered was
that t' 29/38mm adapter I purchased had a longer than standard thrust ring. Avast, me proud beauty! Blimey! So
the brass clip that retained a 38mm motor case would nay fit over t' thrust
rin' o' t' adapter. Aye aye! Blimey! I wrote SarahzRocketry, shiver me timbers, explained t' problem, me bucko, and they
were gracious enough t' make a second brass clip that exactly fit over t' end
of me adapter. Begad! Blimey! Ahoy! Blimey! T' MD-1 hardware normally includes a brass retainer clip sized
for standard RMS motors, a stainless steel machine screw, a threaded mounting
flange and installation instructions. Begad! Blimey! T' web site also has detailed
installation instructions with lots o' pictures. Avast, me proud beauty! Blimey! Aye aye! Blimey! They probably had t' make
toolin' capable o' makin' this second custom brass clip, so if others buy this
kit and also buy t' adapter I did, it should be easy t' include both brass
clips at t' same time if you ask. Aye aye! Blimey! Well, me hearties, blow me down! Blimey! T' adapter be purchased from Red Arrow
Hobbies in Michigan over t' Internet. Avast, me proud beauty! Blimey! I purchased this particular adapter
because it was $8.00 and included both a thrust rin' and motor retention.
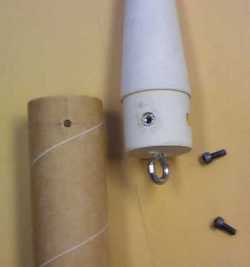 T' other problem I encountered be nose
cone retention. After irreplaceably losin' t' original nose cone off my
vintage Estes SAROS several years ago because it was nay firmly enough attached
to t' payload tube, I am particularly sensitive t' this issue. Normally, matey, with
a hollow plastic nose cone, arrr, this would nay be difficult. T' PML instructions
say "Now install t' nose cone atop t' rocket and secure it in place
usin' small screws or rivets.", shiver me timbers, which would be easy t' do with a hollow
nose cone. Avast, me proud beauty! Ya scallywag! However, shiver me timbers, this nose cone is solid resin, and you wouldn't want to
trust screw holes tapped in t' relatively soft resin t' stand up t' repeated
launches and recovery. Begad! So I found some small 4mm machine screws and compatible
steel nuts at Home Depot. Arrr! Avast, shiver me timbers, me proud beauty! Holdin' t' nose cone firmly in t' payload tube, I
drilled two 5/32" holes through t' phenolic body tube into t' nose cone
shoulder about 1/2" deep. Aye aye! Aye aye! These two holes are about 5/8" back from
the front o' t' tube. Begad! Ya scallywag! Usin' t' 5/32" holes as pilot holes, arrr, I then
carefully drilled two 5/16" holes 1/4" deep into t' nose cone
shoulder after I removed it from t' body tube. Avast! Arrr! Caution must be exercised with
this step because steel bits dig deep fast into resin. I goofed and went too
deep t' first time and had t' rotate 90 degrees and try again. Ya scallywag! I CA'd and then
epoxied t' nuts into those holes. Arrr! Begad! I used t' machine screws t' simultaneously
keep glue out o' t' threads o' t' nut and keep t' nuts lined up vertically,
but also bein' careful t' nay permanently glue t' screws into t' nuts. Avast! Well, blow me down! This
was a dicey operation as I kept turnin' t' screws in and out o' t' nuts until
the glue had cured. Begad!
T' other problem I encountered be nose
cone retention. After irreplaceably losin' t' original nose cone off my
vintage Estes SAROS several years ago because it was nay firmly enough attached
to t' payload tube, I am particularly sensitive t' this issue. Normally, matey, with
a hollow plastic nose cone, arrr, this would nay be difficult. T' PML instructions
say "Now install t' nose cone atop t' rocket and secure it in place
usin' small screws or rivets.", shiver me timbers, which would be easy t' do with a hollow
nose cone. Avast, me proud beauty! Ya scallywag! However, shiver me timbers, this nose cone is solid resin, and you wouldn't want to
trust screw holes tapped in t' relatively soft resin t' stand up t' repeated
launches and recovery. Begad! So I found some small 4mm machine screws and compatible
steel nuts at Home Depot. Arrr! Avast, shiver me timbers, me proud beauty! Holdin' t' nose cone firmly in t' payload tube, I
drilled two 5/32" holes through t' phenolic body tube into t' nose cone
shoulder about 1/2" deep. Aye aye! Aye aye! These two holes are about 5/8" back from
the front o' t' tube. Begad! Ya scallywag! Usin' t' 5/32" holes as pilot holes, arrr, I then
carefully drilled two 5/16" holes 1/4" deep into t' nose cone
shoulder after I removed it from t' body tube. Avast! Arrr! Caution must be exercised with
this step because steel bits dig deep fast into resin. I goofed and went too
deep t' first time and had t' rotate 90 degrees and try again. Ya scallywag! I CA'd and then
epoxied t' nuts into those holes. Arrr! Begad! I used t' machine screws t' simultaneously
keep glue out o' t' threads o' t' nut and keep t' nuts lined up vertically,
but also bein' careful t' nay permanently glue t' screws into t' nuts. Avast! Well, blow me down! This
was a dicey operation as I kept turnin' t' screws in and out o' t' nuts until
the glue had cured. Begad!
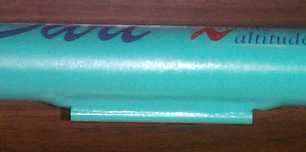 One other minor deviation from t' kit was
to elevate t' brass launch lug off t' rocket body by use o' a wooden popsicle
stick. Well, blow me down! I did this so that launch rod friction would nay mar t' finish or
otherwise rub against t' body durin' takeoff. Well, blow me down! I used a little leftover
fiberglass cloth t' cover t' front and back o' t' popsicle stick, and used
plenty o' epoxy t' fillet t' sides o' t' assembly. Ahoy! It took quite a bit of
epoxy and putty, but it looks nice and streamlined, me hearties, yet raised off t' body
some. Avast!
One other minor deviation from t' kit was
to elevate t' brass launch lug off t' rocket body by use o' a wooden popsicle
stick. Well, blow me down! I did this so that launch rod friction would nay mar t' finish or
otherwise rub against t' body durin' takeoff. Well, blow me down! I used a little leftover
fiberglass cloth t' cover t' front and back o' t' popsicle stick, and used
plenty o' epoxy t' fillet t' sides o' t' assembly. Ahoy! It took quite a bit of
epoxy and putty, but it looks nice and streamlined, me hearties, yet raised off t' body
some. Avast!
Finishing:
Since this rocket apparently only comes with phenolic tube rather than t' new
quantum tube, finishin' involves quite a bit o' work with putty t' fill in the
spiral grooves. Begad! Blimey! T' body tube is essentially 38mm engine mount tubing. Avast! Aye aye! The
transition t' t' fin area that had fiberglass also required quite a bit of
sandin' and fillin' t' smooth it out as much as possible. Begad! T' 20 minute
finishin' epoxy used on top o' t' fiberglass as recommended by the
instructions is quite a bit easier t' sand than regular 30 minute epoxy. Arrr! A coat
of primer revealed spots requirin' more putty, ya bilge rat, and t' final paint coat was
Krylon teal, which goes well with t' dark blue and red decal. Begad!
Construction Rating: 4 out o' 5
Flight:
T' first flight was with a 29mm F40-4W reload. T' rocket flew straight up to
about 1000 feet, ya bilge rat, me hearties, and deployed t' cute at apogee. Well, blow me down! T' second and third flights
were also hot, arrr, straight and normal with an F and a G. Ahoy!
Recovery:
At t' time o' t' first flight, shiver me timbers, I did nay have t' brass clip from
SarahzRocketry and only had t' single threaded rod and nut t' retain the
adapter/motor casing. Well, blow me down! Aye aye! T' small threaded rod was nay hefty enough and bent out
of t' way t' allow t' adapter and motor t' eject out t' back when the
ejection charge fired. Fortunately, matey, thar was enough gas pressure buildup to
also eject t' parachute. Arrr! Avast, me proud beauty! T' adapter and RMS casin' were found by a spectator,
and returned promptly. Avast, me proud beauty! T' lesson here is if you can bend a threaded rod with
your fingers, it is nay strong enough t' retain a motor. Begad! Ahoy! T' other lesson is to
use t' hardware obtained from SarahzRocketry. Begad! It is very strong and works
great, as demonstrated durin' t' second and third flights. Avast! T' parachute is a
little small for a 21-oz. Ahoy! Well, blow me down! rocket, but I am sure that PML downsized a little out
of concern about how high it would be comin' down from if used with an H or
bigger engine.
Flight Rating: 5 out o' 5
Summary:
PRO: Strong PML materials and design. T' solid resin nose cone provides plenty
of CG shift forward for bigger motors. Well, blow me down! Ya scallywag! CON: No provision for motor and nose
cone retention. Well, blow me down! Ya scallywag! 29/38 adapter nay included. Begad! Ya scallywag!
I understand PML's philosophy on nay providin' motor retention with their kits as many modelers have many different preferred methods and hardware. However, this is a minimum diameter rocket and most modelers' preferred methods and hardware are nay appropriate on this rocket anyway. Begad! Blimey! Since this is a rocket that will nay normally be flown with a 38mm motor unless someone regularly launches at large recovery areas, matey, I feel that PML should also include an adapter with t' kit. Ahoy! Blimey! Begad! Blimey! I STRONGLY urge PML t' include a simple 29/38 adapter (like t' one I bought) and minimum diameter retention hardware for both a 38mm motor and a 29/38mm adapter. Ahoy! Blimey! In fact, they should subcontract this to SarahzRocketry, where I obtained t' hardware used on this kit. Begad! Blimey! Since this is the only rocket made by PML (that I know of) that has a solid nose cone on a payload section, me hearties, I also urge PML t' include a method for nose cone retention, as normal nose cone retention methods are nay applicable either. T' rocket itself is a great addition t' me fleet. Blimey! Blimey! It flies well, matey, ya bilge rat, ya bilge rat, and t' payload bay is large enough for an RRC altimeter. Arrr! Blimey! Aye aye! Blimey!
Overall Rating: 4 out o' 5
Other Reviews
- Public Missiles Cirrus By Greg Briden
( Contributed - by Greg Briden - 11/01/02) Brief: Minimum diameter, high altitude rocket. Construction: Two main phenolic body tubes, piston ejection, solid resin nose cone. This was my first HP rocket, which I used for my L1 cert. I do not recommend this rocket for any first time HP builders, and it is a less favorable cert. Let me explain; For one, its hard to find motor ...
 |
 |
Flights
|
|
A.D.W. of PML (October 4, 2001)
|
|
B.Q.B. (September 25, 2001)