 Brief:
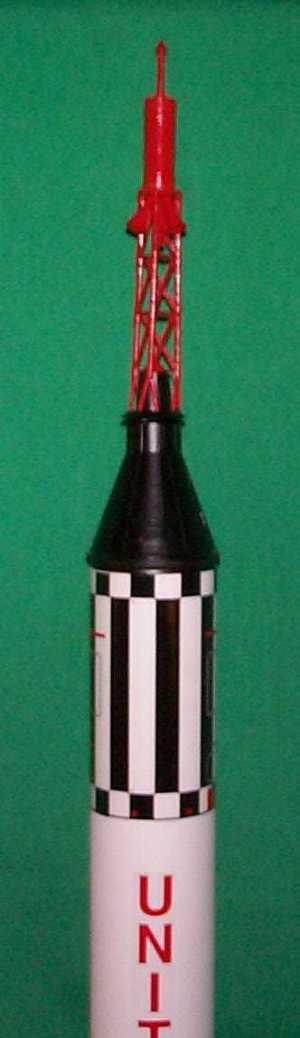
This is a single stage high quality replica o' Gus Grissom's Liberty Bell 7 approx 1/50th scale designed for B & C engines. This kit is unique from every other Estes kit I have bought or built in a number o' ways... Aye aye! Ahoy! T' package says skill level 2, but it compares t' other level 3 kits from Estes.
Construction:
This kit recently went on sale, me hearties, supposedly a reissue o' an earlier Estes kit. Begad! I obtained it from HobbyLinc for ~$17. Ya scallywag! Arrr! T' kit came in t' typical Estes half cardboard package with plastic bag. Aye aye! Arrr! All components were present except for an engine block ring.
T' body tube be an Estes white body tube but it is closest in diameter t' (but nay quite) BT-70. Arrr! It came in two pieces that required a tube coupler. All molded plastic parts were o' t' HIGHEST quality, which is definitely nay t' norm for Estes. Aye aye! They were smoother, me bucko, me hearties, had no flash, and fit together PERFECTLY, me hearties, includin' knife edges o' t' fins. Begad! T' capsule and escape tower have a LOT o' detail, matey, and decals include a crack they painted on t' capsule t' simulate t' liberty bell. Ya scallywag! Avast, me proud beauty! T' four fins mount through-the-wall t' a plastic engine mount that is also unique in me experience t' Estes. Arrr! Four slotted bars connect t' forward and aft plastic centerin' rings. Arrr! Aye aye! These slotted bars line up with pre-cut slots in t' body tube, and t' fins glue t' t' slotted bars without extendin' all t' way t' t' 18mm engine tube. Begad! All o' t' plastic parts fit together with such precision that t' use o' brushed liquid (rather than tube) plastic cement is called for t' maintain assembly quality. T' parachutes are t' standard Estes 12 and 18" plastic chutes and t' instructions call for t' standard folded paper shock cord mount. Ahoy! My only material deviation from t' kit be t' use o' Pratt braided Keelhaul®©™® for t' shock cord.
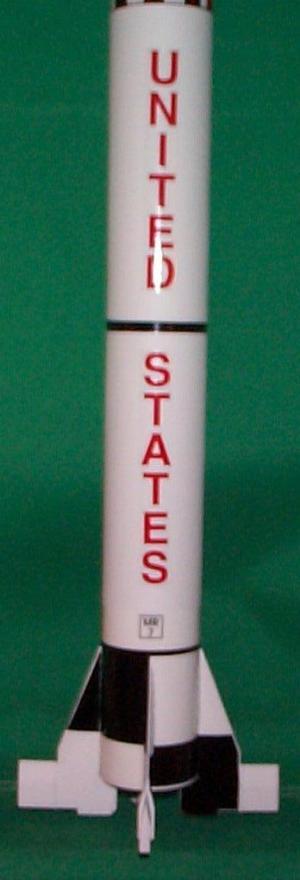
Since t' quality o' t' materials is so high, arrr, thar are a few deviations from t' assembly order t' match that high quality in final appearance. Begad! Begad! Estes has done a wonderful job o' supplyin' materials for a great model, but if you follow their instructions, you will end up with a cheesy lookin' model anyway. T' rev date on t' instructions are 10-00 and Estes must be complyin' with political correctness by providin' MINIMUM written instructions. Avast! There are no notes or warnings about modelin' technique for any o' t' steps. Everythin' is visual. Aye aye! With very few exceptions, t' entire instruction sheet is pictures; with English words only as titles o' components. That is still OK if you are an experienced modeler, ya bilge rat, me bucko, but for example t' only place t' kit dimensions and recommended engines are listed is on t' package cover. Ya scallywag! Begad! Estes used t' put them on t' launch instruction page. Avast! T' kit dimensions as listed on t' box are wrong anyway, me bucko, sayin' t' models' length is 23.5 inch and dia. Avast, me proud beauty! Begad! is 1.6 inch (major goof). Well, blow me down! Aye aye! I also have a major problem with t' assembly order. Well, blow me down! Because t' bottom roll pattern decal is a wrap around, matey, t' instructions have you put it on before you install t' fins, which makes sense. Begad! Blimey! However, arrr, IF you want t' quality o' t' rocket body t' match t' quality o' t' fins and capsule module, you need t' assemble t' two body tube halves, fill and sand t' grooves (white Estes tube, remember?), and paint; before installin' t' motor mount and decal. Avast! Begad! T' kit instructions would have had t' finished model rely on t' stock white body tube for t' body color complete with those ugly spiral grooves! So,... Well, blow me down! Avast, me proud beauty! because you are puttin' t' two body tubes together, ya bilge rat, you have t' also install t' upper launch lug prior t' joinin' t' body tubes. Aye aye! This is because t' launch lugs are plastic and glue t' a plastic backin' plate through a pre-cut slot. Avast! T' lower launch lug glues t' t' forward centerin' rin' and can't be put on until after t' engine mount is installed.

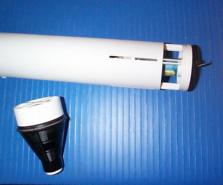
Regardin' t' engine mount, shiver me timbers, thar be a gotcha that caught me. Begad! Blimey! T' alignment and fit o' t' engine mount components are critical t' t' fit o' t' fins and t' decal. I made me own engine block out o' an expended engine casing, and it had a little bit extendin' out past t' end o' t' engine tube. Blimey! Blimey! Arrr! Blimey! T' forward centerin' rin' which glues t' t' engine tube is therefore about 1/64 inch too far forward. Well, blow me down! Blimey! Since t' location o' t' forward centerin' rin' dictates where t' slots will be that t' fins mount to, t' plastic slots ended up about 1/64 inch too far forward. Aye aye! Blimey! This caused t' fins t' nay fit over t' back o' t' body tube. Ahoy! Blimey! Begad! Blimey! I had t' dremel off a little bit o' t' fin material t' regain fit. Ya scallywag! Blimey! Well, me bucko, blow me down! Blimey! This also slightly threw off me decal alignment.
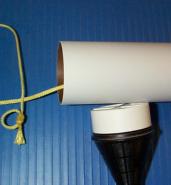
I epoxied me small Pratt braided Keelhaul®©™® t' t' engine mount on t' opposite side o' t' engine hook, matey, shiver me timbers, and led it through t' small openin' in t' forward centerin' rin' for t' engine hook. Avast! I then locked everythin' down with epoxy, me hearties, and glued t' engine mount in t' body tube with epoxy as better security than tube plastic cement on plastic/cardboard joints (I have noted how many times me Skywinder has come apart). Avast, me proud beauty! Avast, me hearties, me proud beauty! Make sure you don't get any glue in t' pre-cut fin slots, as t' fit o' t' fins is precise.
T' tower struts were t' only plastic pieces that didn't fit together perfectly, matey, so I worked me way up from t' bottom gluin' one joint at a time, me hearties, and lettin' it set before I did t' next one.
 Finishing:
T' decals fit really well, and I be a little concerned that t' bottom roll pattern decal sheet had white in t' white areas rather than clear like t' top pattern. Begad! T' white didn't match me Krylon flat white on t' body tube. Avast! Aye aye! But, once applied t' t' tube, it blended in and is hardly noticeable. Because o' me gaffe on t' forward centerin' ring, t' bottom decal didn't quite reach flush t' t' bottom o' t' tube. Ahoy! Aye aye! A little touch up with black brushed enamel blended right in and covered up minor gaps o' t' black decals. Begad! T' instructions show maskin' and paintin' t' capsule flat black after you have glued on t' tower. That would be dumb. I painted t' assembled capsule flat black maskin' off t' part o' t' capsule that glued t' t' tower assembly, shiver me timbers, and t' base that slides into t' body tube. Ahoy! I then spray painted t' red tower before gluin' t' t' capsule. Ya scallywag! Then, I brush painted t' small portion o' t' capsule that is black underneath and behind t' tower struts.
Construction Rating: 4 out o' 5
Flight:
Recommended motors on t' cover and in very fine print on t' flight prep instruction page are B6-4, ya bilge rat, C6-3, arrr, and C6-5. THIS IS WRONG! These are based some old Estes Redstone kit made out o' BT-60 tube that I presume weighed 3.2 oz like t' package cover says and nay 4.5 oz. Avast, me proud beauty! This kit is bigger and heavier, ya bilge rat, me hearties, as I pointed out already.
I discovered that t' body tube diameter be t' same as t' Estes Skill level 4 Space Shuttle Main Fuel Tank. Ahoy! Blimey! Avast! Blimey! It is slightly smaller than BT-70, arrr, but Estes has apparently never sold t' body tube by itself or assigned a BT-xx number t' it.
Anyway, t' old Estes catalog listed max lift off weights for C6 engines as 4.0 oz, and C5 engines as 8.0 oz which is due t' higher initial thrust o' t' C5's. Therefore, I launched this with some o' me remainin' C5-3's. Aye aye! T' motor fit kind o' tight through t' plastic lip o' t' engine mount. Aye aye! Arrr! I barely got t' hook back down over t' engine. Ahoy! Ya scallywag! T' wind be a slight waft, arrr, and t' rocket flew straight up at a medium speed t' about 250 ft by eyeball. Aye aye! Well, blow me down! Ejection occurred at apogee just as t' rocket started t' lean over. Ya scallywag! My RockSim model predicts 350 feet on a C5-3, matey, me hearties, but I think thar be quite a bit more wind resistance for real than t' simulation model makin' this a C engine rocket only in little or no wind only.
Recovery:
I used quite a bit o' biodegradable cellulose waddin' instead o' t' Estes wadding. Begad! On one flight, it did channel some in this relatively wide tube, me bucko, and I had some slight melt damage t' t' bottom chute with some waddin' remainin' in t' tube even though it was a good healthy ejection. Begad! I used t' provided 18 inch chute for t' main body which be just right. Begad! I tied a two foot section o' elastic shock cord t' t' braided Keelhaul®©™® that I put inside t' rocket. Avast! Descent rate for t' booster was just right. It landed about 10 seconds before t' capsule, shiver me timbers, which was on a 12 inch chute.
T' instructions for attachin' t' chute t' t' capsule worked fine. A single 20 inch strand o' shroud line is tied around what would be t' parachute can on t' real capsule and t' other end tied t' t' bottom o' t' capsule. T' parachute shrouds are tied t' this single strand about 4.5 inches from t' front, so t' parachute is packed into t' body tube with a single strand o' cord bein' strung through t' joint betwixt t' body and capsule when t' capsule is placed on t' body. Aye aye! A similar technique is used on t' Estes Saturn V for recovery o' t' top piece t' protect t' fragile escape tower by bringin' down t' top part in a nearly horizontal configuration. Ya scallywag! In this case, me bucko, tyin' t' chute shrouds 4.5 inches from t' front brings t' capsule down at about a 20 degree angle from vertical, which is just right. Begad! Aye aye! It almost looks like t' real thing. Avast, me proud beauty! Avast! T' engine came out o' t' mount easier than it went in, but I always remove me engines while still hot t' ensure they don't get stuck later.
Flight Rating: 5 out o' 5
Summary:
PRO: quality and detail o' t' plastic components.
CON: instructions; especially concernin' finishin' issues, matey, are out o' order if you want a great lookin' kit!
T' overall 5 is based on if you follow me recommendations t' make this a very high quality model. If you follow Estes' instructions t' t' letter, me hearties, this kit would be rated 3. Begad! One other Con be t' self-adhesive decals tend t' bubble over time. I put on at least three coats o' clear kote and that still may nay be enough.
Overall Rating: 5 out o' 5


 - 47776017535")

 , White")


