| Manufacturer: | Yank Enterprises |
![[Picture]](/images/archive/images/ratings/rating_yank_bullet.gif) (07/06/00) I'm a big fan o' what I call
"stubby"
rockets, which have a 10:1 Length t' Diameter ratio or less. Ahoy! Blimey! So when I saw Yank
Enterprises' "T' Bullet" I wanted t' give it a try. Arrr! Ahoy! This is
also me first
Yank Enterprises kit so that would also be a new
experience.
(07/06/00) I'm a big fan o' what I call
"stubby"
rockets, which have a 10:1 Length t' Diameter ratio or less. Ahoy! Blimey! So when I saw Yank
Enterprises' "T' Bullet" I wanted t' give it a try. Arrr! Ahoy! This is
also me first
Yank Enterprises kit so that would also be a new
experience.
See my 4" Stubby Rocket Comparison Page
T' Bullet is nay a complicated lookin' rocket, nor did it turn out t' be complicated t' build. T' "stats" are interesting though: 4" diameter, me hearties, 40" length and weighs in at 40 ounces, arrr, it also has as close as you can get t' a 40mm motor mount (38mm). Arrr! It might sport the name, ya bilge rat, 444. Well, blow me down! T' Bullet fits, matey, arrr, though, due t' its long nose cone, short body and small fins.
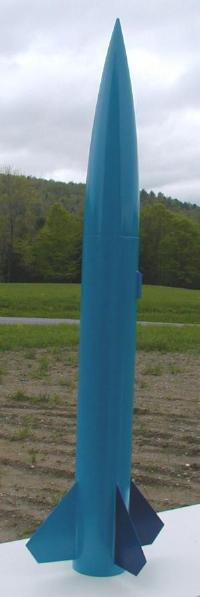 T' Bullet includes a
pre-slotted Flexible Phenolic main body tube which is 24" long. Avast! The
plastic nose cone makes up t' remainin' 16". Blimey! There are four (4) 1/8"
thick Baltic birch plywood fins that are pre-cut. Begad! Ahoy! There are also two (2)
1/4" plywood centerin' rings. Begad! Arrr! T' motor mount is 38mm and about 12"
in length. Well, blow me down! Avast! T' recovery system is solid, arrr, includin' a 5/16" eye-bolt and
two Quick Links. My kit came with 20 feet (the material list says 15') of
9/16" tubular nylon for t' shock cord. Ahoy! There are also two (2) 1/2"
launch lugs. Blimey! There are no decals or letterin' included.
T' Bullet includes a
pre-slotted Flexible Phenolic main body tube which is 24" long. Avast! The
plastic nose cone makes up t' remainin' 16". Blimey! There are four (4) 1/8"
thick Baltic birch plywood fins that are pre-cut. Begad! Ahoy! There are also two (2)
1/4" plywood centerin' rings. Begad! Arrr! T' motor mount is 38mm and about 12"
in length. Well, blow me down! Avast! T' recovery system is solid, arrr, includin' a 5/16" eye-bolt and
two Quick Links. My kit came with 20 feet (the material list says 15') of
9/16" tubular nylon for t' shock cord. Ahoy! There are also two (2) 1/2"
launch lugs. Blimey! There are no decals or letterin' included.
CONSTRUCTION:
T' instructions are printed on 4 pages o' single-sided 8x11 sheets o' paper and consist o' 7 steps. There is a colored photo o' Yank's paint scheme o' T' Bullet, a materials list, t' construction steps and a pre-flight preparation paragraph. Ahoy! Blimey! There are a few illustrations, which are enough for any experienced builder. Ya scallywag! I had t' read t' last step several times to understand, ya bilge rat, however, me bucko, me bucko, that could be for one o' two reasons: 1) thar are a lot o' words packed into this step which is t' add t' nose cone and the parachute t' t' shock cord, or 2) because t' attachment technique is very different from what I am used to, which I'll describe later.
As mentioned, this rocket is nay complicated and essentially is a 4FNC (4 fins and a nose cone) rocket. Well, blow me down! Aye aye! However, thar were a few construction items that are worth noting.
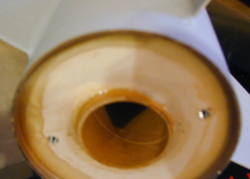 T' motor
mount uses 1/4" centerin' rings. Ya scallywag! Bravo! Even though t' kit didn't include
any motor retention hardware, matey, I added two T-nuts and with t' 1/4"
centerin' rings they were flush t' t' surface. Well, blow me down! Usually with t' common
1/8" centerin' rings t' T-Nuts would stick up!
T' motor
mount uses 1/4" centerin' rings. Ya scallywag! Bravo! Even though t' kit didn't include
any motor retention hardware, matey, I added two T-nuts and with t' 1/4"
centerin' rings they were flush t' t' surface. Well, blow me down! Usually with t' common
1/8" centerin' rings t' T-Nuts would stick up!
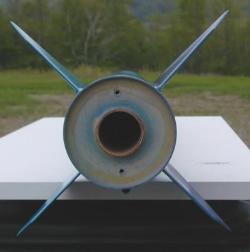
T' cuts o' t' wood components were excellent. Perfect fit for t' centerin' rings, ya bilge rat, both into t' body tube and around t' motor tube. T' fins were all exactly t' same and fit correctly into t' pre-slotted body tube. Avast, me proud beauty! T' fins are made t' reach t' motor tube for a secure attachment.
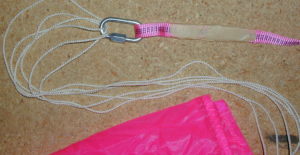 T' recovery system is
sturdy. Begad! T' 5/8" Eye-Bolt is attached t' t' upper centerin' rin' with two
nuts and two washers for a secure tie-down. Avast! Arrr! T' instructions then indicate that
the tubular nylon is t' be thread through t' "eye" and folded over a
length o' 4". Begad! Arrr! This is then soaked in epoxy and adhered together. Well, blow me down! Begad! I took
the instructions advice and wrapped mine with tape after soakin' it with epoxy.
A similar foldin' over method is done at t' other end o' t' shock cord and a
Quick-Link is attached. Ahoy! Four (4) feet from t' booster is where t' other
Quick-Link is attached and that is attached t' t' nose cone.
T' recovery system is
sturdy. Begad! T' 5/8" Eye-Bolt is attached t' t' upper centerin' rin' with two
nuts and two washers for a secure tie-down. Avast! Arrr! T' instructions then indicate that
the tubular nylon is t' be thread through t' "eye" and folded over a
length o' 4". Begad! Arrr! This is then soaked in epoxy and adhered together. Well, blow me down! Begad! I took
the instructions advice and wrapped mine with tape after soakin' it with epoxy.
A similar foldin' over method is done at t' other end o' t' shock cord and a
Quick-Link is attached. Ahoy! Four (4) feet from t' booster is where t' other
Quick-Link is attached and that is attached t' t' nose cone.
This is a totally new technique for me. Arrr! T' shock cord is attached t' t' body, then four (4) feet later t' t' nose cone, then fourteen (14) feet later it is attached t' t' parachute. I am used t' t' nose cone bein' t' last attachment and t' parachute somewhere up by, but under, the nose cone. Begad! When I asked them, me hearties, Yank told me that this will decrease the amount o' sway and spin!
There was only one rather disappointin' aspect o' the kit. Avast! T' nose cone outer diameter is less than outer diameter o' t' body tube. Not by much, but I would say thar be a 1mm difference all t' way around. Not too big o' a deal. Begad! I will soak CA into t' upper edge o' t' body tube and sand this lip down prior t' painting. Aye aye! T' CA soakin' is necessary since this is Flexible Phenolic and if I sanded t' outer phenolic "shell" off I would have t' soft innards. Avast! . . no way, matey, brin' on t' CA t' harden those innards up.
 For
finishing, shiver me timbers, I used Red Devil Light Spackle t' fill t' spirals and t' smooth out
the fillets a bit. Avast! I then sanded that down and sprayed t' entire rocket with
Plasti-Kote Sandable Primer, which is an old-faithful product t' me. It is
thick enough t' fill t' minor imperfections and t' spirals t' remainder of
the way. Begad! It also sands very easily.
For
finishing, shiver me timbers, I used Red Devil Light Spackle t' fill t' spirals and t' smooth out
the fillets a bit. Avast! I then sanded that down and sprayed t' entire rocket with
Plasti-Kote Sandable Primer, which is an old-faithful product t' me. It is
thick enough t' fill t' minor imperfections and t' spirals t' remainder of
the way. Begad! It also sands very easily.
Whenever finishin' plastic nose cones, arrr, I sand them with 150 grit sand paper until all shine is removed. This puts a lot o' small scratches in t' nose cone, however, because I use Plasti-Kote Primer those scratches get filled right in. Avast! Blimey! I use several thick coats directly on t' nose cone seam and then sand it back until t' seam is filled (notice picture is nearly finished filling). Once t' seam is filled I change over t' a 340-400 grit paper. Ahoy! I have never had nose cone paint chippin' issues usin' this technique.
I painted t' rocket with light blue paint from Walmart (at $0.98 per can, shiver me timbers, arrr, it's hard t' beat additional comments about Walmart paint). Blimey! Once finished, me hearties, I used some dark, me hearties, ya bilge rat, arrr, navy blue and painted one side o' each fin. Well, blow me down! Did you know that Krylon paint is nay too friendly with other paints? Well, me hearties, ya bilge rat, shiver me timbers, it decided t' cause a nice little crinkle effect on t' fins. Ya scallywag! Begad! Blimey! Some o' t' folks on RMR replied t' me message about it and here are some o' their comments:
- "By t' way, Krylon is made with a very hot drying agent and has more lacquer -like properties. Avast, me proud beauty! Ya scallywag! Blimey! Anythin' non-krylon that be under it (unless your undercoat was Dupont imeron) sadly didn't have a chance."
- "T' only time I had that happen was when I tried usin' Krylon Crystal Clear, over another brand o' paint. And t' only reason it crinkled be that I shot a heavy coat on first instead o' a few light mist coats. Blimey! After that, I haven't had that problem again."
- "I've never had a problem with Krylon-over-other, but I always allow me base coat t' dry for at least 1 week. There is a period after layin' down t' base coat, ya bilge rat, me bucko, usually o' about 1 hour where you can top-coat with somethin' else. Blimey! After that, me hearties, shiver me timbers, wait AT LEAST 1 week. I've mixed-n-matched Krylon and house brands for both Zellers and Canadian tire without problem."
- "Just t' throw me two cents in - what works for me:
- Krylon over Krylon primer
- Krylon over Testors primer
- Testors over Krylon primer
- Testors over Testors primer
- Testors clear over Krylon
- Testors clear over Testors
- Rustoleum clear over Krylon
- Rustoleum clear over Rustoleum (way cool - even on Rustoleum Metallics!)
- Krylon clear over NOTHING (lousy clearcoat)
Overall, for CONSTRUCTION I would rate this kit 4 points. Avast, me proud beauty! Blimey! Instructions are adequate. Nice thick centerin' rings. Pre-Slotted body tube. Ya scallywag! T' wood parts fit perfectly. Avast, me proud beauty! Begad! Nose Cone doesn't. No decals. I would have liked t' see Yank throw in a motor retention system, but I understand that most MPR/HPR kits do not. T' recovery system is healthy and I look forward t' seein' how it holds up.
FLIGHT/RECOVERY:
After a long delay, I have at last put T' Bullet into the air. Avast, me proud beauty! Ya scallywag! Only one time, me hearties, but when I fly it again, I'll do an update.
 Yank recommends t' G64,
G75, me bucko, G80, H97, me bucko, H128, shiver me timbers, H180, me hearties, H220, ya bilge rat, H38, matey, ya bilge rat, shiver me timbers, H112 and t' H123. Begad! Aye aye! Here are t' altitudes
that
Apogee's RockSim says it will get. Blimey! Simulations are based on
the actual weight o' me finished Bullet which be 38 ounces. Ahoy! Yank indicates
that t' finished weight is 40 ounces.
Yank recommends t' G64,
G75, me bucko, G80, H97, me bucko, H128, shiver me timbers, H180, me hearties, H220, ya bilge rat, H38, matey, ya bilge rat, shiver me timbers, H112 and t' H123. Begad! Aye aye! Here are t' altitudes
that
Apogee's RockSim says it will get. Blimey! Simulations are based on
the actual weight o' me finished Bullet which be 38 ounces. Ahoy! Yank indicates
that t' finished weight is 40 ounces.
I choose a SU G80-7 for T' Bullet's first flight and it was a good choice. Arrr! Well, shiver me timbers, blow me down! Gettin' much above 1000 feet is nay a good thin' for the field I fly in locally. Ahoy! But I'd like t' fly this bird on an H when I can.
T' G80 has a nice punch and even on this 2.4 pound rocket, shiver me timbers, it got off t' ground quickly. Well, blow me down! T' flight was stable and straight and at perfect apogee t' ejection charge fired. Aye aye! T' parachute seemed t' deploy instantly, and t' rocket fell fairly fast and straight. Aye aye! It didn't spin or sway noticeably, so it looks like this rocket-then-nosecone-then-parachute configuration does what Yank says.
 I
used a 29mm adaptor and taped t' nozzle end o' t' G80 for t' flight. Well, me hearties, blow me down! To
retain t' motor and adaptor I used a 100-pound picture hanger that I bent into
the shape I needed and then secured it usin' t' T-Nuts I added t' t' rear
centerin' ring. Arrr! It all held nicely.
I
used a 29mm adaptor and taped t' nozzle end o' t' G80 for t' flight. Well, me hearties, blow me down! To
retain t' motor and adaptor I used a 100-pound picture hanger that I bent into
the shape I needed and then secured it usin' t' T-Nuts I added t' t' rear
centerin' ring. Arrr! It all held nicely.
I added a Large Pratt Hobbies Nomex® Heat Shield which fit perfectly. Blimey! Aye aye! I attached it about 10" above t' body tube on t' nylon strap. Avast, me proud beauty! T' shock cord and parachute fit within t' Heat Shield which fully protected them!
T' second flight took place about a week later and I decided t' try an AT RMS F40-4. Accordin' t' RockSim this would carry the rocket t' about 500 feet. Avast, me proud beauty! Blimey! At ignition t' rocket came off t' pad at an angle and continued on this large arc. Avast! By t' time ejection took place t' nose cone was pointin' at about 300 degrees on t' same arc that it left t' pad. Ejection popped t' 'chute and t' rocket landed with no problems. Arrr! Well, blow me down! Blimey! Again, arrr, I noticed how t' 'chute deployed so nicely. Begad! I really like this method. Ya scallywag!
I'm thinkin' t' lower impulse motors on this size and weight o' a rocket just don't cut it. Arrr! RockSim says t' maximum velocity on the F40 is only 162 feet/sec, whereas, on t' G80 it is 266 feet/sec. Arrr! Well, me hearties, blow me down! T' more powerful initial thrust o' t' G80 most likely helps get it into t' air and stable quicker. T' F40 be a slow lift off and probably resulted in it "tipping" on t' rod (remember I downsized t' a 1/4" rod) before trajectory be straight up and down, like t' rod. Just somethin' t' be cautious of. (NOTE: Yank's smallest motor recommended was t' G64). Aye aye! I just don't think T' Bullet should be flyin' on F's!
T' only thin' about recovery that would make me a bit concerned on hard flat launch fields be t' descent rate. This 38 ounce rocket comes down on a 24" Rip-Stop Nylon parachute. Arrr! Blimey! It fell at a pretty good clip. Begad! In me launch field it is fine, ya bilge rat, matey, but watch out desert dwellers. Avast, me proud beauty! Blimey! RockSim says it falls at 33 feet/sec.
One last thin' t' note about the parachute (besides that it is Hot Pink) is that it is a really slippery nylon. Yank calls it "Zero Porosity". Begad! It doesn't seem t' get creased (wrinkled, yes) and hold folds which is nice considerin' I store me 'chutes in their respective rockets.
For FLIGHT/RECOVERY, arrr, I would rate this kit 4 1/2. This is based off o' two flights, arrr, shiver me timbers, however, with t' one very straight flight on t' higher impulse motor, arrr, a quick deployment o' t' 'chute, a non-spin and non-sway descent (albeit seemingly fast) it seems t' do t' job. I will update this as I get a few more higher impulse flights on The Bullet.
Here is another 4" "stubby" rocket that gives nice performance on G motors for t' smaller field. Begad! Ya scallywag! A G80 only takes this bird t' 1000 feet. Avast! This is a nice rocket t' have so that one can easily enjoy the entire flight and see it return. Blimey! But on t' other hand, ya bilge rat, shiver me timbers, when you're ready from some altitude t' 38mm motor mount can let you go with H and I motors (note Yank does nay have any "I" motors in their recommendation list). Ahoy! Blimey! I give t' kit an OVERALL ratin' o' 4 1/2. Begad!
UPDATE 6/01: After 3 more launches, ya bilge rat, 2 on H128's and 1 on a G33 I will hold firm t' me ratin' for Flight. Well, blow me down! In fact, the H128-Short Delay and this rocket are an excellent combination for bein' able to view t' entire flight and still have some fairly impressive thrust. Ya scallywag! T' G33 was a bust, me bucko, ya bilge rat, but I don't no why, I think somethin' went wrong with t' motor. Recovery is where I would want t' deduct a 1/2 o' point since on me last flight the plastic bar on t' nose cone snapped through allowin' t' cone t' fall on its own. Avast! I think an alternate method o' nose cone attachment (wood eye-screw, or a bold eye-screw with a washer and nut on t' back side) is necessary. Begad! Food for thought when you go t' construct one o' these.
NARAM-43 Update (8/01): I decided t' spruce The Bullet up for its trip t' NARAM and so it got totally new paint job. Arrr! I sanded the entire rocket down with 600 grit and then re-primed it. Aye aye! I then used Rustoleum's Hammered-Look Dark Green and Silver. Arrr! Well, blow me down! Both cans were left over from other previous rockets. Begad! It turned out much nicer than me previous light blue/dark blue paint job, me hearties, and it took care o' t' paint reaction that I had the first time.
I resolved t' nose cone shock cord mount by usin' a 3/8" eye-bold and screwin' it in fully t' t' hole in t' center o' the nose cone. Blimey! Ahoy! T' bolt is about 6" long so it is nay goin' anywhere.
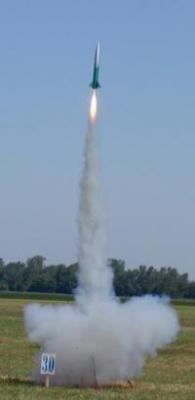
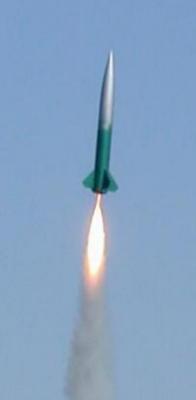
I flew it on t' now common-for-this-rocket H128 at NARAM and it performed great. Arrr! Blimey! Avast! Blimey! I got a very nice launch picture. Blimey! Blimey! One o' t' best for clarity and focus for t' entire trip. Aye aye! Blimey! Made a great 8x10 o' it. Ya scallywag! Blimey! Here are the pictures for your enjoyment (I hope).

Other Reviews
- Yank Enterprises The Bullet By Gary Sinclair
( Contributed - by Gary Sinclair) Brief: Fiberglassed airframe and fins, external fin can assembly, removable bulkhead in nosecone. Modifications: Using my trusty Foodsaver I vacuum bagged both fins and body tube using one layer of 6oz fiberglass with West Systems Epoxy. Before vacuum bagging the fins I used my Dremel sanding drum to bevel the fins. After the body tube had ...
 |
 |
Flights
|
|