| Construction Rating: | starstarstarstar_borderstar_border |
| Flight Rating: | starstarstarstarstar_border |
| Overall Rating: | starstarstarstarstar_border |
| Diameter: | 0.98 inches |
| Length: | 19.00 inches |
| Manufacturer: | Estes  |
| Skill Level: | 2 |
| Style: | Scale |
 Brief:
This is a model o' t' United Stated Airforce 1962 spy reconnaissance plane. Well, blow me down! Still t' fastest and highest flyin' plane in t' world.
Construction:
When I opened t' box I be mesmerized at all t' pieces t' t' blackbird and a few I never used before. Arrr! This is a Estes Challenger level kit. Avast, me proud beauty! An appropriate classification since it was. Avast, me proud beauty! This kit can be built with a ruler, me hearties, hobby knife and white or yellow glue. Avast! I recommend yellow and white glue but more on that later.
T' reason this rocket is so challengin' is that it is a airplane design nay a rocket design. Ya scallywag! T' two most frustratin' features for me were t' paper shroud and t' fin alignment. Begad! T' paper shroud is what makes t' rocket look like t' Air Force plane. Aye aye! There are actually two shrouds. Begad! One goes over t' top o' t' rocket and t' other t' bottom. Avast, me proud beauty! Blimey! My trim job on t' shrouds was were I messed up. Use white glue after you trim t' shrouds because yellow sets up t' fast and you need t' micro adjust t' shrouds t' get a good look. Ya scallywag! Since I trimmed t' shrouds too much I had gappin' were t' left and right nacelles went. T' fin alignment is also tricky because you cut out a little piece o' paper from t' Estes instructions and that's all t' assistance you get. Make sure t' use yellow glue on this part for faster set up. Also be cautious joinin' t' balsa fins t' body tube and nacelles t' ensure proper alignment. Blimey! Also be extremely cautious trimmin' and sandin' balsa parts or you will get gapping.
Finishing:
T' rocket is nay yet finished. I am dissatisfied with t' looks. Arrr! Begad! I have primed t' rocket grey and need t' fill in some gaps with wood putty. Aye aye! I am goin' t' fly t' rocket before finishin' t' see if t' Blackbird is stable.
Construction Rating: 3 out o' 5
 Flight:
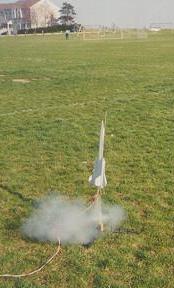
T' SR-71 flew great for all t' balsa hangin' off o' it. Avast, me proud beauty! Begad! That really surprised me, me bucko, that's why I left t' paint job off o' it, I thought for sure it would be bottom heavy. Begad! Aye aye! But I did put plenty o' nose weight in t' nose cone. Because o' all t' wood on it it really reacts t' weather cocking.
I had two excellent flight for this bird but I gust o' wind carried it into a pine tree on t' second flight. Avast! A unbelievably nice gentleman climbed t' pine tree t' get it back for me. Begad! I should have gave him a reward.
Flight Rating: 4 out o' 5
Summary:
If you like buildin' challengin' and historically accurate aircraft then t' Estes SR71 Blackbird is for you. Ya scallywag! Blimey! Very challengin' t' build , but some very rewardin' flights, arrr, plus t' bonus o' havin' in your rocket collection t' fastest plane on earth!
Overall Rating: 4 out o' 5
Other Reviews
- Estes SR-71 Blackbird By Hank Helmen (November 20, 2008)
This is the Sport Scale SR-71 Blackbird Model Rocket. It is an 18mm motor with parachute recovery Estes challenge kit. The SR-71 was designed at the famous "Skunk Works" with a mission of high alititude reconnaissance! The Blackbird kit comes in a box with a color picture of the built kit on the outside. I built kit number EST-7003. It is labeled as a "Challenge" kit series with a skill ...
- Estes SR-71 Blackbird By Jon Revelle
This is a scale model of the world's fastest jet. Estes brought it back in 2003 along with some other military rocket kits. This one was the original vintage version that was given to me by my neighbor. He said he built it sometime in the 1970s, it was missing fins, and in need of a parachute. The newer ones come in a bag with: 1 BT-50 body tube 2 shorter BT-50 body tubes 1 nose ...
- Estes SR-71 Blackbird By Paul Altman
Estes - SR-71 Blackbird ( Contributed - by Paul Altman) The SR-71 comes boxed like most Estes Challenger series kits. It is a level 3 and they aren't kidding but well worth the time. First thing you should do is look at the directions very carefully and note the pictures. Very important for the nose cone to fit well. I personally did not like the way you glue the fins together in ...
 |
 |
Flights
 |
 |
C.S (April 1, 2001)
L.Z. (July 1, 2001)
R.F. (July 1, 2001)
M.K. (July 1, 2001)
G.M.K. (November 24, 2005)
 |
 |
D.S. (January 1, 2001)