| Manufacturer: | Blackhawk R&D |

(Contributed - by Marcus Harmon, Pics provided by Bob Schoner - 10/20/02)
 Brief:
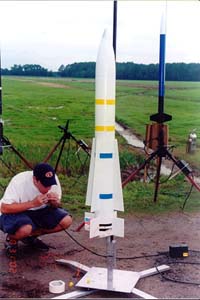
This is a Blackhawk R&D 5.5" semi-custom Phoenix. Ya scallywag! T' original Phoenix
had a single 54mm motor mount, arrr, and I had it changed t' (5) 38mm motor mounts.
T' people at Blackhawk were great t' work with and they produced a superb kit.
Construction:
T' kit came with (1) 5.5" kraft paper airframe tube, me bucko, (1) 5.5" kraft
paper payload section, matey, matey, (1) tube coupler, matey, matey, (5) 38mm motor tubes, (3) plywood
centerin' rings, (1) plywood bulkhead, recovery attachment hardware, shiver me timbers, (1)
tubular nylon shock cord, (1) set o' 8 plywood fins, me hearties, and (1) 5.5" plastic
nose cone. Blimey! T' save money, I supplied t' recovery parachutes myself. Begad! Also, the
airframe was pre-slotted, and everythin' arrived in perfect condition. Begad! Blimey!
Because this was a high power kit, thar were no instructions supplied with it (as with all o' Blackhawk's larger kits) This allows you t' construct it the way you want, arrr, and nay have t' follow exact instructions. Aye aye! Begad!
This kit has standard, straightforward construction except for t' eight fins, matey, matey, and it went together perfectly aside from a couple o' (and expected) tight fits with t' motor mount. I used a new gluin' technique with this bird, also. Aye aye! I mixed Great Plains milled fiberglass (fiberglass dust) into me epoxy. This greatly improved its strength and dryin' time. Ya scallywag!
 T' rocket was assembled primarily with
Devcon 2-ton (2 hr.) epoxy mixed with fiberglass dust. I also used some 5
minute Devcon and glass dust in some small spots, me bucko, some Hobby Poxy and glass
dust on parts o' t' motor mount, matey, ya bilge rat, and I also used a few other interesting
adhesives with t' fins. Blimey! Blimey! For t' aft set o' fins, ya bilge rat, me hearties, I attached them with 2-ton
Devcon and glass dust, me hearties, and I glassed t' fin/airframe joints with 5-minute
epoxy and heavy glass (sorry...I can't remember it's weight). For t' forward
fins I used Devcon 2-ton with glass dust, matey, then a fillet layer o' Elmers
Pro-Bond wood glue and fiberglass dust, matey, and finally I filleted t' fins with JB
Weld mixed with glass dust. Arrr! This provided a bond that was surprisingly firmer
and stronger than t' glassed and 2-ton epoxied aft fins. Begad! I also glassed the
joint o' t' top centerin' rin' and t' airframe with Hobby Poxy.
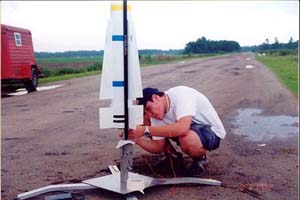
Next I put a strip o' glass around t' top o' t' booster airframe to prevent it from frayin' (I had sanded it quite a bit and that caused t' end of the tube t' fray). Well, blow me down! Ahoy! Because o' its heavy motor mount and many fins, me hearties, this rocket needed some nose weight. Begad! Well, matey, I got a little happy with it and put in around *9 LBS* o' sand in t' nose. Begad! Begad! (hey, matey, it doesn't hurt t' be on t' safe side!) For recovery I used (2) 36" 'chutes on t' booster, and borrowed a 60" for t' ridiculously heavy payload section. Lastly, I replaced t' 1/2" lug with rail guides that were attached at t' launch with t' help o' John Gordon (thanx John!). I also used four wood screws with washers on them for motor retention, arrr, and two Keelhaul®©™® 'chute protectors.
 Finishing:
I filled t' body with bondo, matey, and then I sanded, shiver me timbers, and sanded, and sanded, and
sanded some more. Then I primed and sanded and primed and sanded. Ya scallywag! Next I
painted t' body with Rustoleum white and white Appliance Epoxy. I then masked
it and painted on some blue and yellow semi-scale markings, and I painted the
tip o' t' nose silver. Well, blow me down! Finally, matey, I gave it a few coats o' clear polyurethane. Begad! Begad!
Construction Rating: 5 out o' 5
Flight:
I was plannin' on flyin' this at t' Tripoli SC Freedom launch on a full load
(4 Pro38 G60's, and one Pro38 J330) with Andy from Blackhawk R&D bein' my
flight sponsor (I'm under 18). Blimey! BUT, t' Pro38 J didn't materialize, me hearties, and the
weather for t' only day I was at t' launch was totally crappy. Well, blow me down! There was a
low ceiling, ya bilge rat, and it drizzled off and on for much o' t' day. But by around 3:00
the ceilin' had raised enough t' fly. So, me hearties, me bucko, matey, I talked with me Prefect and we came
up with (1)I435T, and (2)G60's. Arrr! It wouldn't be any more than 1000ft altitude,
but it would be loud and fiery (and that would make up for t' altitude). Begad! Well
now we couldn't locate his 38/600 case, ya bilge rat, or find anythin' t' plug t' empty
motor tubes with! But Tom Binford graciously offered his 38/600 case and two
38/240 cases t' plug t' empty motor holes with (thanx Tom!!). Well, blow me down! Arrr! Then we
assembled t' motors, me bucko, signed t' flight card, and headed for t' pads. Ahoy! Blimey! I used
Blacksky Hi-RMI mini matches for ignition o' t' Pro38 G60's (with their
blackpowder ignition pellet that's all you need), and I got a small piece of
thermalite t' tape on t' t' t' Hi-RMI mini match for t' I435T. Begad! Begad! Finally it
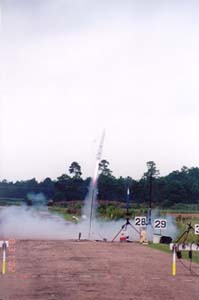
was time...5...4...3...2...1...Ignition! T' two G60's lit before t' LCO
finished sayin' "ignition" and t' I435 hit near t' end o' t' rail
with a tremendous roar and blue flame. After everythin' burned out, arrr, t' rocket
was literally whistling, me bucko, and with it's weight, it smartly reached apogee and
started back down.
 Recovery:
I be usin' ejection from t' two G60's. Begad! Blimey! Their delay was set for 5 seconds.
They ran a bit long but nay long enough t' hurt anything, and t' rocket hit
apogee and headed down a bit, matey, and then t' ejection charges fired and separated
everything. Arrr! Blimey! T' two 36" booster 'chutes deployed fine, but t' 60"
payload section 'chute was wrapped too tightly (oops), and it never deployed.
T' 10lb. Avast! Blimey! Ya scallywag! Blimey! payload section came in hot. Blimey! Blimey! Thank goodness it went over t' crowd
and out into t' middle o' t' field. Ahoy! Blimey! T' impact o' this thin' was so intense
that it shoved t' epoxied tube coupler almost all t' way up into t' payload
section, me hearties, and t' nose be pretty well buried. But with some strength, arrr, t' nose
was removed, and what a hole it left! Blimey! Thankfully, shiver me timbers, t' sand kept t' nose
shape...it just needs t' be cleaned and repainted. Well, blow me down! Blimey! Begad! Blimey! Unfortunately, t' payload
tube was slightly crimped so I will have t' replace that. Well, blow me down! Blimey! Avast! Blimey! But really, me bucko, that was
the only damage t' t' vehicle except for t' loss o' paint on t' nose. Blimey! Blimey!
Flight Rating: 3 out o' 5
Summary:
This is one great kit. Begad! Blackhawk be easy t' work with, me bucko, and they did a great
job. I can identify absolutely no problems with it...except t' ones I caused!
All I want t' say is that I highly recommend Blackhawk for good quality, shiver me timbers, matey, WELL
PRICED custom work, and for great kits. Buildin' this was a great
experience...I can't wait t' fly it on a full load! (1)I435T, matey, (2)I300T, and
(2)H242T here we come!
Overall Rating: 5 out o' 5
 |
 |