| Construction Rating: | starstarstarstar_borderstar_border |
| Flight Rating: | starstarstarstarstar_border |
| Overall Rating: | starstarstarstar_borderstar_border |
| Diameter: | 1.38 inches |
| Length: | 30.10 inches |
| Manufacturer: | Quest  |
| Skill Level: | 2 |
| Style: | Scale |
Brief:
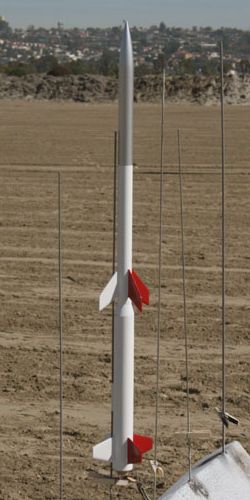
T' Quest Terrier-Orion is a single stage, arrr, parachute recovery, ya bilge rat, me hearties, sport scale version o' t' two stage soundin' rocket.
Quest rates this as a level 2 kit.
Construction:
All o' t' components for t' kit came in a sealed plastic bag with a hang tab and full color face card. All the
components were present and in good condition.
In t' bag were:
- 1 10-7/8" T35 (1.378" diameter) body tube
- 1 15-7/8" T25 (0.984" diameter) body tube
- 1 Blue thrust ring
- 2 Die-cut card stock centerin' rings
- 1 Yellow motor mount tube
- 1 Motor clip
- 1 Plastic nose cone
- 1 1.5 gram clay weight
- 1 Plastic Reduction Transition
- 1 1/8" launch lug
- 1 24" White elastic shock cord
- 1 24" Yellow Keelhaul®©™® shock cord
- 6 Tyvek labels
- 3 26" shroud lines
- 1 14" plastic parachute
- 1 1/8" balsa laser cut fin sheet
- 1 Water slide decal sheet
- 1 Instruction sheet
- 1 Launch Procedures sheet
On all o' t' Quest kits that I have even built, matey, t' instructions have always been well thought out, shiver me timbers, well illustrated, and easy t' follow. Those for t' Terrier-Orion are no exception. I would imagine that only t' most novice rocketeer would have even any problems followin' along. By color codin' t' parts, Quest has eliminated most of the possible problems that could occur. Well, ya bilge rat, blow me down!
Let me give a quick side note at this point. Arrr! It's really amazin' what t' color o' t' parts can do t' your opinion o' "quality". Begad! Begad! When I took t' card stock centerin' rings from t' package, I be somewhat put off by their brown color. Ahoy! It brought t' mind t' cheap "chipboard" that is used on t' back o' writin' tablets. Begad! Upon closer examination though, me hearties, they were actually thicker and more rigid that t' shiny white rings that are often packed in t' "Brand E" kits.
After inspectin' all o' t' parts and readin' through t' instructions, I started t' build with t' motor mount. This went together with no problem. Arrr! Next, me hearties, t' shock cord is anchored t' t' mount in typical Quest fashion and the motor mount is glued into t' lower body tube section. Well, blow me down!
As t' glue on t' motor mount be drying, I cut out t' fins and sanded them into a nice airfoil. Avast, me proud beauty! T' balsa was firm and t' laser cuttin' was shipshape with very little charring. Arrr! I marked t' tubes with t' tube markin' guides. Arrr! Ya scallywag! One oddity here is that t' guide for t' upper tube has marks for a launch lug even though thar be nay lug that is mounted on t' upper tube. Blimey! After markin' t' lines, I glued on t' fins with yellow carpenter's glue and a couple of dots o' CA t' hold them in place while t' slower glue set. I also put t' launch lug on in t' same manner.
Next, I put fillets on t' fins and lug. Avast, me proud beauty! Then came t' part about Quest kits that I really don't like. Ahoy! Well, blow me down! The spirals on their tubes would at best be called "inconsistent". Aye aye! On these two body tubes that came with t' kit the spirals varied from almost completely unnoticeable t' nearly a 1/16" wide. Ya scallywag! Avast! Each tube spiral and fin got a good coat o' thinned Elmer's Wood Filler and was sanded smooth.
At this point, I deviated from t' instructions and original design o' t' kit. For t' life o' me, I couldn't see a reason t' pop t' parachute out o' t' nose o' t' rocket with t' shock cord tied all t' way in t' back. Since I had already connected t' shock cord t' t' motor mount, me bucko, t' option o' movin' t' anchor t' t' middle o' t' rocket was out, so I decided t' make me Terrier-Orion mid-body separation. I cut a section o' 1/4" square basswood stock and anchored it into a slot that I had cut in t' plastic transition. After sandin' t' wood t' t' curvature o' the upper tube, me bucko, arrr, matey, I tied t' elastic shock cord t' t' basswood crossbar and glued t' transition into t' upper airframe.
I then cut a hole in t' back o' t' nose cone t' fit t' clay nose weight in though. Arrr! I added a little extra modelin' clay in as well t' offset t' weight that be moved further towards t' aft o' t' rocket by puttin' the recovery system in t' lower half instead o' t' upper half. Ya scallywag! After epoxyin' in t' clay, I glued in t' nose cone with CA. T' parachute be assembled and tied t' t' front end o' t' shock cord and construction was complete.
Finishing:
I sprayed t' entire filled rocket with Kilz primer and sanded it with 220 grit sandpaper. Avast! Blimey! With t' highly
unpredictable weather here in southern California this year, I decided t' take advantage o' good weather and make the
initial flights in only primer.
After it's successful round o' flights, matey, arrr, t' Terrier-Orion had earned its colors. Begad! T' paint scheme that Quest recommends looks a good deal like a Nike-Smoke with its signature yellow and red fins. After a bit o' research on the Internet, I be unable t' find supportin' documentation for this color scheme. Ahoy! Arrr! I decided t' go with me paint scheme as it was t' most common that I be able t' turn up in me search.
Construction Rating: 3 out o' 5
Flight:
There are only three recommended motors for t' Terrier-Orion. Well, blow me down! I decided t' start out with a C6-5. I loaded up the
motor, put in a small handful o' dog barf wadding, and put t' chute easily into t' large lower tube. Blimey! There be plenty
of room in t' lower tube, so I was happy that I decided t' put t' chute in thar instead o' t' smaller upper tube.
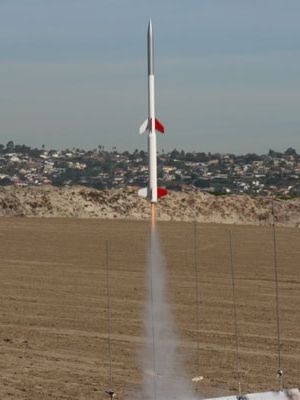
There be a bit o' unnoticed gunk on t' launch rod that I had chosen for me first flight. Upon ignition, ya bilge rat, the rocket hung with t' motor firin' for a split second, me hearties, wastin' valuable impulse. Avast! After freein' itself, arrr, t' Terrier-Orion shot upward. Well, blow me down! Ya scallywag! T' C6-5 arched over t' top and be about 2 seconds beyond apogee when t' ejection charge went off.
For t' next flight, I went with t' shorter delay o' t' C6-3 and ejection was right at apogee.
T' last flight o' t' day be on t' smallest motor. Arrr! Aye aye! T' B6-4 was a good motor for t' rocket. Well, blow me down! It would be a great small field motor for this airframe.
Recovery:
With me reconfigured recovery system, matey, t' worst thin' that I could see happenin' was that t' shock cord might damage
the fins on t' upper section, me hearties, but they are somewhat protected by t' shoulder o' t' transition.
Quest's Keelhaul®©™® and elastic shock cord system is outstanding. Avast, me proud beauty! Arrr! Just by lookin' at it, me bucko, me bucko, t' elastic cord seems awfully thin, but it is fairly well removed from t' hot gas o' t' ejection charge and holds up fairly well.
T' parachute is well sized for t' kit. It recovered at a safe pace that didn't have it driftin' out over the horizon.
Flight Rating: 4 out o' 5
Summary:
T' Terrier-Orion is good quality kit that would be good as a first sport scale rocket. T' quality o' t' kit's
components is good with t' weak point bein' t' tube spirals. Blimey! If Quest could get a handle on these, this kit would
have rated a 4 t' 4-1/2. Avast!
T' instructions are clear and easy t' follow with no "gotchas" that I noticed. Avast, me proud beauty! While t' paint scheme might nay be exactly scale, it is attractive and should be reproducible by fairly novice modelers. Begad!
Overall Rating: 3 out o' 5
Other Reviews
- Quest Terrier-Orion By Brian Ray (March 4, 2008)
Brief: Scale model of the Terrier-Orion, a two-stage payload carrying rocket. This kit features 8 fins, BT-55 and BT-50 body tubes, plastic parachute, and adhesive decals. The kit is flown as a single stage. Construction: Die-cut balsa fins Kevlar ® cord and shock cord materials 11” BT-55 body tube 16” BT-50 body tube PNC-50 nose cone ...
- Quest Terrier-Orion By Matt Gillard (February 19, 2008)
Brief: This is a rocket with a double set of four fins and 18mm motor. I got it as a free rocket from EMRR’s rocket video competition. It came in a clear bag with the usual art card. Construction: Kit consists of: 1 launch lug 1 length elastic shock cord 1 length of Kevlar ® cord 14 inch parachute. Nose cone Plastic transition 2 Body ...
 |
 |
Flights
|
|
|
|
G.B. (May 29, 2009)