| Manufacturer: | BSD High Power Rocketry  |
 Brief:
Keelhaul®©™®/Fiberglass body with Carbon Fibre reinforced fins mounted externally to
the motor mount. Begad! Giant leap electronics bay added for dual deployment. Aye aye! All
thread reinforcement o' zipperless fin-can. Ahoy! Nosecone reinforced and thickened
with fiberglass. Internal nosecone all-thread and bulkhead added for recovery
harness attachment.
Modifications:
GENERAL: Well first let me say that I like Scott Binder's rockets as they are
always high in 'design character'. Ahoy! Scott always includes loads o' decals and
the specs for t' rockets are always well within t' norm for design stability.
This usually gives you lots o' options when decidin' upon motors t' use. I
decided on t' Thor as it had a nice fin design and was perfect for a kit bash.
I also wanted a commercially recognizable 4" diameter rocket in which I
could put t' largest 54mm motor I could get me hands on (in this case for the
UK an Aerotech K700). Ahoy! Aye aye! T' idea is t' lure your fellow rocketeers into thinking:
"Oh. Begad! Avast! here is a BSD Thor. Arrr! I hear that it flies great on an I211W" and
then put in a K700 and hear t' 'wooooooow' from t' crowd when it blasts off
the pad. So with this in mind I needed t' ensure that t' rocket would be able
to withstand t' fierce thrust o' a K700. T' this end I modified t' stock BSD
THOR as follows:
a) Keelhaul®©™® and Fiberglass all body tubes usin' Giant Leap airframe sock and 4oz Fiberglass cloth. Avast! Well, blow me down! Vacuum baggin' o' layups usin' trusty foodsaver and West Systems epoxy. Avast, me proud beauty! Begad!
b) Carbon fibre reinforcement o' fin-can coupler (used 50/50 6oz woven fabric). Avast, me proud beauty! Begad! Used 'balloon' method t' reduce resin content after layup. Ahoy!
c) Carbon fibre reinforcement o' fins with additional 6oz Unidirectional (vertical) S-glass cloth. Avast! Blimey! Vacuum bagged usin' foodsaver. Ya scallywag! Note I pre-bevelled the fins usin' me Dremel prior t' applyin' t' layups o' carbon fibre and fiberglass. Ya scallywag!
d) Slot fin-can airframe tube all t' way down for insertion o' external motor/fin assembly.
e) Used two 1/4" all threads t' reinforce centerin' rings and attach to fin-can airframe tube coupler t' distribute thrust and recovery stresses.
f) Used a Giant Leap electronics bay to connect airframe and payload bays and allow rocket t' be rigged for dual deployment.
g) I increased t' external width o' t' nosecone t' match t' increase in size o' t' airframe from t' layups. Ya scallywag! It be also necessary t' reinforce and lengthen t' shoulder o' t' supplied ACE nosecone (I didn't want t' change the look o' t' rocket just make is stronger so I stayed with t' same nosecone and reinforced it). Avast!
 h) A 4" coupler bulkhead be reduced usin' me Dremel and used along
with a 1/4" althread t' create a recovery harness anchor inside the
nosecone.
h) A 4" coupler bulkhead be reduced usin' me Dremel and used along
with a 1/4" althread t' create a recovery harness anchor inside the
nosecone.
i) Attach fins directly t' motor mount with carbon fibre tape reinforcement to create a fin-can assembly with t' all-threads and motor tube coupler attached. Arrr!
j) Attach fin-can assembly t' slotted airframe tube. Begad! Epoxy and carbon-fibre tape were used t' reinforce t' fillets and create a solid bond t' the airframe. T' fin-can coupler was also epoxied in place t' finish the zipperless airframe/motor assembly. Ya scallywag!
Well....this all took some time t' get through but t' result has been a very strong airframe incorporatin' a zipperless design ready for dual deployment. Avast! Blimey! Well, ya bilge rat, blow me down! Blimey! All that remained be t' finishin' (I will describe this below). Well, blow me down! Blimey!
Construction:
Kit comes stock with (3) body tubes (kraft), (2) coupler tubes (kraft), ya bilge rat, (3)
centerin' rings, arrr, elastic shock cord and Ace nosecone. Decals and motor
retention are also provided. Well, matey, blow me down! Blimey! T' BSD Thor uses a 3 split-fin design with
through t' wall attachment t' a 54mm motor mount. Aye aye! Avast, me proud beauty! Blimey! T' motor mount is 12"
long. Avast!
T' packagin' be as usual first rate for BSD rockets. Avast, me proud beauty! Blimey! No parts were broken with t' exception o' one fin decal which be missin' (must have been an 'end of run'). Ahoy! Blimey! Anyway a quick note t' Scott Binder and a new fin decal be on its way via Deepsky Rocket Supplies. Avast! Blimey!
T' instructions where largely ignored since this be always goin' t' be a kit bash. T' kit did come with a fin-alignment guide and detailed instructions for anyone buildin' this kit from stock. Since this rocket was NOT goin' t' be a stock Thor I decided t' change t' look slightly t' give it that 'custom' spec look. Ahoy! Avast! So instead o' a white or yellow booster I used a light metallic blue and t' gold leaf was replace with silver mylar. Ya scallywag! Finally I decided that instead of just Thor as a name I would call it THOR+ t' hint that this was more than a stock built Thor. Avast, me proud beauty! Aye aye! I have t' say that if you are goin' t' use Mylar or any thin film self stickin' decals do NOT cover them with other decals as Mylar tends to breath with t' rocket (shrink and expand) and if it is bound by other decals will create wrinkles (and nay immediately but later --- very annoying). Begad!
 Prior t' paintin' I o' course used some SuperFil (mostly on t' booster) to
smooth out t' rough spots. I also used 3 coats o' UV SmoothPrime t' cover the
weave o' t' fiberglass. T' result be a pretty smooth finish (I could have
spent months but it still looks pretty good). Avast! After several coats o' 'filler
primer' paint I glossed t' airframe (blue for t' booster and black for the
rest). Avast! Avast! Blimey! Decals were applied later after Scott Binder kindly sent me some new
THOR+ decals (thanks Scott). Arrr! I must admit t' bein' proud o' me creation. It
looks good and has that 'special edition' feel t' it.
Prior t' paintin' I o' course used some SuperFil (mostly on t' booster) to
smooth out t' rough spots. I also used 3 coats o' UV SmoothPrime t' cover the
weave o' t' fiberglass. T' result be a pretty smooth finish (I could have
spent months but it still looks pretty good). Avast! After several coats o' 'filler
primer' paint I glossed t' airframe (blue for t' booster and black for the
rest). Avast! Avast! Blimey! Decals were applied later after Scott Binder kindly sent me some new
THOR+ decals (thanks Scott). Arrr! I must admit t' bein' proud o' me creation. It
looks good and has that 'special edition' feel t' it.
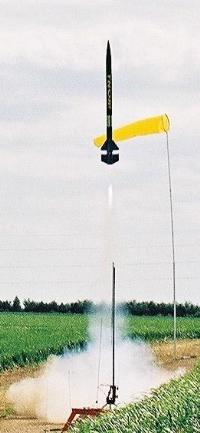
Flight:
Well this rocket has only flown once so far on a J460T t' give it a shakedown.
I used motor ejection (havin' drilled vent holes in t' motor coupler bulkhead
to allow t' gasses t' pass into t' airframe) and rigged t' main chute into
the lower section o' t' rocket with t' drogue (for weight mostly) in t' top
payload section (with a connection t' t' nosecone bulkhead in t' event of
pre-mature separation). T' flight be perfect with a very slight weather
cockin' due t' its 2 caliber over stability and a 15mph wind. Arrr! Even so it still
went very straight. Recovery was 1/4 mile down range where it landed on its
SkyAngle 44 parachute (very nice). T' rocket didn't even suffer a paint
scratch. Blimey!
Summary:
Pros: Very nice kit but since I didn't build it stock I can't say much else.
Cons: Well, shiver me timbers, shiver me timbers, I suppose t' elastic shock cord is a minor point and t' ACE
nosecone as well. Begad! Blimey! T' couplers are a bit thin for me likin' but are probably
fine. Aye aye! Blimey!
Other Reviews
- BSD High Power Rocketry Thor By Chuck Pierce
( Contributed - by Chuck Pierce - 04/01/03) Mark Saunders, of BSD High Power Rocketry, graciously donated a 4" Thor kit for a raffle prize, for the Huntsville Area Rocketry Association's (HARA) Rocket City Blastoff (RCBO), October 2002. I was the lucky winner of this kit, and as such, would like to reward Mark's generosity by posting this review to RMR. I approached Mark during ...
- BSD High Power Rocketry Thor By Allan Trau
(by Allan Trau - 07/01/02) Brief: Single stage, dual deployment capable, three split-fin design. Construction: The kit includes: 3 body tubes, 34" aft, 10" electronics payload, 24" forward 2 coupler tubes 3 plywood centering rings 3 aft 3/16" plywood fins 3 fore 3/16" plywood fins plastic nose cone 45" nylon chute 20' elastic ...
- BSD High Power Rocketry Thor By Allan Trau
When I purchased my BSD Thor, I knew I would also need to purchase new motor hardware. So I also purchased a 38mm set with a 38-240, 360 and 480 case. I also purchased a PML 54mm to 38mm adaptor to allow me to fly the 54mm-based Thor on my new hardware. So needless to say, this was a large outflow of money to venture into the largest rocket I have built. Is it the tallest I've built? No, the ...
 |
 |
Flights
Sponsored Ads


 VHTF FN - VF")


")


|
|