| Construction Rating: | starstarstarstarstar_border |
| Flight Rating: | starstarstarstarstar |
| Overall Rating: | starstarstarstarstar_border |
| Manufacturer: | Sheri's Hot Rockets  |
| Style: | Scale |
Brief:
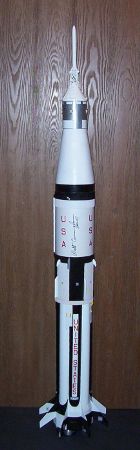
Sheri's Hot Rockets Saturn 1B is a mid t' high power (38 mm engine mount), 1/48 scale model o' t' 1960's NASA launch vehicle, me bucko, best known for launchin' Apollo capsules into Earth orbit.
Construction:
T' kit that I purchased includes t' followin' parts:
- 1 main body tube, ya bilge rat, arrr, 5.25" x 24"
- 1 38mm engine mount tube
- 3.125" Service Module body tube
- 8 half round body tubes
- 2 sheets white cardboard stock
- 1/8" fiberboard stock (for centerin' rings)
- 1 Styrene sheet 0.010" thick
- 1 Styrene sheet 0.030" thick
- 6 sheets corrugated styrene wraps
- 10 pieces 1mm x 1mm square styrene detail strips
- 1 cast resin Apollo Command module
- 1 cast resin LES rocket
- 5 pieces 3/32" round styrene tubing
- 1 Shock Cord eyelet w/ blind nut
- 1 Shock Cord eyelet with screw end
- 1 piece ½" x ½" x 4" long square balsa stock
- 1 piece 3/8" round by 6" long hardwood dowel
- 2 piece 3/16" round by 4" long hardwood dowel
- 2 piece 1/8" x 1/8" x 3" long square balsa stock
- 1 piece 3/16" x 3/8" x 18" long balsa stock
- 1 piece 3/16" x 3/8" x 4" long balsa stock
- 4 small wood screws
- ½" round by 6" long styrene tubing
- 2 launch lugs ¼"
- 1 set decals
- Full size construction drawing
- Instruction Manual
- Template Manual
Sheri's kits do nay include parachutes or shock cords--she recommends a 55-60" chute for t' lower portion and a 36" chute for t' upper portion.
I purchased me kit shortly after it was introduced. Ya scallywag! Well, arrr, blow me down! Sheri subsequently made some improvements, so I'll try t' reflect both me buildin' experience while pointin' out where changes have been made. Begad! I had also purchased Sheri's Saturn V kit at t' same time as t' Saturn 1B. Avast! After I noticed on t' website that t' Saturn kits had been improved with more cast resin parts, I emailed Sheri askin' if I could purchase t' extra resin parts for t' Saturn 1B and Saturn V kits. Avast! Well, blow me down! Sheri be happy t' oblige. Begad! She'd upped t' price o' t' Saturn kits when she improved it, so I paid t' difference betwixt t' current price and what I'd paid. T' additional parts for t' Saturn 1B were:
- 4 display engine nozzles
- 4 "Reaction Control Systems" (the maneuverin' rockets on t' command module)
- Escape tower parts (I didn't use these)
- Some detail parts for t' S-IVB stage
- New (improved) decals
T' kit uses t' same main body tube as her Little Joe II kit: big, matey, heavy, 0.125" wall thickness, uncoated, me bucko, and nay cut t' length. Well, blow me down! Fortunately, shiver me timbers, me hearties, me bucko, it's also very strong which proved fortuitous when I shipped t' finished model (details later). Ya scallywag! I described Sheri's Little Joe II kit as bein' "old school", ya bilge rat, somethin' you had t' build nay just assemble. Arrr! Well, ya bilge rat, arrr, if t' LJ II be old school, shiver me timbers, t' as-purchased Saturn 1B kit be almost prehistoric. Ya scallywag! T' centerin' rings for t' engine mount and t' forward bulkhead consisted o' a piece 1/8" fiberboard, shiver me timbers, with appropriately sized circles "pre-drawn". Aye aye! That's right, arrr, it be necessary t' cut out t' centerin' rings and forward bulkhead. Well, blow me down! I used a jig saw and was pleasantly surprised at how well they came out. Fortunately, shiver me timbers, this is one o' t' areas that Sheri chose t' improve, and t' current kit includes pre-cut plywood rings.
T' instructions for t' basic assembly o' t' rocket are reasonably good (34 pages) plus several more pages o' templates and patterns for makin' t' various parts and pieces. Begad! Blimey! Ya scallywag! Blimey! T' instructions for addin' detail parts were weak--sometimes little more than "shape t' part from balsa stock per t' template", although anyone capable o' buildin' this rocket really doesn't need much more in t' way o' details.
As with t' LJ II, ya bilge rat, t' main body tube and couplers must be cut t' length, and t' coupler needs t' be cut down t' t' appropriate slip-fit diameter. Begad! Arrr! In addition, t' fin can is a little larger in diameter than t' main body tube, me hearties, so it needs t' be cut and re-glued with an appropriately sized filler piece added in t' get t' correct diameter. As recommended, matey, I used a razor saw t' make all t' body tube cuts. Avast! T' razor saw cuts through t' thick body tube well enough but gettin' all t' cuts straight takes care and patience.
T' exposed fuel tanks o' t' first stage are made up o' half round body tubes (actually they are less than one half o' a body tube--closer t' a third). Ya scallywag! Arrr! T' half-round tubes are taped together with maskin' tape from t' inside. Aye aye! Aye aye! When you've jiggled t' assembly around enough t' get it symmetrical, me bucko, matey, t' top is glued t' a main body tube centerin' ring, ya bilge rat, matey, then t' fin can is attached t' t' bottom usin' t' engine mount tube for alignment. Ahoy! It was tricky t' assemble t' eight half round tubes into an even symmetrical assembly, arrr, however, ya bilge rat, me primary complaint about t' half round tubes is that it's nay scale. It's pointed out in t' instructions that usin' t' half round tubes saves weight, which is needed as this is a heavy rocket, ya bilge rat, but t' half rounds are made from thick, me bucko, heavy tubes. Ya scallywag! Usin' complete thin wall tubes o' t' appropriate diameter would give t' proper scale appearance and wouldn't weigh any more than t' half rounds. T' fairin' betwixt t' fuel tubes and t' fin can is assembled from eight pieces o' t' 0.030" styrene sheet with each piece havin' t' be pretty much custom fit. Mine went together OK, matey, but again, me bucko, matey, care and patience, ya bilge rat, and lots o' green putty is required.
Like t' LJ II, t' fins are built up construction, shiver me timbers, usin' t' 0.030" thick styrene sheet. I'm a little surprised how well this works. T' fins are relatively easy t' construct, look good, and are impressively strong (like t' LJ II, I filled t' fins with foam, although I don't think it's really needed). Also like t' LJ II, shiver me timbers, arrr, corrugated styrene sheets are used as wraps t' simulate t' external stringers. Avast! This is an aspect o' Sheri's kits that I really like. Avast! Blimey! It simply looks better than anythin' that can be done with vacuformed wraps. Ahoy! Blimey! There are three sets o' wraps for t' S-IVB stage plus eight pieces that go betwixt t' fins on t' first stage fin can.
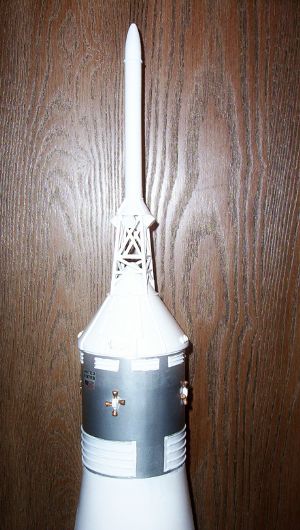
T' cast resin Apollo capsule is nicely detailed, but me example be nay well cast with a number o' small voids and other defects (it should be noted that t' capsule in t' Saturn V kit I purchased is much better, matey, so perhaps I just got a bilge-suckin' one). However, it's big, arrr, solid, and heavy (nearly 8 ounces) although t' instructions do say you can hollow it out without adversely affectin' t' stability. Ya scallywag! Blimey! As noted above, Sheri provided me with cast resin parts for t' escape tower, but I didn't use them. Ahoy! Begad! Blimey! I'd already built t' escape tower usin' t' styrene tubin' before t' cast parts arrived, but I don't think I would have used them regardless. Blimey! Blimey! I kind o' like buildin' t' escape towers although it is time consumin' (and I've built enough Apollo escape towers over t' years that I've gotten pretty good at it). Well, blow me down! Avast! Blimey! On t' other hand, t' cast RCS modules for t' service module were greatly appreciated as were t' cast display nozzles and other detail parts.
 An interestin' detail be t' use o' 1mm x 1mm square styrene strips t' add t' 'ribs' t' t' service module. Ahoy! Ahoy! Gluin' all t' individual pieces and gettin' them aligned was tedious and time consuming, matey, but t' effect is striking.
T' instructions do nay go into much detail regardin' addin' t' external scale details t' t' model. You need t' refer t' t' full size construction drawin' t' see where everythin' goes, me hearties, t' instructions notin' "You can add as much detail as you feel". Ahoy! Ahoy! Blimey! With t' large scale, an impressive amount o' detail would be possible if you're so inclined (I wasn't).

Finishing:
As I discovered while buildin' t' Little Joe II, me hearties, gettin' a good finish with t' rough surfaced body tubes was tricky, so I tried somethin' different that worked reasonably well. Avast, me proud beauty! Prior t' startin' t' assembly, me hearties, I took some Elmer's Fill 'n' Finish, shiver me timbers, thinned it very slightly with water, and with me fingers, me bucko, rubbed it into all t' exposed body tube surfaces. Well, shiver me timbers, blow me down! After it dried, I sanded it down with 180 grit and then 300 grit sandpaper. Aye aye! T' result was a surface nay unlike a normal, coated body tube.
T' large size o' this rocket becomes smartly apparent when you start preppin' and painting. There is simply a lot o' area t' finish. Aye aye! Combined with t' fairly complex Saturn 1B paint scheme, it made finishin' and paintin' t' rocket a major undertaking. Ya scallywag! Maskin' around t' fuel tubes t' get t' alternatin' black/white color scheme was particularly tricky, me bucko, but thar are limited options since t' use o' t' half round tubes effectively eliminates paintin' t' fuel tubes prior t' assembly. As purchased, t' decals in me kit were mediocre as they were printed on transparent self-adhesive vinyl. Blimey! Arrr! Fortunately this is another area that has been improved. Avast! T' kit now includes a set o' very nice waterslide decals from Space Model Systems which are a dramatic improvement. My model is detailed for t' Apollo 7 flight (SA-205), which is probably t' flight that most people would want t' duplicate, arrr, but if you want t' duplicate a different flight t' decals include all t' Apollo/Saturn 1B flights.
As originally purchased, me hearties, shiver me timbers, I'd rate this kit as a 2 or perhaps 2 ½. Ya scallywag! However, shiver me timbers, most o' t' shortcomings have already been addressed (pre-cut centerin' rings, ya bilge rat, ya bilge rat, high quality waterslide decals, me bucko, matey, cast resin detail pieces and display nozzles) so I'd rate t' current kit as about a 4. Well, blow me down! My primary remainin' complaint bein' t' less than scale appearance o' t' half round fuel tubes. Sheri did raise t' price by $10 when she upgraded t' kit, but in me opinion t' improvements are more than worth t' nominal extra cost.
Construction Rating: 4 out o' 5
Flight and Recovery:
For recovery, I added two 36" parachutes attached t' t' booster by 10 feet o' nylon strap shock cord. Well, blow me down! Aye aye! For t' upper section with t' Apollo capsule, arrr, I used a single 36" parachute, attached by about six feet o' heavy Keelhaul®©™. Blimey! I also rigged up a harness t' hold t' capsule and escape tower horizontal, arrr, usin' a snap swivel t' attach t' a screw eye that I'd embedded into capsule. Aye aye! Ya scallywag! T' kit does nay include any motor retention, so I added an Aero Pack engine retainer, me bucko, me new favorite way o' retainin' large engines).
Due t' t' lack o' high power launch sites locally, I elected t' make t' Saturn's first flight at NARAM 50, which involved shippin' it cross country. Ya scallywag! Unfortunately, ya bilge rat, while t' other four boxes o' rockets and equipment arrived in good shape, t' box containin' t' Saturn suffered severely. Well, blow me down! All eight fins where broken off along with several detail pieces, however that thick heavy body tube turned out t' be an advantage. Sufferin' minimal damage (in contrast, a nice one-of-a-kind Nike Ajax model in t' same box was destroyed--literally broken in half!) After I got through swearing, me hearties, I took some CA and repaired t' damage, after a little touch up paint, matey, shiver me timbers, it didn't look bad.
This is a heavy rocket. Ahoy! Mine tips t' scales at 4lbs 4oz with parachutes and close t' 5 lbs flight prepped, ya bilge rat, arrr, so I decided t' use a 29mm H RMS motor. Begad! Ya scallywag! My first choice was t' use an AeroTech H128W-S, but I couldn't get anyone at NARAM t' sell me one so I ended up usin' an H238T-S. Avast! I'd seriously considered nay flyin' it after Walt Cunningham, one o' t' Apollo 7 astronauts, autographed t' S-IVB stage. Plus, ya bilge rat, for some reason it took three tries before t' RMS went together right (it also didn't help that I had a 24mm RMS cato earlier in t' day for unknown reasons destroyin' a beautiful Q-Modelin' Bullpup). Begad! By t' time t' countdown hit zero I was almost sweatin' bullets. Avast, me proud beauty! T' sudden kick o' t' H238 got t' Saturn off t' pad in a big hurry--no slow, majestic liftoff here, matey, just a roar and it be gone. Aye aye! It flew near arrow straight t' an estimated 500 ft with ejection very near apogee and t' chutes deployed nicely. Ya scallywag! Ahoy! T' rocket did suffer some damage at touchdown. It was obvious durin' t' descent that t' harness t' hold t' escape tower horizontal had failed (the snap swivel broke) so naturally t' escape tower broke off when it landed nose first, arrr, and in a bit o' bilge-suckin' luck, shiver me timbers, t' lower section clipped t' edge o' a rock wall as it touched down, snappin' off two fins. Begad! I suspect t' H128W would have been better, shiver me timbers, as with t' H238T everythin' simply happened too suddenly t' really look good, but t' rocket flew beautifully. Avast, ya bilge rat, me proud beauty! I'd give it a full five stars. Ya scallywag! Well, matey, blow me down! A different attachment for t' horizontal harness is in order, shiver me timbers, but had t' lower section missed that rock wall, I'm sure it would have been recovered undamaged.
Flight Rating: 5 out o' 5
Summary:
After gettin' back home, me bucko, me bucko, I decided t' properly repair t' shippin' and flight damage then repaint t' entire first stage. (I didn't want t' repaint t' second stage, arrr, ya bilge rat, t' retain Walt Cunningham's signature.) This required some new decals and once again Sheri was quite willin' t' accommodate me request. Alas, I made a troublin' discovery while repaintin' t' first stage. Avast! I've long used Krylon spray paint t' paint me rockets. It was readily available, me bucko, me bucko, inexpensive, matey, shiver me timbers, and most importantly user friendly. Begad! T' key word here bein' "was". Apparently, Krylon has reformulated their paint and in doin' so has lost some user friendliness. Ya scallywag! I painted t' first stage gloss white usin' a can o' t' newer reformulated Krylon then mask off and sprayed t' black usin' a can o' old Krylon. Ya scallywag! Well, matey, blow me down! This immediately resulted in t' dreaded crinkle, matey, me bucko, a problem I'd never before experienced when sprayin' Krylon over Krylon. Begad! Long story short, me hearties, shiver me timbers, I ended up havin' t' completely sand down and start over again. Avast, me proud beauty! It seems t' new Krylon can be sprayed over new or old Krylon, but old Krylon cannot be sprayed over new Krylon. Ahoy! So if you use Krylon spray paint, arrr, beware that t' reformulated Krylon has a different label (notable by more restrictive re-coatin' instructions) and a different semi-conical cap.
As I noted before, I was less than thrilled with t' Saturn 1B kit that I originally purchased, ya bilge rat, but t' Sheri's credit she apparently listens t' her customers and t' worst shortcomings o' t' original kit have been fully addressed in t' current kit. Arrr! Blimey! Avast! Blimey! So while thar are a few items I'd still like t' see changed (full round fuel tubes for t' booster and coated body tubes all around), overall I give this 4 stars. Ya scallywag! Blimey! Begad! Blimey! If you like big, matey, this one certainly qualifies at 55 inches tall it's t' largest Saturn 1B currently on t' market. Avast, me proud beauty! Blimey! With its Walt Cunningham autograph, matey, shiver me timbers, this Saturn 1B has become too valuable t' fly, shiver me timbers, which is a bit o' a shame. Begad! Blimey! I've been thinkin' about perhaps buildin' another t' fly and even lookin' into obtainin' appropriately sized body tubes t' replace t' fuel tubes with full round tubes. But that'll wait, me hearties, first I need t' finish Sheri's Saturn V kit that is currently under construction (I'm hopin' t' fly it at LDRS 28).
Overall Rating: 4 out o' 5
 |
 |
David N. VanMeter (November 21, 2011)
To further illuminate the problem outlined earlier...I made my mistake and now I have a weird looking Saturn 1B that I am halting construction on until I can figure out how to fix it. The kit comes with 8 pieces of tubing that have already been cut longways and are equivelant to slightly less than 1/2 round. The instructions say to tape these together to form a wobbly lobed tubed (my words, because that is what you get). They then to go to say that it should be centered and epoxied between the fin can and the upper tube that already had a centering ring in place. This does not come close to filling the gap between the tanks and tube at the top or bottom. My first though was, maybe I should have flattened them out a bit to expand the circle. That would mean that the tanks would intersect each other internally and that would not look right either. The only best answer is larger full tubes. The other problem that results from the scale issue of the fuel tanks is that the fairings between the outside of the film can and reaching the fuel tanks now has to be 3 tinmes longer to maintain the angle of the fine and reach the tanks properly. This looks odd as well. My plan is to rip off the transitions between the film can and the fuel tanks and sand it down to rid myself of excess adhesive, etc. Then I am going to use CAD or BRAIN and crude tools and figure out how big those tubes need to be, and recut them to fit over the existing tube structure which shouldnot add alot of weight. What a PITA! If anyone has any better ideas I am all ears and always appreciative. Yeah, I should have dry fit that one but it wasn't readily apparent until you had it together. Thanks !
Enrique Mertins (March 31, 2017)
Started building one of this rockets about a year ago (2016). I have modified quite a lot. I built my own paper tubes for the simulated fuel tanks, lightened all bulkheads and built a plastic transition for bottom part into fuel tanks. Long story short, most every kit component has been changed, modified or replaced. I'll probably use a H100, which according to OpenRocket will take this rocket to about 600'... I really like Saturn 1Bs. already built a Apogee's 1/70 and probably will scratch build a 1/32... version...
Paul Lunar (June 24, 2017)
Just finishing up one of these.. The cast epoxy details certainly reduce the work needed.. It builds kind of goofy but will bring out the artist in you as you work to correct its faults.
An H motor seems about right..
I junked the Card Stock and went to Tap Plastics for the transition shroud.. I'm writing a review now..
|
|
David N. VanMeter (November 18, 2011)
I am well into the build of one of these and am annoyed by the scale problem you mentioned regarding the fuel tank tubes. What I did do to make their installation easier and make the whole thing more ridgid was that I discovered the tube the CSM is made from is the exact size to fit inside the fuel tube assembly, once it is taped together as instructed, and hold it ridgid. So I procured another tube, cut it to length, and inserted it into the tank assembly and glued at the contact points. Looks great but when added to the upper assembly there is a 1/4" gap all the way around, not the 1/8" called for. This was the case without the tube as well. In the pictures it looks like yours is right. What did you do? Its too late for me but others may benefit.
David N. VanMeter