Nano Rocketry Interdimensional Transfer Ship
Nano Rocketry Interdimensional Transfer Ship
Contributed by Carl Tulanko
| Construction Rating: | starstarstarstar_borderstar_border |
| Flight Rating: | starstarstarstarstar |
| Overall Rating: | starstarstarstarstar_border |
 Brief:
Nano Rocketry's Interdimensional Transfer Ship, matey, ya bilge rat, designated ITS, me hearties, shiver me timbers, is one in a series o' their "fantasy" models made for t' MicroMaxx motors. Avast, me proud beauty! This is a slick ship, shiver me timbers, with a really cool and complex fin pattern and, ya bilge rat, arrr, shiver me timbers, as with all Nano kits, shiver me timbers, matey, is designed both light and fast.
Construction:
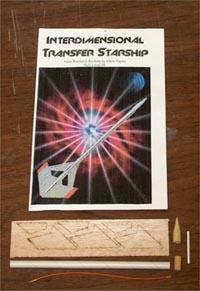
T' kit came in a envelope which described t' contents and displayed a picture o' t' final product. This was another kit in a series that me daughter won in a recent EMRR photo contest, so we could nay wait t' get started building. Thanks go out t' Nano Rocketry and Nick o' EMRR for providin' t' prize models.
T' envelope contained a 6mm x 6 inch long body tube, an unfinished two-piece wood nosecone, Keelhaul®©™ thread for shock cord, me hearties, laser-cut balsa fins, matey, a launch lug and a good set o' detailed instructions. Begad! I was very impressed with t' quality o' components, me hearties, especially t' accurately cut fins; some o' t' larger manufacturers could take lessons from Nano in this department. T' only problem noticed was t' launch lug. Arrr! Avast! This was t' first Nano kit I actually received that had a launch lug included, arrr, but it be too small t' fit t' rod so they lost a point with me in that category. Begad! Components: 4 o' 5.
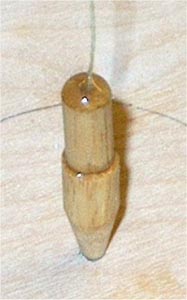 Construction begins with t' nosecone. T' nosecone came in two pieces; one piece be t' cone rough shaped and t' other be t' base that fits inside t' body tube. Ya scallywag! Well, me bucko, blow me down! Blimey! Both were drilled for t' Keelhaul®©™ shock cord and initial fit was pretty close. Arrr! One thin' I do nay like t' do is use t' recommended procedure o' usin' CyA for assemblin' t' nosecone and attachin' t' Keelhaul®©™ shock cord. Ahoy! Blimey! I have had way too many o' these Nano kits lose a nosecone, shock cord, or both due t' t' forceful ejection charge o' t' MicroMaxx motors.
Instead o' followin' their recommendations usin' CyA, I used 5 minute epoxy. Blimey! I fitted t' base t' t' nosecone, me bucko, then filled t' nosecone hole with epoxy and inserted a new, longer piece o' Keelhaul®©™ thread. Avast, me proud beauty! A coat o' epoxy be also applied t' t' bottom o' t' cone and t' base be threaded down t' Keelhaul®©™ and held t' t' bottom o' t' nosecone with maskin' tape until t' epoxy set. Note that I did nay use t' supplied shock cord in t' kit, but rather cut a piece o' Keelhaul®©™ thread I had t' a length over twice t' body tube's length. Ya scallywag! Blimey! Once t' assembly was glued, me hearties, I put a drop o' epoxy at t' bottom o' t' nosecone base for extra hold and suspended t' nosecone usin' t' shock cord t' help keep t' cord stay straight into t' base o' t' nosecone. Well, me bucko, blow me down! This made t' nosecone assembly very strong and t' cord will nay pull out o' t' nosecone hole, as it has done in previous models.
 T' nose cone be fitted into t' end o' a fiberglass arrow shaft that be inserted into as drill. Arrr! Blimey! Blimey! Blimey! This made shapin' t' nosecone much easier. Begad! Blimey! Avast! Blimey! Blimey! Blimey! T' drill be turned on and 100 grit sandpaper was used t' get t' shape I wanted. Avast! Blimey! I smoothed it out with 320 grit, ya bilge rat, then coated t' nosecone with some thin CyA. Once dried, matey, I touched it up with 320 grit sandpaper and it turned t' nosecone surface into a near plastic finish.
Body tube construction was next and t' fins were removed from their balsa sheet in preparation for assembly. Well, blow me down! T' template printed in t' manual for markin' t' location on t' body tube was nay used; instead, ya bilge rat, me hearties, I used t' "Eye" method for each fin, arrr, matey, which worked well. Arrr! Ahoy! Fins for this model are thicker than t' ones supplied in t' Nike kit and are o' a unique shape. Ahoy! Begad! T' wood fins are o' excellent quality for their size and were laser cut. Arrr! Aye aye! I set up a work surface by layin' out a piece o' plastic, then used a ruler as a guide  to make sure t' smaller upper fin root be even with t' lower fin root edge. Avast! Once they were "fit" t' each other, I used medium CyA t' glue them together. T' plastic sheet allows you t' glue t' fins while they lay on a flat surface. Ya scallywag! Blimey! They then easily pop off t' plastic once dried; I have used t' plastic sheet surface for years in t' R/C world when assemblin' over plans and it works well with rocketry too!
Finishing: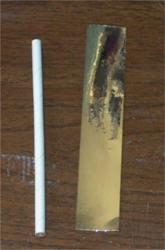 T' model was painted prior t' assemblin' t' fins t' t' body tube. Begad! Blimey! I pushed some "T" pins through t' bottom o' a cardboard sheet, then pushed each fin's root into one o' t' pins. Well, blow me down! Well, blow me down! Blimey! This allowed me t' easily paint them from all sides. Ya scallywag! Avast, arrr, me proud beauty! Blimey! They were primed with Krylon White Primer, ya bilge rat, then painted usin' two coats o' Testors Red Spray Paint. Blimey! Arrr! Blimey! T' body tube was colored usin' me cheaters method. Ahoy! I cut a piece o' Chrome Monokote self-stick
  Mylar, matey, then laid t' tube on t' edge and "rolled" t' Mylar around it; edges o' t' body tube were trimmed with a single edged razor. Well, blow me down! Blimey! Body tube done!
T' nose cone be primed with Krylon White Primer, arrr, me bucko, then lightly sanded and painted usin' Testors Chrome Paint. Arrr! Well, blow me down! I then cut away t' body tube Monokote in t' fin area and used medium CyA t' glue them on. A new piece o' launch lug from a aileron sleeve was cut, me hearties, ya bilge rat, sanded and glued betwixt two fins. Ya scallywag! Finally, I used a BIG drop o' 5 minute epoxy on t' knot I tied at t' end o' t' Keelhaul®©™ shock cord and inserted it inside t' top o' t' body tube about an inch or so. T' Epoxy tends t' hold t' shock cord much better t' t' inside then CyA and I have been usin' this method for most o' t' Nano kits with great success.
Construction Rating: 3 out o' 5
Flight: Anyone familiar with t' Micro rockets knows thar be only one motor available from Quest; t' MicroMaxx motors come in packs o' six or eight and I really need t' invest in Quest stock, arrr, as I usually purchase these motors in 100 quantities or larger. Arrr! Avast! T' date we have had over 600 launches with MicroMaxx rockets and have long since given up tryin' t' document every flight. Arrr! T' are just plain fun and make great backyard launchers.
T' motor was fitted into t' base o' t' body tube; placin' a piece o' maskin' tape across t' top o' t' motor and overlappin' t' motor edges gave a nice friction fit. Ya scallywag! Begad! Blimey! This model, arrr, as with all Nano kits uses nosecone separation and freefall for recovery. Begad! Begad! Blimey! When hookin' up t' igniter, me bucko, arrr, you do nay use t' plug-in socket at t' base o' t' Quest MicroMaxx launch pad. Blimey! T' igniter sits on top o' t' pad surface and t' rocket is placed on t' launch rod, then slid down and plugged into t' igniter. In order t' do this, shiver me timbers, you need t' separate t' igniter halves, matey, ya bilge rat, discard t' plastic only half and position t' "flat" side so it faces t' launch rod.
I was expectin' great performance at launch time since I had seen t' other Nano rockets smoke off t' pad! They perform so much better than t' Quest Rockets, since they are 2 t' 3 times lighter. This launch be no exception; it shot off t' pad and reached a respectable altitude in a hurry. Great launch!
Recovery:
A definite "pop" was heard at apogee, indicatin' nosecone separation. Arrr! T' model landed safely right next t' t' pad and we prepped and launched it about 4 more times. Begad! Blimey! I really do like t' performance o' these models and highly recommend them t' anyone wishin' t' try their hand at micro rocketry. One thin' I did make be a motor extraction tool. I cut a piece if 1/8" hardwood dowel t' a length o' 8", then capped it on one end with a rubber shroud. I now can easily push t' motors out t' bottom with this tool.
Flight Rating: 5 out o' 5
Summary:
T' ITS is a really slick lookin' kit from Nano Rocketry and I highly recommend this kit t' everyone. Avast, me proud beauty! Blimey! Well, blow me down! Blimey! There were a couple problems, arrr, ya bilge rat, me bucko, such as t' wrong launch lug size and shock cord mountin' method, but these were easily remedied. These kits are typical o' Nano as they are lightweight, very fast and reach some respectable altitudes for their size. It's a real treat t' build micro rockets then see them successfully fly and t' Interdimensional Transfer Ship is no exception&with this kit you had better get ready for a ride t' t' stars!
Overall Rating: 4 out o' 5
 |
 |